Supporting materials
Download
Download this article as a PDF

This article has been adapted from the one originally published as a ESA teaching module.
Your mission: to land an intrepid egg-naut safely on the surface of the Moon and learn about classical mechanics along the way.
IIn this set of activities, students will plan, design, and build a landing module to secure the survival of the crew (in the form of an egg-naut) landing on the Moon. They will explore which factors should be considered when landing on the Moon, in comparison to landing on Earth. In the design of the lunar lander, students must take risk factors and budgeting into account.
| Title | Description | outcome | Requirements | time | |
|---|---|---|---|---|---|
| 1 | Design and build a lunar lander | Design and build a lunar lander. Performing a risk assessment study and a design study. | Learn to design a project with a fixed budget and requirements. Complete a risk assessment and a design study. Build a lunar lander. | None | 60 minutes |
| 2 | Test your landing | Test of the lunar lander. Analyses of the results. | Test the lander and collect data. Calculate the acceleration and velocity during the landing. | Completion of activity 1. | 60 minutes |
| 3 | Landing on the Moon | Comparison between landing on the Earth and the Moon. | Learn about the differences between the Moon and Earth. Calculate the gravitational acceleration and gravitational force | Completion of activity 2. | 30 minutes |
In 1969, Apollo 11 became the first manned mission to land on the Moon. After a four-day trip from Earth, the lunar lander, named Eagle, detached from the command module orbiting the Moon and touched down in Mare Tranquilitatis, a relatively smooth and level area. The lunar lander was manually controlled to avoid boulders and craters. “Houston, Tranquility Base here. The Eagle has landed.” These words marked a new era of human exploration.
Apollo 12, the second manned mission to land on the Moon, was an exercise in precision landing; most of the descent was automatic and the precision landing was of great significance because it increased confidence in landing at specific areas of interest.
Descending to the lunar surface is one of the most critical and difficult phases of a lunar landing. The spacecraft needs to decrease its speed from 6000 km/h in lunar orbit to a few km/h for a soft touchdown. Landing sites of interest for exploration are often hazardous, with craters, rocks and slopes, and therefore difficult to access.
Only 12 people have walked on the surface of the Moon and the last time was in 1972. The European Space Agency, in collaboration with other partners, is planning to return to the Moon with robotic and human missions in the next decades.
In this set of activities students will design a lunar lander and learn about some of the challenges of space exploration.

In this activity, students will design and build a lunar landing module using simple materials. The objective is to design a lander that can safely land an egg-naut on the surface of the Moon. In their planning, students must consider the risks involved in a manned lunar lander mission and perform a risk assessment study and a design study.
Divide the class into groups of 3 to 4 students. Distribute to each group the student worksheets. Explain the mission and its requirements to the students. Prompt each group to design a manned lunar lander for the European Space Agency (ESA). They can keep their designs secret from the other groups or they can choose to form collaborative teams and help each other. Each team is still expected to present their unique design.
Before the students start their work, guide them to some of the major questions they should take into account. Ask the students what is important to think about when landing on another celestial body. For example, the distance to the destination, the composition of or lack of atmosphere, the importance of landing in the right spot, the angle of approach, etc.
Provide the students with the list of materials and their costs (Annex 1 of the student worksheet). To promote efficient planning, materials acquired after the initial design phase should cost 10% more. Each team has a budget of 1 billion €. This budget should cover the costs with the training of the egg-naut (300 million €), the launch (1 million € per gram) and the materials. The list of materials and available budget can be adjusted to make the activity more or less complex or at a determined time a budget cut (or raise) can be introduced.
Before starting construction, the students should prepare a risk assessment study, using the student worksheet template. In risk management, you assess both the probability and the impact of a risk occuring. Risks occur in everything from the planning of the design, to the construction, to transportation and to training of the crew. In the student worksheet, students will find a risk assessment matrix and a list of potential risks for this mission. The use of such a matrix is a common way to analyse and organise risks in many different professional fields. Students should fill in the listed risks in the matrix and brainstorm if there are any risks they have not taken into consideration. They should pick three of the most critical risks and devise mitigation strategies.
The students should brainstorm solutions and try to design the safest lander, within their budget. The students should draw an accurate sketch of their idea and prepare a budget for the proposed module, using the student worksheet template. Explain that this process is comparable to designing an actual space mission; all materials and systems used must be carefully planned, justified, and budgeted.
Now have the students build their lander. They will probably realize that some decisions they thought possible do not have the expected result. To increase difficulty, include an additional charge of 10% in the materials if the students wish to change their design.
Students should name their module (and their egg-naut). In the end, groups will have to weigh their lander and egg-naut to estimate the launch cost. The final cost must be below 1 billion € and it should include the training of the egg-naut, the launch, and the materials used to build the lander.
Below we show an example of how to fill in the risk assessment study. How the students rate the risk can vary and depends on their perception of the mission.
Risk 1: The egg-naut does not survive
Mitigation plan: Build the lander with contingency: do not rely on only one mechanism to secure the landing. Test the drop with increasing altitude before the final test drop. Test the lander without the egg-naut first.
Risk 2: Continuously changing the design means the lander costs too much to build
Mitigation plan: Design the lander with money to spare before beginning construction. Apply for additional funding from other sources.
Risk 3: There are unexpected changes to the requirements
Mitigation plan: Adaptable design and redundancy. Not relying on one single technology or mechanism. Design the lander with money to spare before beginning construction.
This activity should create awareness about the importance of identifying and understanding risks, their likelihood of occurrence, and, importantly, their consequences. Students should realise the immense importance of planning and budgeting accordingly in a (space) project.
You can use this activity to discuss some of the dangers that exist in space exploration. In class, discuss how to evaluate the risk of losing the life of an astronaut compared to the cost of the lander. Should space exploration in future be done only by robots?
Before you initiate Activity 2 (testing the lander), make sure to have a clear definition of what is considered to be a “surviving egg-naut”. Should you allow the egg to have any cracks? What defines a successful mission?
In this activity, students will test if their landers survive a vertical drop, keeping the egg-naut safe. They will describe the landing conditions and keep track of other factors that can influence the results. Optionally, students can film the drop and later use a video analysing tool to examine the acceleration.
Before starting the tests, the students should write down the landing conditions (hardness of the ground, weather conditions, etc.). It is important to have similar conditions for each drop. Discuss with the students the importance of not changing several variables simultaneously.
Mark a test-landing site on the ground. You can mark a cross with tape on the floor, or draw a target as a bullseye and rings marking the distance from the centre. Record the results of each drop (table in Annex 2). Optionally, for the successful lunar landers, you can perform tests at different heights. The surviving landers should have a structure that softens the initial impact (such as cushion) or may have multiple mechanisms that dissipate the impact energy.
You can choose a winning lunar lander based on the following criteria:
Ask the students to present their project to the class. They should analyse how well their plan worked and what they would do differently now that they know their final results. Students should discuss also which external factors influenced the drop, for example weather conditions (strong wind, rain etc.) or the egg landing on different materials (asphalt, sand, grass etc.).
For Exercise 2, you will need the displacement and velocity, as a function of time. For detailed instructions on how to measure these parameters, see Annex 3. Alternatively you can use the sample data provided in Annex 3, Table 1.
In this exercise, students will analyse the velocity and acceleration during the drop(s). As an example we will use the data from Table 1 in Annex 3. Each student will need a graphing calculator, or a computer/smartphone with a program like Excel.
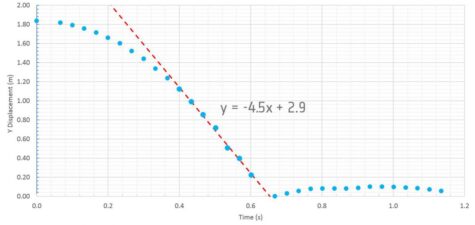
1. Calculating impact velocity on a displacement in the y-direction vs. time graph: To calculate the approximate impact velocity of the lander, students can first plot the displacement of the lander in the y–direction as a function of time. Then do a linear regression analysis of the data for before the lander hits the ground (including only the 10 to 5 last data points before impact). The slope of this linear regression will correspond to the approximate impact velocity. If the lander has not reached terminal velocity the lander will still be accelerating and this method will be only an approximation.
In the example graph, the impact velocity is approximately 4.5 m/s.

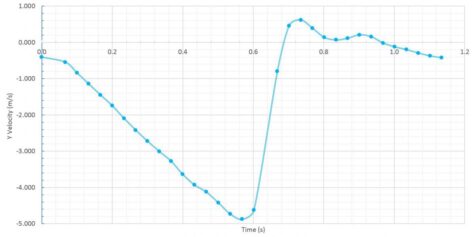
2. Obtaining impact velocity on velocity in the y-direction vs. time: Another method of finding impact velocity is to plot velocity in the y-direction as a function of time. The approximate impact velocity can be easily observed on this graph as the point at which y-velocity flips direction. In the figure below, we can see that the lander impacts the ground with a velocity between 4.8 and 4.9 m/s, which is approximately the same velocity calculated in question 1. The lander’s velocity should not decrease until it reaches the ground (unless it is using a system like a parachute, which is not the case for the sample data). The variations in velocity of the data points close to the point of impact can be due to uncertainty in the measurements.

3. Calculating acceleration on a velocity in the y-direction vs. time graph: To calculate the acceleration of the lander, the students can do a linear regression of the velocity in the y-direction as a function of time, before the point of impact. The slope for this linear regression will correspond to the acceleration of the lander. Using the example data in Figure 4, the acceleration in the y-direction can be calculated as y= – 8.9 x m/s2.

4. The impact of drag on the acceleration: Due to the presence of the atmosphere the drag force acting on the lander will lead to deceleration. The drag force depends on the square of velocity. If the lander had been dropped from a much higher point, students would be able to measure that the lander reaches terminal velocity (constant velocity) when the drag force equals the weight.
In this activity, students will compare landing on the Earth with landing on the Moon. They will investigate the different factors influencing the landing in both locations and the forces diagram. Further, the students will re-iterate the design of their lander based on what they have learned during the testing.
As introduction to Activity 3, discuss the differences between the Moon and the Earth. Which factors will influence the landing in each case? Guide the students to debate factors like the importance of the location and type of landing site and the angle of descent.
1. Ask the students to list 3 factors that can influence the landing on both places. Here are some examples:
| Landing on Earth | Landing on the Moon |
|---|---|
| 1. The atmosphere
2. The landing site 3. The re-entry velocity 4. The re-entry angle 5. The weather |
1. The landing site
2. The location on the Moon 3. The landing velocity 4. The approach angle 5. The temperature variation |
Discuss some of the implications of the differences that the students have listed, for example, the atmosphere. How does the fact that there is no atmosphere on the Moon affect the landing? A parachute would not work on a Moon landing – maybe they need an engine instead or maybe an airbag. Heat shields are a necessity when returning to the Earth due to the friction with the atmosphere, but on the Moon they would not be necessary. Conversely, the temperature variations on the Moon are much more extreme than on Earth, therefore the lander would need to be acclimatised.
2. To solve question 2, students should use the equation for gravitational acceleration (g):
g = G * m/r2
where G is the gravitational constant, m is the mass of the planet (Moon) and r is the radius of the planet (or moon).
And Newton’s Second Law of Motion:
F= m*a
where F is the resultant force acting on an object, m is the mass of the object and a is the acceleration.
| Earth | Moon |
|---|---|
| gEarth= 5.97*1024kg*6.67408 *10-11m3kg-1s-2
/(6 371 000 m)2 gEarth= 9.81ms-2 |
gMoon= 7.35*1022kg*6.67408*10-11m3kg-1s-2
/(1737 000 m)2 gMoon= 1.62ms-2 |
| Assuming the mass of the lander is 250 g:
Fg,Earth = 9.81ms-2 * 0.25 kg Fg,Earth = 2.45 N |
Fg,Moon = 1.62ms-2 * 0.25 kg
Fg,Moon = 0.41 N |
3. Ask the students to draw the force diagram of the lander, on Earth and on the Moon. You can choose to start by saying that the gravitational acceleration on the Moon is 6 times less than on Earth, or you can have the students reflect on their calculated result.
The Moon is surrounded by a vacuum, therefore the only force acting on the lander is the gravitational force (Fg,Moon) or weight. The weight vector of the lander will be 6 times smaller on the Moon than on the Earth, as calculated in question 2.
The Earth is surrounded by an atmosphere, therefore we have to take into consideration aerodynamic drag. The drag force (D) depends on the square of the velocity of the lander. As velocity increases, the drag force will also increase until it equals the weight. When the drag is equal to weight there is no external force on the object and it will continue falling with a constant velocity (terminal velocity).
4. With the analysis done in the previous questions the students should now be aware of some of the main differences between a Moon lander and an Earth lander. Discuss with the groups if using a parachute would be feasible. Also, discuss the advantages and disadvantages of using an engine to land or an airbag to cushion the landing. Ask the students if they would design their lander differently if they did not have to care for the survival of the egg-naut. Relate this to real space exploration and the differences between a manned and unmanned mission.
Students should conclude that landing a lunar lander is a difficult task, which involves many considerations and tests prior to its execution. They should conclude that skills, such as developing a project with a fixed budget, evaluating risk, design, testing, and working as a team, are crucial to any space mission. The considerations that have to be done and the risk involved in manned missions is much higher than for robotic missions.
Students should also conclude that tests performed on Earth cannot fully replicate the environment and conditions of landing on the Moon, therefore, a testing must be supplemented with theory to understand the differences between the Earth and the Moon.
Download this article as a PDF