Supporting materials
Download
Download this article as a PDF


Discover how hands-on experiments can introduce students to light and particles through the lens of space exploration.
A set of activities that introduce students to different types of electromagnetic radiation and ionising particles is presented in the context of space exploration. The activities are part of a new workshop offered at CERN Science Gateway[1] and are designed for students aged 13–18. They are modular and can be adapted to different curricula and classroom settings.
Cosmic SOS places participants in the role of a space crew who receive a mysterious signal from deep space. To decode the message, students conduct activities exploring electromagnetic radiation and ionising particles. In doing so, they discover how CERN technologies can be used both in terrestrial experiments and in space.[2]
Radiation is a topic that is of great interest to students,[3] yet it is usually introduced in schools in an abstract way.[4,5,6] Teaching radiation in the framework of space travel offers an exciting and relatable context for students,[7] naturally linking to cosmic rays and to the real use of detector technologies beyond Earth.
The workshop utilises equipment varying from every day and easily obtainable materials to setups requiring some teacher tinkering and specialised detectors. Here, we will present each activity independently, so that teachers can select the ones that best suit their teaching needs and material available to them or simply get some inspiration for their teaching practice. These activities can be used for students aged 13–18, allowing teachers to adjust the depth of their explanation accordingly.
In many of these activities, the Predict-Observe-Explain method is encouraged.[8] Research has shown that students tend to be more engaged in an activity and demonstrate increased understanding when asked to make predictions about an experiment’s outcome before observing it.[9]
The activities are designed for groups of four students. The accompanying worksheet, one per group, can be printed out or displayed on a tablet. The worksheet, printable materials and further equipment can be found in the supporting materials.
Each activity takes around 10 minutes.
To ensure active participation and mirror real scientific teamwork, as well as to increase engagement through ownership, we encourage to assign the following roles within each group:
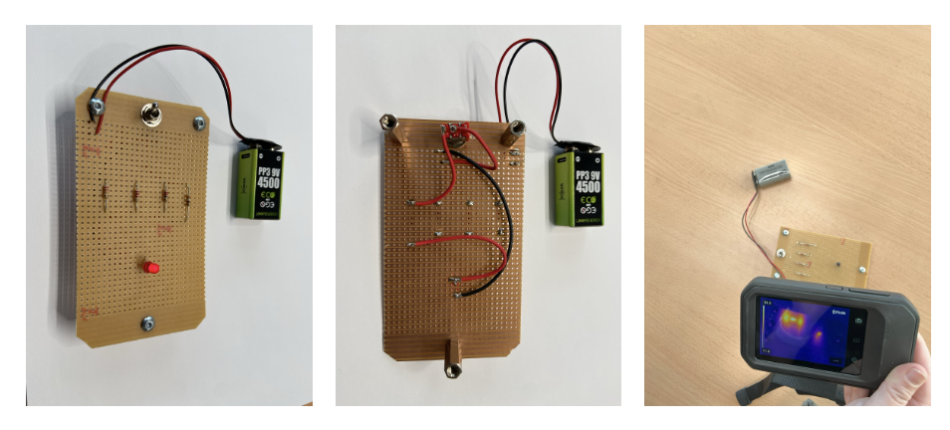
Students inspect a circuit board to identify the faulty resistor(s) by using different tools.
While using the UV torch, students should wear protective goggles and always point the torch downwards.
Resistors and batteries might get warm. The battery should be disconnected directly after the observation.
Students find that the faulty resistor can be most clearly identified using an infrared camera as, when current flows, functioning resistors heat up. This observation provides a concrete link between infrared radiation and heat and helps students understand that not all radiation is visible to the human eye.
Students decompose white light using a diffraction grating and investigate fluorescence using light and highlighters of different colours.
While using the UV torch, students should wear protective goggles and should always point the torch downwards.
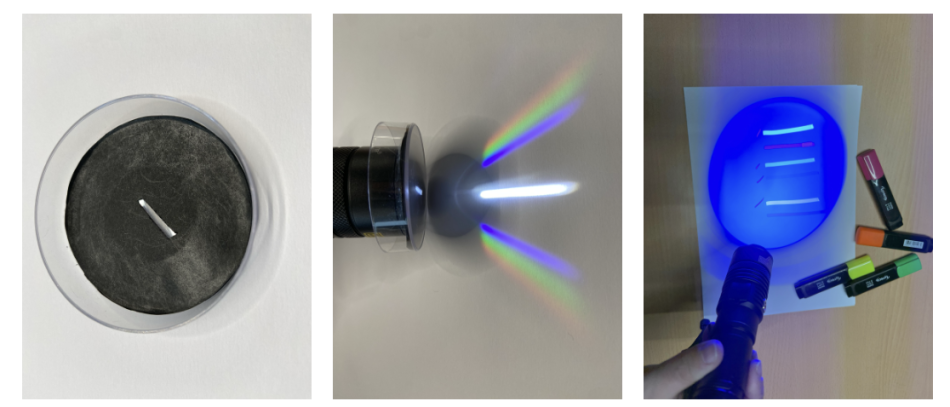
When light passes through the diffraction grating, it is decomposed into a spectrum of colours, like a rainbow. Highlighter ink fluoresces most strongly under blue or ultraviolet light, illustrating that blue light carries more energy than red light.
Students arrange the electromagnetic spectrum cards from lowest to highest energy and match real-world applications to each spectral region.
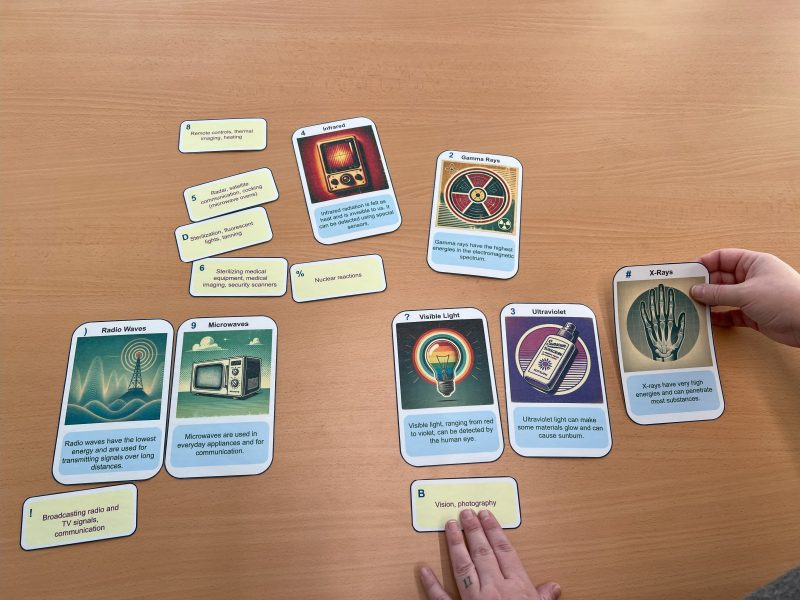
This activity provides a visual and engaging way for students to classify different regions of the electromagnetic spectrum and link them to applications they are already familiar with from everyday life.
Students measure radiation emitted from different everyday objects using a Geiger counter and compare the results with their predictions.
The Geiger counter requires careful handling.
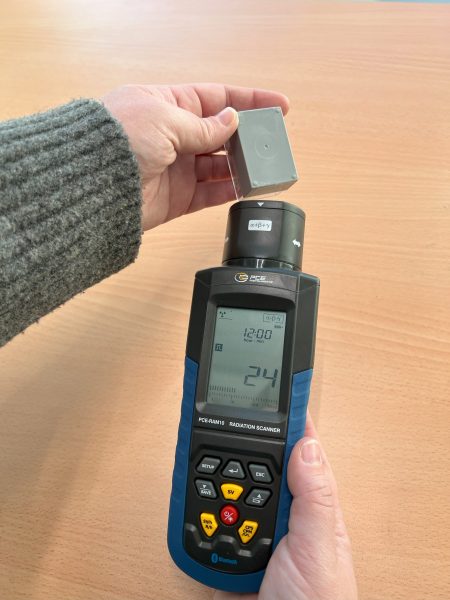
Students usually observe measurable differences between the tested objects. They also detect a non-zero count rate even when no object is present. These observations open a discussion about background radiation and natural radioactivity.
Students assemble a model MiniPIX EDU detector,[10] a miniature pixel detector whose technology was originally developed at CERN, using LEGO bricks.
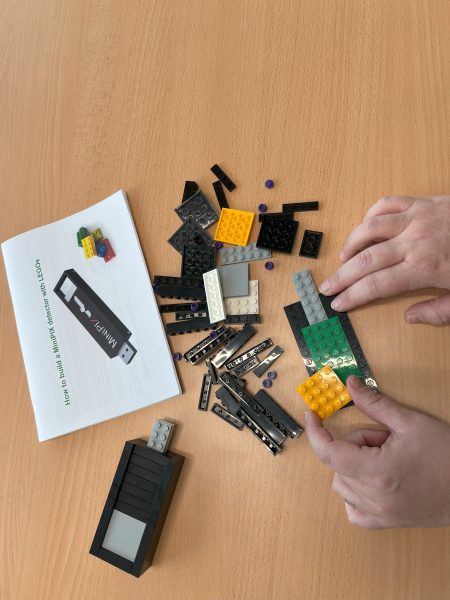
This exercise provides a hands-on way for students to understand that the model pixel detector is composed of multiple layers, each playing a role in the signal creation and readout.
Students use a real MiniPIX EDU detector connected to a laptop to observe particle tracks from background radiation and, optionally, from selected objects.
The MiniPIX EDU detector is quite fragile. Students should open the protective cover just before taking a measurement and then close it again. Nothing should touch the detector surface.
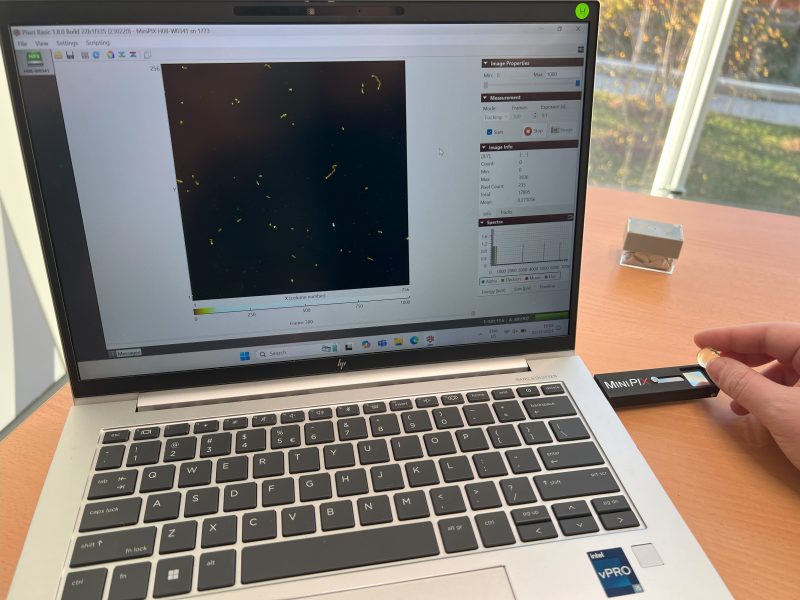
By comparing shapes and sizes of the tracks, students can distinguish between different types of particles, which reinforces the idea that different particles interact with matter in different ways.
Students examine MiniPIX measurements taken at three different locations: a CERN office, an aeroplane and a satellite. They then match each measurement to its corresponding location.
Cosmic radiation levels increase with altitude because there is less shielding provided by the Earth’s atmosphere. In outer space, where there is no protection from the Earth’s magnetic field, radiation levels are even higher.
We hope that these activities offer inspiration for teachers’ practice, whether they are looking to implement cost-free ideas, take on a hands-on tinkering project, or have the possibility to purchase more specialised equipment. The activities also highlight how knowledge and technologies originally developed at CERN are applied in aerospace science, linking this work to real scientific contexts. Silicon detectors based on the same technology as the MiniPIX EDU device are, for example, deployed on the International Space Station (ISS) and on NASA’s Orion spacecraft. In addition, CERN operates radiation experiments such as the Alpha Magnetic Spectrometer (AMS) on the ISS are with a continuous 24/7 connection. Lastly, many materials intended for use either in space or in underground experiments at CERN are tested in its facilities to ensure they can withstand extremely harsh conditions, including temperature, pressure and radiation.
We recognise that access to advanced detector technologies such as MiniPIX EDU can be challenging for most schools. TIMEPIX@school is a new CERN-led educational initiative designed to lower this barrier by bringing Timepix-based detectors, which were originally developed at CERN and are currently used in medical and space applications, into classrooms around the world.[11]
We would like to thank Pinelopi Christodoulou for her guidance and support regarding the use and capabilities of the MiniPIX EDU detector. We are also grateful to Francesca Giovacchini and Sonia Natale for their valuable insights into CERN’s involvement in aerospace research, particularly through the AMS experiment.
[1] CERN Science Gateway lab workshops: https://visit.cern/lab
[2] CERN Aerospace Applications: https://kt.cern/aerospace
[3] Häussler P et al. (1998) A typology of students’ interest in physics and the distribution of gender and age within each type. International Journal of Science Education 20: 223–238. doi: 10.1080/0950069980200207
[4] Libarkin JC et al. (2011) Invisible misconceptions: Student understanding of ultraviolet and infrared radiation. Astronomy Education Review 10. doi: 10.3847/AER2011022
[5] Morales López AI, Tuzón Marco P (2022) Misconceptions, knowledge, and attitudes towards the phenomenon of radioactivity. Science & Education 31: 405–426. doi: 10.1007/s11191-021-00251-w
[6] Neumann S (2014) Three misconceptions about radiation – and what we teachers can do to confront them. The Physics Teacher 52: 357-359. doi: 10.1119/1.4893090
[7] Holstermann N, Bögeholz S (2007) Interesse von Jungen und Mädchen an naturwissenschaftlichen Themen am Ende der Sekundarstufe I. Zeitschrift für Didaktik der Naturwis-
senschaften 13: 71–86. doi: 10.25656/01:31607
[8] White R, Gunstone R (2014) Probing understanding 1st edition. Routledge. ISBN: 978-1134732340
[9] Crouch C et al. (2004) Classroom demonstrations: Learning tools or entertainment? American journal of physics 72: 835-838. doi: 10.1119/1.1707018
[10] MiniPIX EDU: https://advacam.com/camera/minipix-edu/
[11] TIMEPIX@school website: https://timepix-at-school.web.cern.ch/

Pupils are interested in broadening their knowledge – and not only their knowledge, but also knowledge of their class. They would like to be useful to others and work as part of a functioning crew. They would like to know how their brains work and how interactions among them work. Of course, it is not possible to make the brain processes visible in school. This set of activities, focused on making the invisible visible, has the potential to raise students’ self-confidence and engagement, and to foster a sense of being part of a crew.
Peter Demkanin, Comenius University Bratislava, Slovakia
Download this article as a PDF
Particle physics is often seen as something only for huge research institutes, out of reach of the general public. Francisco Barradas-Solas and…


Identify tracks of subatomic particles from their ‘signatures’ in bubble chamber photos – a key 20th century technology for studying particle…

Claudia Mignone and Rebecca Barnes take us on a tour through the electromagnetic spectrum and introduce us to the European Space Agency’s fleet of…


