Track inspection: how to spot subatomic particles Teach article
Author(s): Julia Woithe, Rebecca Schmidt, Floria Naumann
Identify tracks of subatomic particles from their ‘signatures’ in bubble chamber photos – a key 20th century technology for studying particle physics.
What is the Universe made of? What holds it together? How will it evolve? Particle physicists are fascinated by these big eternal questions. By studying elementary particles and their fundamental interactions, they try to identify the puzzle pieces of the Universe and find out how to put them together. Our current understanding is summarised in the Standard Model of particle physics, one of the most successful theories in physicsw1.
But how do we know anything about these particles, all of which are much smaller than the atom? From the 1920s to the 1950s, the primary technique used by particle physicists to observe and identify elementary particles was the cloud chamber (Woithe, 2016). By revealing the tracks of electrically charged subatomic particles through a supercooled gas, with cameras used to capture the events, researchers could work out the particles’ mass, electric charge and other characteristics, along with how they interacted. However, in 1952 the bubble chamber was invented, and this soon replaced the cloud chamber as the dominant particle detection technology. Bubble chambers could be made physically larger, and they were filled with a much denser material (liquid rather than gas), which made them better for studying high-energy particles.
Today, both cloud chambers and bubble chambers have largely been replaced by other types of detector that produce digital signals and work at a much faster rate. So while photos from bubble chambers are no longer the technology of choice for professional physicists, they can still enrich the discussion of particle physics in the classroom.
How does a bubble chamber work?
The key component of a bubble chamber is a superheated liquid. When electrically charged particles pass through a bubble chamber, they ionise the molecules in the chamber medium. The ions trigger a phase transition and the superheated liquid vaporises, creating visible tracks as bubbles form along the particle’s path. Once the newly formed bubbles have grown large enough, cameras mounted around the chamber capture the event.
Importantly, a uniform magnetic field runs through the chamber, which produces a force on moving electrically charged particles, making them move in curved paths – and creating ‘signature’ shapes for different particles. Measuring the radius of curvature allows a particle’s momentum to be calculated, providing further clues to its characteristics.
Analysing bubble chamber tracks in the classroom
We have developed several activities for advanced high-school students, in which they study bubble chamber photographs and try to work out for themselves what they show. You can find our original worksheet describing these activities (including solutions and additional information for teachers) on the CERN websitew2.
The photographs were produced by the 2 m-long bubble chamber at CERN in 1972. This chamber was filled with 1150 litres of liquid hydrogen cooled to 26 K (–247°C). In its 12 years of operation, 20 000 km of photographic film were produced to capture the particle collisions.
In this article, we present three simple but intriguing activities for students aged 16–19 as an introduction to particle track analysis, using the bubble chamber images. Before starting the activities, students should be familiar with the basics of particle physics (especially the properties of protons, electrons, positrons, photons and, if possible, neutrinos).
The first two activities focus on the identification of some typical particle tracks based on the behaviour of electrically charged particles in magnetic fields. Activity 3 builds on these activities to look at particle transformations. Depending on students’ prior knowledge, it will take approximately 1 hour to carry out all the activities.
Note: when working with bubble chamber pictures, high-resolution images are crucial to allow the identification of individual tracks. You can download full-sized versions of the images in the additional materials section of this article.
Activity 1: Electrically charged particles in magnetic fields
In this activity, students identify the electric charge of particles based on the direction of curvature of their tracks in a magnetic field. They also compare the speed of electrons, based on the radius of curvature of their tracks.
As a preliminary to this activity, students will need to understand the following facts relating to particle physics:
When electrically charged particles move through a magnetic field, they experience a force.
This force is always perpendicular to the direction of movement of a particle and the direction of the magnetic field. The left-hand (or right-hand) rule tells you in which direction this force points.
Due to this force, electrically charged particles at constant speed follow circular paths when moving through constant magnetic fields (because the experienced force acts as a centripetal force).
When several electrically charged particles with the same mass experience a force while moving through a magnetic field, the radius of curvature of their tracks depends on the particles’ speed. Tracks of slower particles are more curved than tracks of faster particles with the same mass.
Figure 1: The left-hand and right-hand rules. v: direction of particle’s movement; B: magnetic field (north to south); F: force on the particle
Nicola Graf
Materials
For this activity, the only materials needed are the images and information in figures 1, 2 and 3. Each student or group of students will need colour printouts of the two bubble chamber photos (figure 2 and figure 3), which can also be downloaded from the additional materials section. In all the bubble chamber images, the particles enter the chamber from the left, and the magnetic field points out of the page.
Ask the students to work through the tasks below, using the materials provided.
Make sure you are familiar with the left-hand and right-hand rule, which link the following:
Direction of movement of an electrically charged particle
Direction of the magnetic field (north to south)
Direction of the force on the electrically charged particle
These rules are shown in figure 1.
Look at the first bubble chamber photo (figure 2) and try to answer the following questions:
Which of the two coloured tracks belongs to a positively charged particle?
Which of the two coloured tracks belongs to a negatively charged particle?
Why do the particles leave spiral tracks?
Remember, the particles enter the chamber from the left, and the magnetic field points out of the page (on a printout).
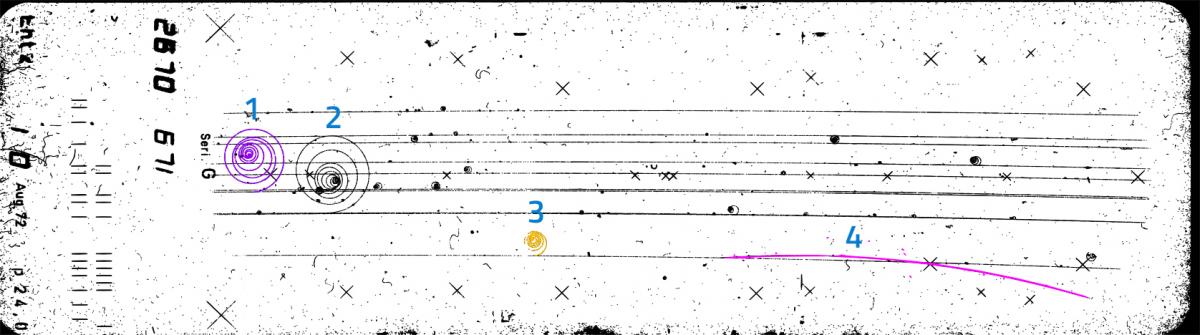
Then look at the second bubble chamber photo (figure 3). Again, using the right-hand and left-hand rules, try to answer the following:
Which of the coloured tracks in the picture (1, 2, 3 or 4) belong to negatively charged particles?
Assume that all tracks belonging to negatively charged particles in the photo are caused by electrons. Place the four tracks in order according to the speed of the electrons, from high speed to low speed.
Explain your results.
Discussion
The answers are as follows:
Photo 1 task
Because the blue track curves downwards in the photo in photo 1, there must have been a force pointing downwards. Now we try both the left-hand and right-hand rules with the following information taken from the photo:
Direction of movement of an electrically charged particle (thumb): to the right (as the particles enter from the left)
Direction of the magnetic field (index finger): out of the page
Direction of the force on the electrically charged particle (middle finger): downwards
This configuration of fingers works only with the right hand, thus the blue track was caused by a positively charged particle.
The red track curves upwards in the photo in photo 1, so there must have been a force pointing upwards, which leads to the following configuration of fingers:
Direction of movement of an electrically charged particle (thumb): to the right
Direction of the magnetic field (index finger): out of the page
Direction of the force on the electrically charged particle (middle finger): upwards
This configuration works only with the left hand, thus the red track was caused by a negatively charged particle.
Why do particles leave spiral tracks in a bubble chamber? On their way through the liquid, electrically charged particles constantly lose kinetic energy – for example, because they ionise the hydrogen molecules on their way. A lower kinetic energy then leads to a progressively smaller track radius in a magnetic field.
Photo 2 task
In photo 2, the same procedure identifies tracks 1, 2 and 3 as belonging to negatively charged particles, whereas track 4 was caused by a positively charged particle.
For the speeds, track 2 belongs to the electron (with the highest speed), followed by track 1, then track 3 (with the lowest speed). This is because the lower the speed of the particle, the smaller the radius of curvature of its track. This relationship can be derived for particles as follows:
The force on the electrically charged particle (charge q) moving with speed v perpendicularly to a magnetic field B is described as:
FL = q x v x B
This force acts as centripetal force, Fc , and leads to a circular particle track with radius r. The centripetal force needed to keep an object on a circular path with radius r depends on the mass m of the object, and the square of its speed v, thus:
Fc = m x v2/r
So FL = Fc
Therefore: q x v x B = m x v2/r
So r = (m x v)/(q x B)
Thus the radius of curvature is directly proportional to the speed of the particle.
Note that we are assuming here that the particles are non-relativistic, i.e. they are moving much more slowly than the speed of light. However, tracks in bubble chamber photos are typically made by relativistic particles moving at speeds close to that of light. In this case, there is a relativistic factor that changes this relationship.
Activity 2: Particle signatures and identification
In the next activity, students use their understanding of track characteristics to identify specific particle ‘signatures’ (track types) in bubble chamber photos.
Three different types of track are shown in table 1, together with the particle identities, signature descriptions, and explanations in terms of the processes that produced the tracks. This information enables students to identify particles in the bubble chamber images that follow.
Materials
For this activity, the only materials needed are the images and information in table 1 and figure 4. In all these images, the particles enter the chamber from the left, and the magnetic field points out of the page.
Table 1: Particle signatures and production processes
Electron
Electron-positron pair
Proton
Signature track
Description
Upward-curving track, starting at another visible particle track
Downward-curving track (positron) starting ‘out of nowhere’, together with an upward-curving track (electron)
Downward-curving track, starting at the visible track of another particle
Production process
An electrically charged particle enters the chamber and interacts with an electron in the liquid.
A photon transforms into an electron-positron pair. (The photon does not leave a track.)
An electrically charged particle enters the chamber and interacts with a proton in the liquid.
Figure 4: Bubble chamber photo for activity 2
CERN, CC BY 4.0
Procedure
Ask the students to tackle the following tasks using the materials provided.
Look at the particle signatures shown in table 1.
Use this information to identify the tracks highlighted in the bubble chamber image (figure 4).
Complete table 2, giving reasons for your choices.
Table 2: Identifying particles in figure 4 from their signature tracks
Electron?
Positron?
Proton?
Explanation
Green track
Upper blue track
Lower blue track
Purple track
Discussion
The correctly completed table is shown in table 3.
Table 3: Identifying particles from their signature tracks: answers
Electron?
Positron?
Proton?
Explanation
Green track
✓
Track curves upwards.
Upper blue track
✓
Track curves upwards.
Lower blue track
✓
Track curves downwards and appears together with an electron track.
Purple track
✓
Track curves downwards and starts at another track.
Activity 3: Particle transformations
Interpreting particle transformations is what made bubble chambers famous: many of the particles produced in a bubble chamber are not stable, but transform in time to other particles. However, working out transformation events is usually more difficult for students than simply identifying specific track types, because it requires additional knowledge about the fundamental interactions described by the Standard Model of particle physics. We suggest using a simple example (figure 5) and providing step-by-step instructions to work through.
Materials
Again, the only materials needed are the image in figure 5 and the information provided previously. As usual, the particles enter the chamber from the left, and the magnetic field points out of the page.
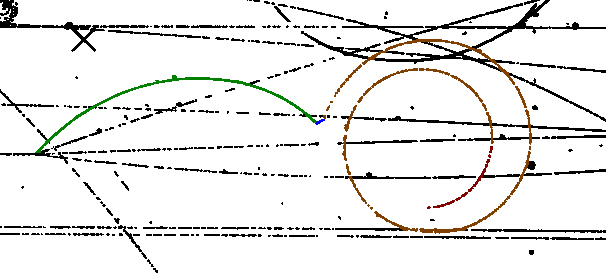
Figure 5: Particle transformations
CERN, CC BY 4.0
Procedure
Ask the students to answer the following questions, using the materials provided.
The green track belongs to a type of particle called a pion. There are three types of pions:
π+ (positive electric charge)
π− (negative electric charge)
π0 (no electric charge)
Which type of pion caused the green track? Explain your answer.
At the end of the green track, the pion transforms into two new particles: a positively charged anti-muon and a muon-neutrino. Why do we only see one track (the blue track) originating from the end of the green track?
The anti-muon transforms into a particle that you might be able to recognise. Which particle do you think caused the brown track? (Hint: the new particle has a lower mass than the anti-muon, which has a mass of around 200 times that of an electron.) Explain your answer.
Discussion
The answers are as follows:
The green track curves downwards, so it was caused by a positively charged particle. Therefore, we can identify it as π+.
Neutrinos have no electric charge, which means they cannot ionise the molecules in the chamber, so they do not leave visible tracks.
The brown track was caused by a positron. It is easy to recognise the positive electric charge because of its downward-curved track. This could therefore be a proton track – except we are told the particle has a lower mass than the anti-muon (because unstable particles typically transform into lighter particles), which itself has a mass of around 200 times that of an electron. This is nowhere near enough to match the mass of a proton, so the track must belong to the only other positively charged particle we have met: a positron. In this situation, the positron track occurs without an accompanying electron track, because the production process is different.
More information about this transformation and the Feynman diagrams that can help to understand this process can be found in the CERN student worksheetw2.
Bubble chambers: into the future
As these activities show, bubbles chamber images are a great way to make particle physics accessible to high-school students. Using these images, students can discover the identity of particles by working out their characteristics for themselves.
Meanwhile, the ongoing endeavour to understand the missing puzzle pieces of our Universe continues. And as well as helping to train the particle physicists of tomorrow, bubble chambers have recently found a new role in current research: the detection of dark matter particles – for example, in the PICO project in Canadaw3. Here, the bubble chamber’s relatively slow rate of response (compared to new digital technologies) is not a problem, because – unlike the cascades of particles produced each second at CERN – no signals from dark matter have yet been detected.
Finally, for a completely different approach to particle physics, the unique spirally patterns found in bubble chamber pictures can inspire a range of artistic ideas – from Christmas decorations made using the technique of paper quilling to fabric design. What other fun ideas can your more creative students come up with?
Resources about bubble chambers can be found on the CERN HST Bubble Chambers website, including an introduction to bubble chamber pictures, many images, and practical exercises developed together with teachers at CERN.
For more educational and accessible online bubble chamber exercises, visit Peter Watkins’s website.
Find out how to build a classroom cloud chamber. See:
Julia Woithe is a high-school teacher of physics and mathematics. Since 2014, she has been responsible for S’Cool LAB, CERN’s hands-on particle physics learning laboratory. She is interested in enquiry-based learning activities in particle physics, students’ conceptions and 3D printing.
Rebecca Schmidt and Floria Naumann developed an extensive teaching unit about bubble chambers for their masters’ theses at the University of Dresden, Germany. Today, they both work as physics teachers in Dresden.
Review
This article provides the opportunity to use photographs produced by a bubble chamber at CERN in 1972 to analyse particle tracks and get to know the typical characteristics of these subatomic particles.
The tasks are inspiring and detailed, and they allow for self- or peer-assessment to be used. The historical aspects of the topic as well as the images could appeal to science teachers running science clubs. The tasks are also very suitable for use in class, as a follow-up to theoretical teaching on this topic, such as when discussing evidence for subatomic particles. For the more creatively inclined, the article could provide a basis for cross-curricular projects – perhaps using the tracks or images as inspiration in an art or craft lesson, for example.
Comprehension exercise could relate to the introductory part of the article. Some suggested questions could be:
What events do bubble chamber pictures show?
Why have cloud and bubble chambers been replaced today?
List three subatomic particles.
Stephanie Maggi-Pulis, head of physics department, Secretariat for Catholic Education, Malta