Through a microbiologist’s eyes: optimal time to add honey to tea Teach article

Do you drink tea with honey? We are often told to let it cool first, but when is the best time to add the honey to tea?

Disclaimer

This activity is flexible and can be adapted to different laboratory settings. Simplified and advanced options are provided, so teachers can select the most suitable methods for their available equipment and students’ experience.

Honey is a natural substance produced mainly by honeybees (Apis mellifera) from flower nectar.[1] Its antimicrobial activity results from several mechanisms, including its high sugar concentration, acidity, hydrogen peroxide, phenolic compounds and other bioactive substances. The high sugar concentration creates a hypertonic environment that draws water out of bacterial cells and can inhibit their growth through osmotic stress.

However, osmotic effects alone do not fully explain honey’s antibacterial activity, as artificial honey solutions containing similar concentrations of mono- and disaccharides often show little or no antibacterial activity against many bacteria. Glucose oxidase, an enzyme naturally present in honey, is largely inactive in undiluted honey because of its low water availability and acidic conditions. When honey is diluted with water, the enzyme becomes active and acts on glucose, leading to the formation of hydrogen peroxide, which provides an additional antibacterial mechanism.[1]

These antimicrobial properties can vary between honey types,[2] and heat treatment may reduce antibacterial activity.[3] This raises a familiar everyday question: how long should tea be allowed to cool before honey is added? In these activities, students first compare the antibacterial activity of different types of honey using the agar well-diffusion method. They then investigate how heating temperature affects honey’s antibacterial activity and measure the cooling of hot water using an Arduino and temperature sensor or thermometer.

The activities are suitable for students aged 14–19 and link microbiology, chemistry, experimental design, measurements and data analysis.
Image: Angello Pro/Unsplash

Activity 1: Comparing the antimicrobial activity of different types of honey

In this activity, students compare the antimicrobial activity of several types of honey using the agar well-diffusion method. They measure the inhibition zones and determine which honey shows the strongest effect. An artificial honey analogue (e.g. a sugar solution containing the same amount of sugar as the tested honey) is included as an osmotic control to help distinguish the effect of high sugar concentration from other antimicrobial mechanisms of natural honey.
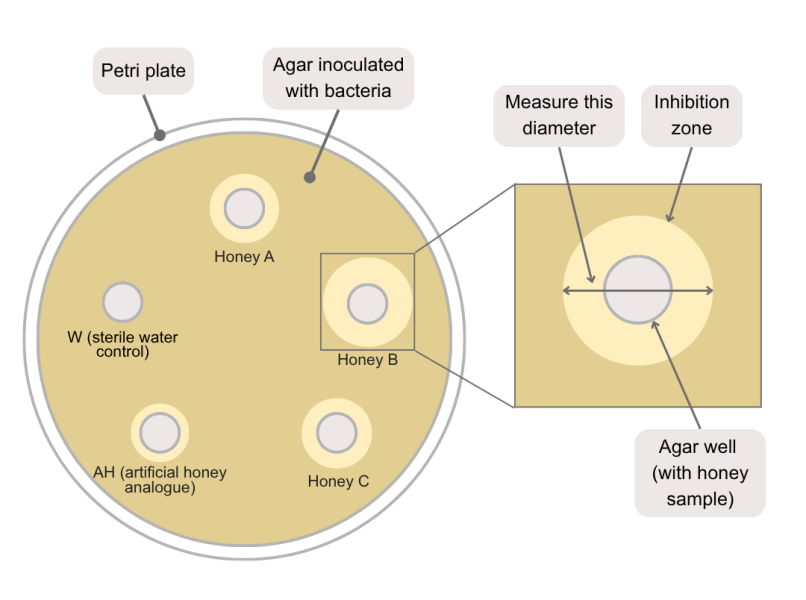
Figure 1: Measuring the diameter of an inhibition zone around an agar well
Image courtesy of the author

The practical work takes approximately 40–50 minutes, followed by about 24 hours of incubation at 37°C or longer at room temperature. A further 20–30 minutes is needed to measure and compare the results.

Safety notes

  • Use only approved Biosafety Level 1 (BSL-1), non-pathogenic teaching strains and follow local and institutional laboratory safety procedures.
  • Wear a laboratory coat, gloves, and safety goggles, and disinfect work surfaces before and after use.
  • Work aseptically (using sterile tools to avoid contamination), open cultures only briefly, and avoid procedures that may generate aerosols.
  • Bacterial cultures should be prepared and handled under the supervision of a teacher or trained laboratory staff member.
  • Once bacterial plates have been incubated, keep them sealed. Students should observe and measure inhibition zones without reopening the plates.
  • All cultures, used plates, pipette tips, swabs, and other contaminated materials must be sterilised or disposed of as biological waste according to local institutional procedures.
  • Heating and pressure-sterilisation equipment should be operated only by trained adults using equipment approved by the school or institution.

Materials

For each group:

  • Worksheet 1
  • Optional instruction sheets:
  • Three types of honey, approximately 1 g of each
  • Artificial honey analogue: a sugar solution containing the same amount of sugar as the tested honey (grams of sugar labelled on the package)
  • One fresh liquid culture of a non-pathogenic teaching strain, approximately 0.5 ml
  • One sterile 90 mm LB agar plate
  • 3 small, labelled glass beakers
  • Micropipette and sterile tips
  • Sterile spreader or disposable sterile swab
  • Sterile pipette tips or a sterile cork borer for making agar wells
  • Water bath or dry-block heater set to approximately 50°C (alternatively, use a hot plate with a beaker of water and a thermometer to maintain the temperature)
  • Permanent marker
  • Ruler or calliper
  • Parafilm or adhesive tape
  • Personal protective equipment
  • Surface disinfectant
  • Biological-waste container
  • Optional:
    • Incubator set to 37°C
    • Additional plates for three independent replicates

Procedure

Preparations by the teacher before the class:

Before the lesson, prepare sterile LB agar plates and sterilise all reusable tools and containers. Also prepare a fresh liquid culture of a non-pathogenic teaching strain.  Instruction sheets can be found in the supplementary materials (Preparation of liquid nutrient media, nutrient agar and agar plates and Preparation of a fresh bacterial liquid culture).

Agar diffusion assay:
  1. Allow the prepared bacterial culture and sterile LB agar plates to reach room temperature.
  2. Label the bottom of each plate with the date and group name. Mark and label one well for each honey sample, one as ‘W’ for the sterile water negative control and one as ‘AH’ for the artificial honey analogue. Use no more than five wells per Petri dish. If more wells are required, use additional plates.
  3. Place approximately 1 g of each honey sample into separate labelled small glass containers.
  4. Warm the honey samples to approximately 50°C for 5 minutes in a water bath or dry-block heater to make them easier to transfer, then allow them to cool slightly.
  5. Working aseptically, transfer the same volume of bacterial culture onto each agar plate. If a micropipette is available, use approximately 100 µl. Otherwise, use a sterile graduated or Pasteur pipette and try to keep the volume as consistent as possible between plates.
  6. Spread the bacterial suspension evenly across the agar surface using a sterile spreader or sterile swab. Close the plates and allow the liquid to absorb for a few minutes.
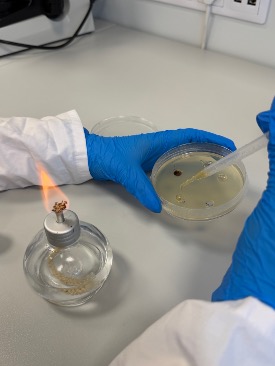
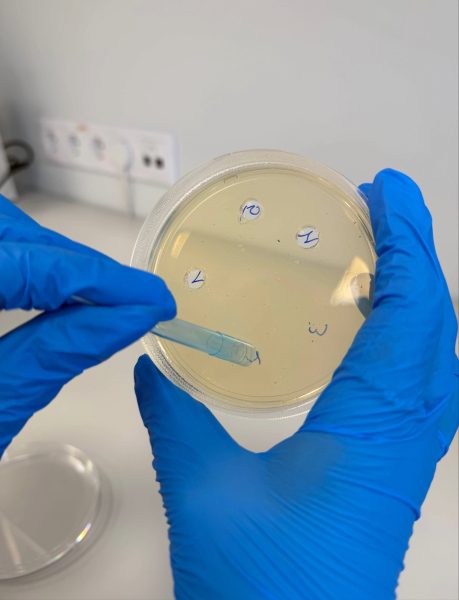
  7. Using a sterile pipette tip or cork borer, make wells of equal size at the marked positions (figure 2).
Figure 2: Making agar wells using a blue pipette tip
Image courtesy of the author
  1. Add the same volume of the corresponding honey sample to each labelled well. Add the same volume of sterile water to the well labelled ‘W’ and the same volume of artificial honey analogue to the well labelled ‘AH’ (figure 3).
  2. Close and seal the plates with parafilm or adhesive tape. Do not invert the plates.
  3. Incubate the plates at 37°C for approximately 24 hours or for longer at room temperature.
  4. Observe the sealed plates without opening them. Measure the inhibition zones and record the results in the Worksheet 1.
  5. Keep the plates sealed and sterilise all cultures and contaminated materials before disposal.
Figure 3: Adding honey and control samples to the wells prepared in the inoculated agar plate
Image courtesy of the author

Results/discussion

Ask students to compare the inhibition zones produced by the natural honey samples, the artificial honey analogue and the sterile water control. The artificial honey analogue helps assess how much of the observed inhibition may be explained by high sugar concentration and osmotic effects alone.

Suggested questions:

  • Which honey produced the largest inhibition zone?
  • Did the sterile water control produce an inhibition zone? What does this indicate?
  • Why was it important to add the same volume of each honey sample?
  • Did the artificial honey analogue produce an inhibition zone?
  • How did the inhibition produced by the artificial honey analogue compare with that produced by the natural honey samples?
  • What does this comparison suggest about the contribution of osmotic effects to honey’s antimicrobial activity?
  • Why might different types of honey produce different inhibition zones?

For Activity 2, students should select the honey samples that produced clear and measurable inhibition zones. If several types of honey were antimicrobial active, teachers may choose to continue with just one type to keep the investigation manageable. Alternatively, if sufficient time, materials and Petri dishes available, they could compare two or more types.

Activity 2: Investigating the effect of heating temperature on honey

Some of the compounds that give honey its antimicrobial properties, such as enzymes and phenolic compounds, are sensitive to heat. Heating can reduce enzyme activity, including that of glucose oxidase, and may also alter heat-sensitive phenolic compounds. As a result, hydrogen peroxide production and other antimicrobial effects may decrease as the temperature of the heating increases.[3] In this activity, students heat the samples selected in Activity 1 to different temperatures and compare their antimicrobial activity using the agar well-diffusion method. They measure the inhibition zones to determine the temperature at which the effect begins to decrease.

The practical work takes approximately 50–60 minutes, followed by about 24 hours of incubation at 37°C or longer at room temperature. A further 20–30 minutes is needed to measure and compare the results.

Materials

For each group:

  • Worksheet 2
  • Approximately 1 g of each honey sample per temperature tested
  • Approximately 0.5 ml of a fresh liquid culture of a non-pathogenic teaching strain
  • Sterile 90 mm LB agar plates: one plate can be used to test honey heated to up to four different temperatures. Use additional plates if more than four temperatures are tested.
  • One small, labelled glass beakers or heat-resistant containers per temperature tested
  • Micropipette with sterile tips or sterile Pasteur pipette
  • Sterile spreader or disposable sterile swab
  • Sterile pipette tips or a sterile cork borer
  • Water bath or dry-block heater (alternatively, use a hot plate with beakers of water and thermometers)
  • Permanent marker
  • Ruler or callipers
  • Parafilm or adhesive tape
  • Personal protective equipment
  • Surface disinfectant
  • Biological-waste container
  • Optional:

Procedure

  1. Prepare the fresh bacterial liquid culture and sterile LB agar plates, then spread the bacterial suspension evenly across the agar surface as described in steps 1–7 of Activity 1.
  2. Label the bottom of each plate with the date, group name, honey type and the temperatures to be tested. Use no more than four wells per plate.
  3. Place approximately 1 g of the selected honey into separate labelled glass containers, one for each temperature.
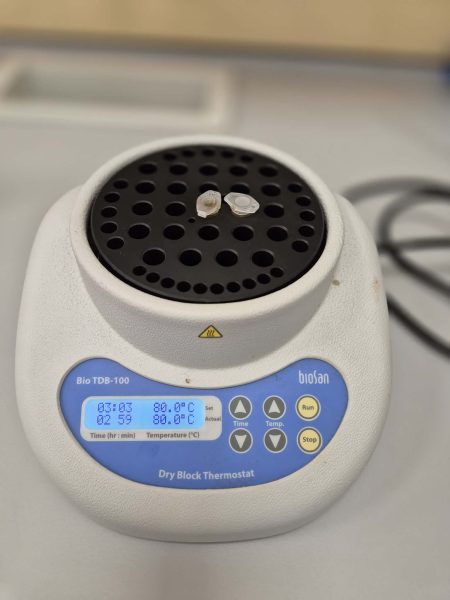
  4. Heat the samples for 5 minutes at the selected temperatures (for example, 70°C, 80°C, 90°C and 100°C). If more temperatures are tested, use additional plates (figure 4).
  5. Allow the heated honey samples to cool slightly so that residual heat does not affect bacterial growth.
  6. Using a sterile pipette tip or cork borer, make wells of equal size at the marked positions.
  7. Add the same volume of each temperature-treated honey sample to the corresponding well.
  8. Close and seal the plates with parafilm or adhesive tape. Do not invert them.
  9. Incubate at 37°C for approximately 24 hours, or longer at room temperature.
  10. Observe the sealed plates, measure the inhibition zones, and record the results in Worksheet 2.
  11. Keep the plates sealed and sterilise all cultures and contaminated materials before disposal.
Figure 4: Heating honey samples at different temperatures in a dry block thermometer
Image courtesy of the author

Discussion

Ask students to compare how the inhibition zones changed as the heating temperature increased. A smaller inhibition zone suggests that heating reduced the antimicrobial activity of the honey.

Suggested questions:

  • At which temperature was the largest inhibition zone observed?
  • At what temperature did the inhibition zone begin to decrease?
  • Did heating completely remove the antimicrobial effect?
  • Why was it important to heat each sample for the same length of time?
  • Which temperature should be considered the highest suitable temperature for adding honey to tea?

After this activity, students should be able to identify a suitable target temperature for adding honey. However, this does not yet show when freshly prepared tea reaches that temperature. Activity 3 investigates how long hot water takes to cool to the selected temperature.

Activity 3: Determining the optimal time to add honey to tea

In this activity, students record the temperature of hot water as it cools and determine the time needed to reach the target temperature selected in Activity 2. Measurements can be taken using a standard thermometer or, as an advanced option, an Arduino with a digital temperature sensor.

The activity takes approximately 20–30 minutes, depending on the starting temperature, cup, water volume and room conditions. A further 15–20 minutes is needed to present and compare the data.

Materials

For each group

  • 250 ml ceramic cup
  • 200 ml freshly boiled water
  • Laboratory or kitchen thermometer that can measure temperatures of at least 100°C
  • Measuring cylinder
  • Stopwatch or timer
  • Laboratory stand and clamp to hold the thermometer
  • Heat-resistant gloves
  • Safety goggles
  • Paper towel or cloth for spills
  • Worksheet 3

Note

If an Arduino is available, temperature changes can be recorded automatically using an Arduino Uno and a DS18B20 temperature sensor. Full equipment, wiring, code and measurement instructions are provided in the supporting material (Measuring temperature with Arduino).

Procedure

  1. Measure 200 ml of freshly boiled water and pour it carefully into a 250 ml ceramic cup.
  2. Place the thermometer in the water without touching the bottom or sides of the cup.
  3. Start the timer immediately after pouring.
  4. Record the temperature at regular intervals in Worksheet 3 (for example, every 30 seconds).
  5. Continue measuring until the water reaches the target temperature identified in Activity 2.
  6. Record the time taken to reach this temperature.
  7. Repeat the measurement at least three times and calculate the average cooling time.
  8. Use the result to recommend how long to wait before adding the honey to the tea.

Extension: Students can repeat the activity using cups made from different materials or cups of different sizes and compare the cooling times. Based on the results, they can prepare separate recommendations for adding honey to each type of cup.

Discussion

Ask students to compare the cooling times obtained in each trial and consider which factors may have affected the results.

Suggested questions:

  • How long did the water take to reach the target temperature?
  • Were the results similar across repeated trials?
  • Why might cup material, size, water volume or room temperature affect the cooling rate?
  • How reliable is the final recommendation?
  • How could the investigation be improved?

Students can also present the results as a graph, plotting temperature (°C) against time (min). If different cups are tested, the cooling curves can be shown on the same graph for comparison.

Conclusion

Across the three activities, students identify which honey samples show antimicrobial activity, investigate how heating affects that activity, and determine how long hot water takes to cool to a suitable temperature for maintaining the antimicrobial activity of honey. The results can then be used to make an evidence-based recommendation for when honey should be added to tea.


References

[1] Hossain ML et al. (2022) A review of commonly used methodologies for assessing the antibacterial activity of honey and honey products. Antibiotics 11: 975. doi: 10.3390/antibiotics11070975

[2] Mavric E et al. (2008) Identification and quantification of methylglyoxal as the dominant antibacterial constituent of Manuka (Leptospermum scoparium) honeys from New Zealand. Molecular Nutrition & Food Research 52: 483–489: 10.1002/mnfr.200700282

[3] Stojković M et al. (2021) Changes in the physicochemical, antioxidant and antibacterial properties of honeydew honey subjected to heat and ultrasound pretreatments. Journal of Food Science and Technology 58: 2555–2566. doi: 10.1007/s13197-020-04762-2

[4] Preparation of nutrient media for growing microorganism: https://www.scribd.com/document/529433106/206-Lab-Ex-3-media-Preparation

[5] Hossain T J (2024) Methods for screening and evaluation of antimicrobial activity: A review of protocols, advantages, and limitations. European Journal of Microbiology and Immunology 14: 97–115. doi: 10.1556/1886.2024.00035

Resources

Author(s)

Eglė Vaičiūnė is a biology and chemistry laboratory methodologist at the Mykolas Romeris University Marijampolė Regional Open Access STEAM Centre. She develops STEAM activities, supports school students research and trains teachers.

Sigita Dzimijonienė is a biology teacher-methodologist at Liudvinavas Kazys Boruta Gymnasium. She actively involves students in a wide range of projects, prepares them for competitions and supports their research work. Together with Eglė Vaičiūnė, she presented this project at the final stage of Science on Stage festival 2026 in Klaipėda.

License

CC-BY
Text released under the Creative Commons CC-BY license. Images and supporting materials: please see individual descriptions.