Plant genetics: extract DNA and explore the challenge of gene sequencing Teach article

Extract DNA from fruit using household ingredients and then explore the challenges of gene sequencing by assembling a fragmented poem.

Natural green plants with biochemistry structure illustration.
Image: Billion Photos/Shutterstock.com

Domesticated crop plants tend to have low genetic diversity because they have usually been selectively bred from varieties that are genetically related. This cross-breeding approach produces high-yield varieties, but it can also increase susceptibility to disease and pests.[1]

Cross-breeding these domesticated strains with wild-type strains has been shown to increase genetic diversity and can produce strains with beneficial genes from their wild-type ancestors. Genome data is key here, as phenotype does not also predict genetic potential.[1]

Representation of the domestication process and the loss of useful genetic variation due to selective breeding and selection of few alleles.
Image adapted from Ref. [2]

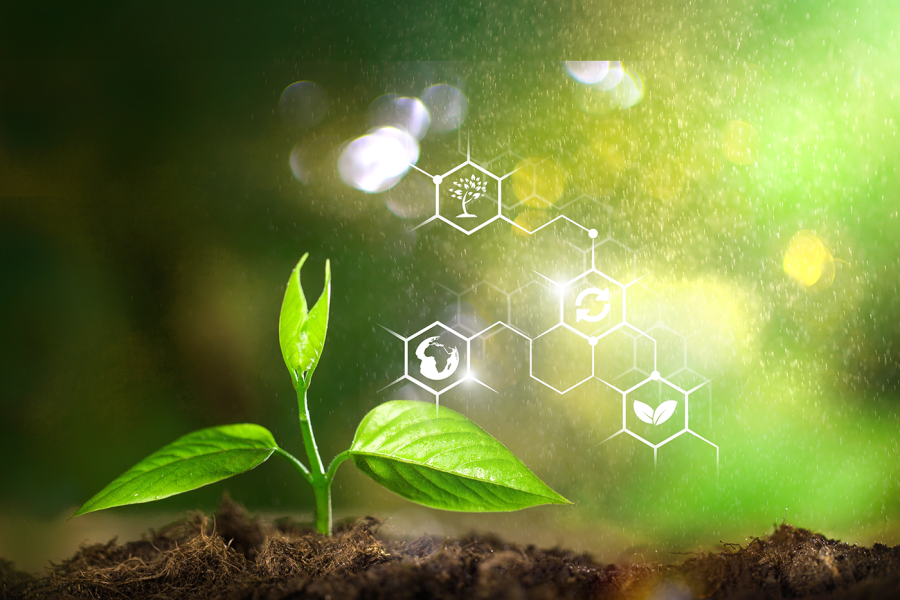
EMBL-EBI’s EnsemblPlants database contains genome assemblies and annotations for agriculturally and environmentally important crops and plants. The data is all open access and freely available to use. Database users can explore plant genomes down to the nucleotide level for a range of species, including the genes and their predicted protein structures. Users can also explore genetic variations identified from different individuals and the predicted effects those will have on the organism’s genes.

Some example functions of the EnsemblPlants database. Scientists can look up published genes for plants they are studying.
Image: EnsemblPlants/EMBL

Here, we present activities to introduce some of the basic concepts of plant DNA and sequencing data to explore the curriculum topics of evolution, inheritance and variation, and bioinformatics. Students extract genetic material and explore the process of assembling genome sequences.

Then, in a second article in the next issue, students are invited to explore the genetics of food plants and crops by going on a plant treasure hunt and trying to breed the best apple! They’ll be encouraged to consider the importance of genetically diverse agricultural plants and crops, especially in the context of a growing population and changing climate.

These activities are suitable for students aged 14 and above. It is useful for students to visualize DNA as a first step; however, if DNA extraction from fruit has previously been carried out by students, they can go straight to Activity 2.

Activity 1: Extraction of DNA from fruit

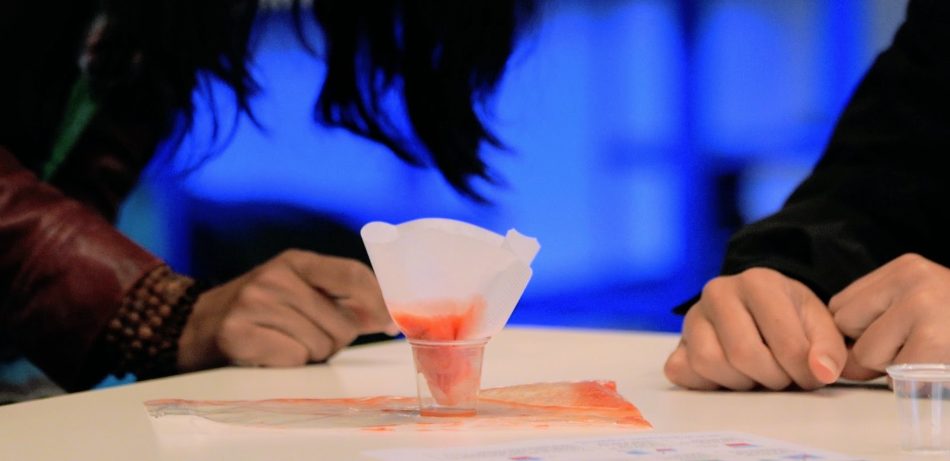
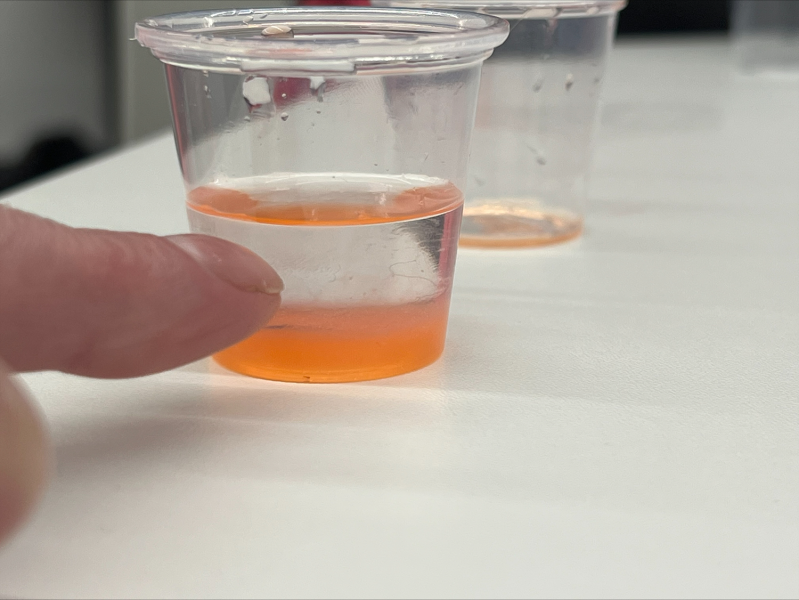
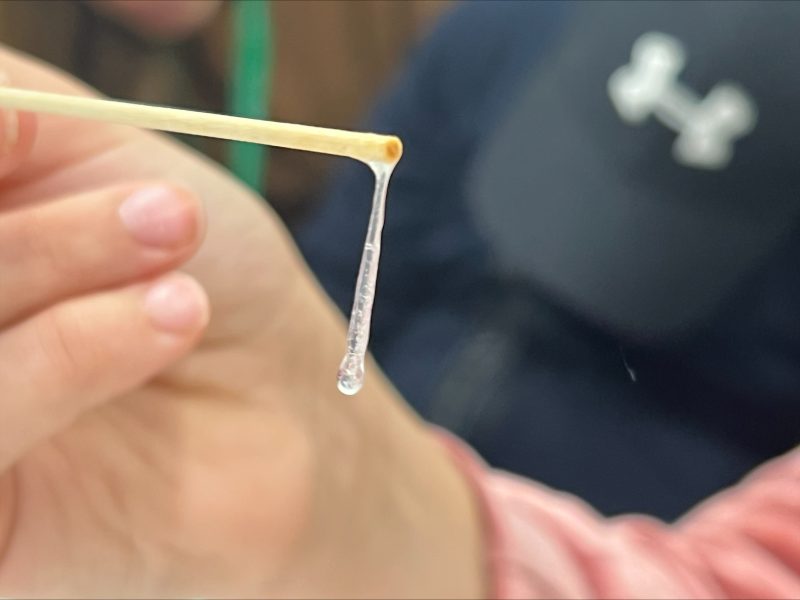
This activity provides hands-on experience of following a lab protocol and helps students to understand the following stages of DNA extraction.

– Preparation: mixing the ingredients to make the lysis buffer.

– Lysis: the cells that make up the fruit are burst open by the prepared solution, leading to the DNA being released into the liquid.

– Precipitation: alcohol is used to bring DNA out of the solution, so it appears as a gloopy solid, which can then be collected.

The DNA extraction procedure was adapted from a protocol created by Emily Angiolini, Earlham Institute. It takes around 30 min to complete.

Materials

Materials for each group:

  • 4 blueberries or two small strawberries
  • Lysis buffer (see below)
  • Cold ethanol (100%)
  • 1 sandwich bag
  • Measuring cylinder (10 ml)
  • 1 plastic tube (50 ml)
  • 1 funnel lined with a coffee filter
  • 1 bamboo stick to collect DNA
  • Collection tube (1.7 ml)
  • DNA extraction infosheet

Lysis buffer (ideally made by the teacher before the lesson)

  • Shampoo (or similar detergent, 100 ml)
  • Salt (2 teaspoons, 15 g in total)
  • Water (make up to 1 litre)

Procedure

  1. Place the fruit into a sandwich bag; seal shut; and squash for about 1 min between your thumb and index finger, making sure there are no lumps (except for the skin).
  2. Add 10 ml of the lysis buffer and continue to squash the fruit  together with the liquid for a further minute.
  3. Place the funnel lined with the coffee filter in the 50 ml plastic tube, and pour the fruit–buffer  liquid from the bag into the funnel.
  4. Wait while the liquid drips into the tube. Do not squeeze the filter. Once the drips slow down, you should have enough liquid (5–7 ml).
Image courtesy of Jeff Dowling/EMBL-EBI
  1. Now pour an equal volume (5–7 ml) of ice-cold ethanol carefully down the side of the tube, so that it forms a separate layer on top of the blueberry liquid.
  2. Watch for about 30 seconds to 1 minute. What do you see? You should see fluffy white clumps forming between the two liquids – that’s DNA!
Image courtesy of D.Crabb/ Lincolnshire Travellers Initiative
  1. Make gentle stirring motions with the bamboo stick in the solution, so the DNA wraps around the stick.
  2. Pull out the stick and put the DNA into the 1.7 ml tube. You should see that the DNA is very viscous or sticky looking.
Image courtesy of D.Crabb/ Lincolnshire Travellers Initiative
  1. Optional: try this with other fruits. Soft fruits like banana and kiwi work well. Student can consider why some fruits (e.g. hard fruits or those with tough skins) may be more difficult.

Discussion

Discuss the following questions:

  • What action do you think the shampoo has? What component of shampoo is responsible for this action? Could you use an alternative household substance in this step?
  • Why do you think you had to squash the blueberries at the beginning of the experiment?
  • What role does the salt play?
  • Why is alcohol poured on top of the fruit solution?
  • Why does the DNA become visible in the alcohol layer?
  • Do you think blueberry cells contain more or less DNA than human cells?

Details on the extraction process can be found in the DNA extraction infosheet, which can be handed out as a summary at the end or used as an introduction at the start (in which case, students should already know the answers to many of the above questions).

Activity 2: Genomes assemble!

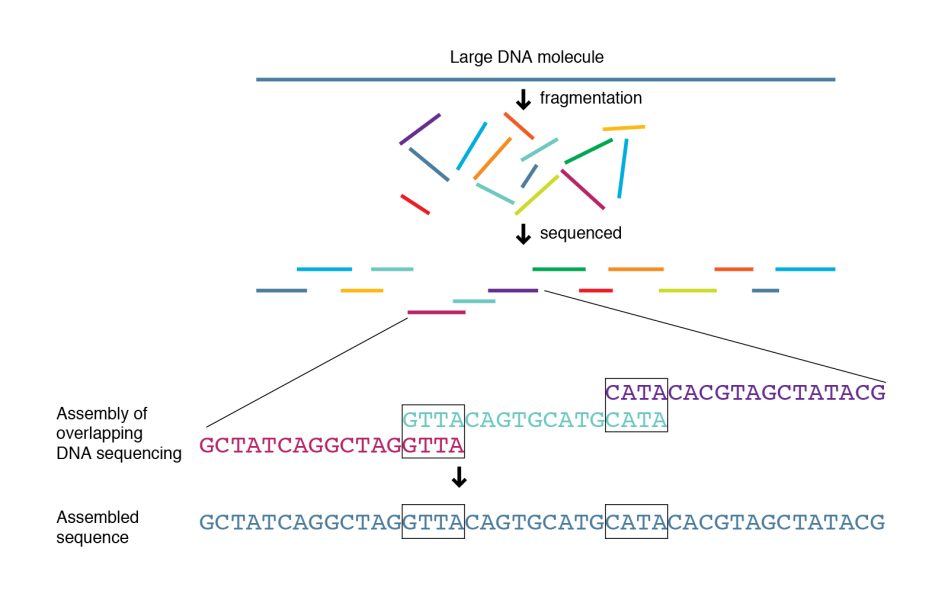
Once DNA is extracted and sequenced, the sequence needs to be reassembled. We can’t currently sequence a genome from start to finish – it has to be broken up into smaller fragments. These small fragments then need to be arranged in the correct order before scientists can start analyzing the genome.

Sequencing is not yet 100% accurate, so small errors can occur. To account for this, each base is sequenced multiple times – this means that, at the end of sequencing, there will be lots of pieces of DNA sequence that need to be assembled in order. It’s like putting together a jigsaw puzzle when you have only part of the picture (if you have existing DNA sequences for comparison). If you don’t have existing sequences to compare them with, it’s like doing a jigsaw with no picture, and you have to look for sections of sequence overlap to get them in the right order – this stage is called assembly.

A scheme of sequencing, showing how the sequenced fragments need to be assembled.
Image: National Human Genome Research Institute

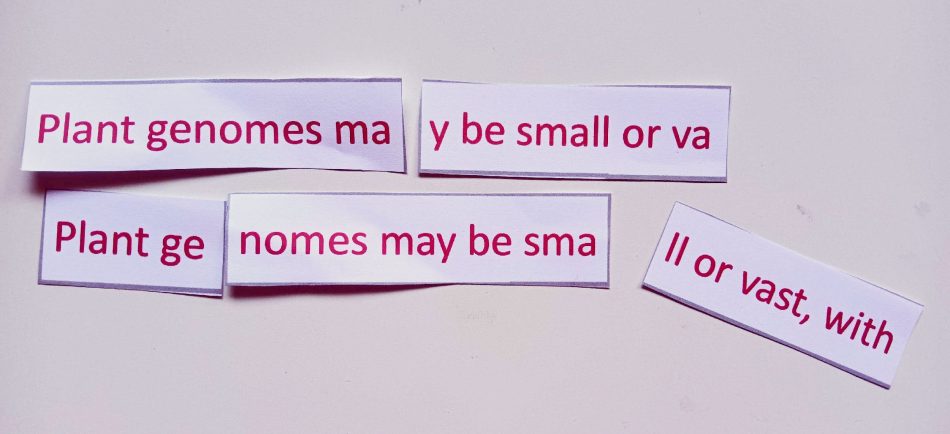
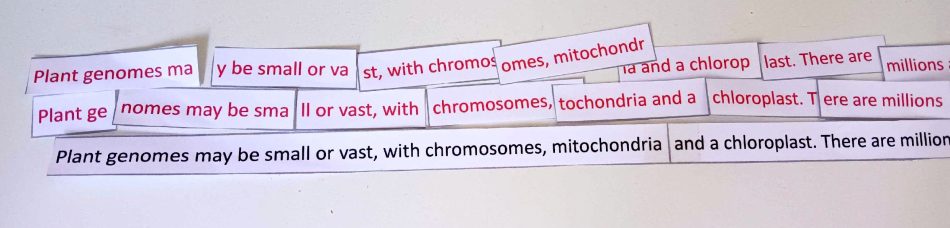
Students should work in pairs or small groups to have a go at sequence assembly using the ‘sequences’ of an assembly-themed poem about genomes.

There are three parts to this activity:

– Exercise 1: Assembly with short reads – illustrating challenges from next-generation sequencing (red words)

– Exercise 2: Aligning short reads to a reference genome (black words)

– Exercise 3: Assembly with long reads – illustrating advantages of third-generation sequencing (purple words)

Materials

  • Printable instructions
  • Printable text fragments:
    Two sets of red words (short reads) – fragments of about 16 characters (Exercise 1)
    One set of black words – this reference sequence should be stuck together into a continuous line (Exercise 2)
    Two sets of purple words (long reads) – these are fragments of about 40 characters (Exercise 3)
  • Bioinformatics infosheet

Procedure

  1. Before the lesson, print out the text fragments and cut out the boxes. They all come from the same piece of text. Keep the red words (Exercise 1), black words (Exercise 2), and purple words (Exercise 3) separate.
  2. Hand out the bioinformatics infosheet and discuss how it is difficult to sequence very long sections of DNA, so sequencing results come as smaller fragments that need to be assembled into the original sequence.
Exercise 1: Short-read assembly
  1. Hand out the text with red words (lengths of ~14 characters). Each student or group should get a full set containing two copies of the poem.
  2. Challenge students to reassemble the original text using the overlaps. There are two parts to the text. The first part has long words, which are not repeated much, making it easier to assemble; this part represents gene regions. The second part is very repetitive and difficult to assemble, representing intergenic regions, which are often full of repeated sequences.
  3. Here are some tips to help with the assembly process:
    1. Each region of the text is included twice, but split in different places.
    2. Use easy-to-spot words to build out from, for example, chromosome.
    3. Sentences start with capital letters and end with a full stop.
    4. It’s easiest to remove the repeat regions and deal with them second. Tip: your repeats contain the word “repeat”.
    5. Getting repeat regions correctly assembled may not be possible with short reads.
Image depicting Exercise 1 texts to assemble.
Exercise 2: Aligning short reads to a reference
  1. Hand out the black fragments.
  2. Have the students stick the black word fragments together to make a continuous line; this is the reference sequence.
  3. Students should then take the short (red words) fragments from Exercise 1 and align them with the reference sequence where they match. Note that some fragments may match in more than one place.
Image depicting Exercise 2 texts to assemble.
Exercise 3: Long-read assembly
  1. Hand out the purple fragments.
  2. Have students use the same approach as that for assembly of the short reads. The process should be much easier with long reads (purple fragments), and the repeat regions should also assemble now.
  3. Optional extra step: align the long reads (purple) with the reference, as in Exercise 2. This should also be faster and easier.

Discussion

Have students consider the following questions:

  • Was that easier or more complicated than you thought it would be?
  • Was it easier using shorter fragments or longer ones? What about when there were repeated words?
  • How might this be different when working with a large genome (example of number of base pairs)?
  • How might bioinformatics tools make this process easier?
  • Did you work in pairs or small teams? Would this activity have been harder or easier without your team? (Science is all about teamwork and inviting different perspectives, skills, and experience to find answers and solve problems.)

Then discuss the differences between this exercise and DNA sequencing. The main points are as follows.

In this activity, the assembled small fragment of a poem was written using the English alphabet, with grammar and punctuation to help us understand it. DNA assembly will typically be genomes of millions of bases, with only four different characters (A, C, G, and T), and we do not understand the ‘grammar’ of the genome. It’s a tough problem!

Imagine if there were spelling errors or typos in your fragments; this would make them even harder to use. Sometimes sequencing machines make errors, so to be certain we know what the right letter should be, we usually sequence more deeply than just the two copies used in this exercise; we might use 7, 20, 50, or more than 100 copies! It depends on how many errors you expect in the sequencing, and how perfect you need your genome to be.

Take-home messages:

  • It is harder to assemble short reads, as the same fragments can come from different places in the genome. The longer the reads, the easier it gets. Newer sequencing technologies are helping a lot with this.
  • Aligning to a reference sequence is easier than assembling a genome from scratch, but if you have reads in your genome that do not map to the reference, then those are lost, and sometimes these novel regions have exciting genes we want to find!

References

[1] Tanksley SD, McCouch SR (1997) Seed banks and molecular maps: unlocking genetic potential from the wild. Science 277: 1063–1066. doi: 10.1126/science.277.5329.1063

[2] Kumar R et al. (2021) Understanding omics driven plant improvement and de novo crop domestication: some examples. Frontiers in Genetics 12: 637141. doi: 10.3389/fgene.2021.637141

Resources

Institutions

Author(s)

Sarah Dyer is the nonvertebrate genomics team leader at EMBL-EBI. She studied biology and then bioinformatics and has worked for several research organisations, including the Wellcome Sanger Institute and the National Institute of Agricultural Botany (NIAB). Her main interests are exploring genetic diversity for crop improvement, and at EMBL-EBI, her team supports research communities using plant, insect, and worm genomics.

Briony Jackson is Public Engagement Officer at EMBL-EBI. She studied Biochemistry at the University of Kent and has an MSc in Science Communication and Society. She has worked in the museum sector developing exhibits and STEM engagement programmes and in industry as a wet-lab scientist. At EMBL-EBI she is responsible for shaping the public engagement strategy and community engagement approach.


License

CC-BY
Text released under the Creative Commons CC-BY license. Images and supporting materials: please see individual descriptions.

Related articles

Teach

A chromosome walk

Stroll through biological databases: Walking on chromosomes is a CusMiBio project that teaches students how to explore biological databases and…


Understand

When plants moved ashore and changed the planet

Plants today are extremely diverse, abundant, and flamboyant. However, the first land plants, which initiated a great change in the flora and fauna on planet Earth, were very different.