Conservation and transfer of energy: project-based learning with Rube Goldberg machines Teach article
Author(s): Sarah Ferguson, Francis Estacion, Nicole Del Russo, Becki Grimes
Silly or serious? Rube Goldberg machines are not only a lot of fun but can help students to understand the principles of conservation and transfer of energy.
What are Rube-Goldberg machines?
Reuben Garrett Lucius Goldberg (1883–1970) was an American cartoonist and inventor best known for illustrations of his contraptions, named Rube Goldberg machines, which solve simple tasks in the most complicated and funny ways possible. These contraptions live on in the form of pop culture and competitions.[1] Below is a comic demonstrating one of Rube Goldberg’s machines.
Project-based learning (PBL) builds on the notion that students will be more engaged in learning through a curriculum built on exploring real-world problems or designed challenges.[2]
Combining the idea of Rube Goldberg machines and PBL creates an engaging learning sequence designed to help students understand the conservation and transfer of energy. This activity is designed for physics students aged 15 to 18 and can be appropriately scaled up or down, depending on students’ learning needs and classroom dynamics. It provides an exploration of the conservation of mechanical energy. The main objective is to design and build a Rube Goldberg machine, while exploring the conservation and transfer of energy.
Through this project, students are expected to address the following performance objectives:[3]
Demonstrate how energy in a closed system is conserved if no work is done on, by, or within the system.
Use everyday life to illustrate that energy can be transformed from one form to another.
Investigate conservation of energy in a mechanical system to verify whether any energy is lost outside the system.
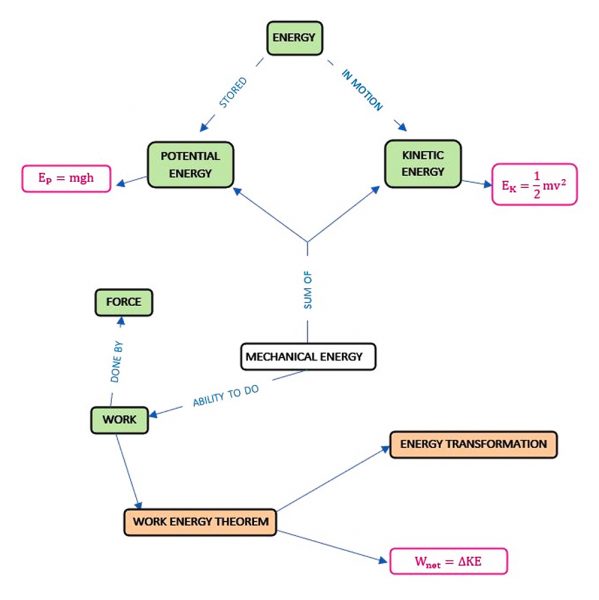
The project concept map outlines the connectedness of all major and minor ideas that need to be explored.
Concept map Image courtesy of the authors
The major terms that the map is built upon, mechanical energy and law of conservation, serve as the focal points of the concept map. These two major topics are connected via energy, more specifically, kinetic and potential energy, but the mechanical energy idea also includes work and force.
Implementation
The project is delivered in three class periods, spanning seven days to include a weekend, giving students a good amount of time to be creative with their Rube Goldberg machine designs and creations. These lessons are designed for a virtual experience, but they can also work well in an in-person classroom environment.
To begin the first day, the teacher should ask the class to list some chores that they must complete at home.
The teacher can then ask students whether those listed chores could be accomplished by a machine. The students will excitedly discuss the chores that they dislike having to do and brainstorm if they think the task can be accomplished by a machine.
Once the students are fully engaged with the discussion, they should watch the engagement video, which is a highly entertaining music video containing a complicated Rube Goldberg machine.[4]
After the video, the teacher should ask the driving question: What kind of machine could you build that would complete a chore or task for you? To engage the students into figuring out how to answer this question, the teacher can probe with further questions, such as “what is a Rube Goldberg machine” and “how does the machine continue after only one action?”
After a brief discussion, the teacher introduces the full project via a PowerPoint presentation.
Students are assigned a Project Worksheet to supplement their projects, which is due on the third and final day of the unit. The worksheet requires sketches as well as input–output energy equations, which students will work through to calculate potential, kinetic, and possibly rotational energy.
Step
Description of step
Energy transformations
Simple machines
x
Describe what is happening in your machine
EP-gravitational to EK and Erotational
Lever, pulley, screw, wheel & axle, inclined plane, or wedge
Student Project Worksheet
After hearing about their assignment, students can begin to explore energy transfers and Rube Goldberg machines by participating in an online game. This game is broken into levels, each with their own challenges for students to work through. While exploring Rube Goldberg machines through the game, students are also instructed to pay attention to energy transfers and the initiating tasks that begin each machine. Students are encouraged to notate ideas from the game that they would like to incorporate into their own Rube Goldberg machine creations. The students are given ten minutes of class time to work through as many levels as possible for a little competition.
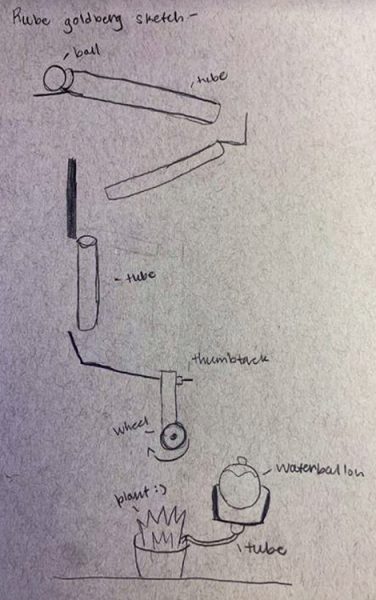
After completing the game activity, the remaining lesson time is allotted for students to begin sketching their machines.
Based on the sketches, the students should have created a list of materials needed to build their machines.
A Granby High School physics student’s sketch of a machine to water a plant Image courtesy of the authors
Online teaching: there are many activities and learning sequences within this small unit of instruction, so a project website was created to house all supplemental materials and to provide easy access to directions, timelines, requirements, and project details for students. If using this, students can be shown the site at end of the lesson (where and how to upload their assignments) and be given their first exit ticket. The exit ticket requires the students to list two examples for each of the six different types of simple machines.
Lesson 2: Construction
A sketch and photo of a Granby High School physics student’s Rube Goldberg machine that ultimately switches on music on their phone Image courtesy of the authors
Below is a list of suggested materials to have in the classroom for students to use, but students are encouraged to bring materials from home.
String
Paper
Cardboard
Scissors
Tape
Paper clips
Rulers
Marbles
Dominoes
Aluminium foil
Ice lolly sticks
Straws
Paper cups
Textbooks
Pulleys
Procedure
The teacher introduces another engagement video to get students thinking about physics and their projects,[5] and the students are given the video assessment worksheet to supplement the video assigned. Afterwards, the worksheet problems are worked through as a class.
The students are given the remaining class time to work on assembling their machines. In a virtual teaching environment, some students will build small machines near their computers and others will build larger machines elsewhere and check back in with the teacher periodically. The teacher assists students with building ideas or questions as needed.
At the end of the class, students are instructed to create a video recording of their machines before the next class.
The students are assigned their second exit ticket, which requires them to list three things they learned about simple machines, as well as two questions they still have about energy transfers. The teacher collects these questions, answers them, and distributes the questions and answers back to the students via email, prior to the next class. The questions posed by students are also listed, with answers, on the project website.
A sketch and photo of a Granby High School physics student’s Rube Goldberg machine that will drop an object onto their keyboard to type an essay for them Image courtesy of the authors
Lesson 3: Presentations
Materials
PowerPoint slideshow of all Rube Goldberg machines
The final component of a PBL lesson is presentation. In a virtual setting, it is best to have students create videos showcasing their Rube Goldberg machines, and class time on the third day will be dedicated to video sharing and peer review. The students will arrive at class excited to present their Rube Goldberg machines.
The teacher explains how the presentations will be conducted and how the peer-review process functions.
Students are given a peer-review worksheet to complete during the presentations. About half the class time is designated for the presentation showcase, so there is time for replaying video recordings multiple times as well as in slow motion.
After all student videos are presented and peer-review comments are submitted, the teacher will show the students a national Rube Goldberg competition and discuss their smaller machines in comparison to the elaborate machines showcased in the national competition.
Summary
This project can be modified in many ways. If situations permit, this can be a good project for groupwork or for a competition. Also, the number of energy transfers can be scaled up or down, depending on the students’ abilities. Additionally, if the project is conducted in person, then the driving question can be changed to be more applicable to tasks that can be completed in the classroom. Along with being in person, the presentations can either be live or completed through video recordings. An option could be for students to record their machines in the classroom, so they are able to record multiple takes if their machines malfunction.
Student learning and understanding regarding energy transformations increases after having the opportunity to create their own energy transformations in a fun and educational way.
Sign up for one of the fantastic Rube-Goldberg contests offered by rubegoldberg.com: The Rube Goldberg Machine Contest, The Rube Goldberg Crazy Contraption Cartoon Contest, or The Rube Goldberg/Minecraft Competition. These activities are free and open to all ages.
Dr Sarah Ferguson is a master teacher with the Old Dominion University’s MonarchTeach program. Experienced with problem-based instruction, she enjoys working with pre-service teachers to expand their understanding of problem-based instruction techniques.
Francis Estacion is a physics teacher with King’s Fork High School in Suffolk, Virginia. He enjoys bringing hands-on experiences into his physics classroom and encouraging his students to explore their curiosity.
Nicole Del Russo and Becki Grimes are pre-service teachers majoring in physics. They enjoy working with students in hands-on lessons that encourage curiosity while making physics relatable and understandable.
Review
If you are looking for a novel and exciting way to teach classic physics concepts to older students, this article may be what you are looking for!
Energy transfers are investigated through a project-based learning activity intertwining science and popular culture to create a Rube Golberg contraption. This activity can be used as part of a seven day guided physics project or even be adapted into a fun, cross-curricular competition using skills from other subjects such as design and technology. Designed to be delivered online as well as in person, this activity offers a creative and easily adaptable physics option for today’s changing classroom.
Koulla Andronicou, Head of Science, Med High Private English School, Cypress