Supporting materials
Download
Download this article as a PDF


Help students develop STEAM skills by building a smart lamp with this creative project that combines physics, programming, and art and design.
Cross-curricular projects that combine science with art and technology offer a great opportunity to enhance students’ creativity, which is a key 21st century skill.[1] We describe a project developed by teachers at Flatåsen School in Trondheim (Norway), where students design and build their own ‘smart’ lamps that are controlled by various sensors on a micro:bit (www.microbit.org).
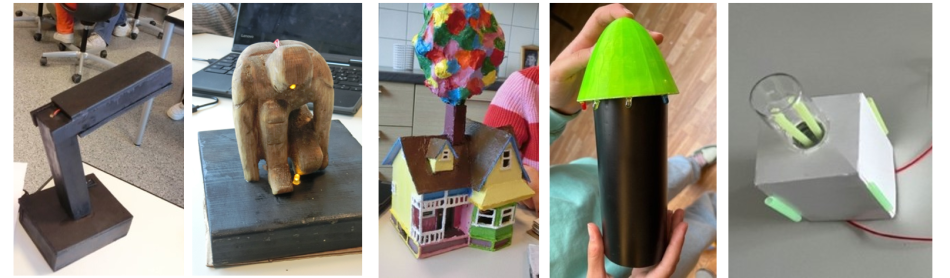
This creative project combines knowledge of electric components and circuits with algorithmic thinking and programming, while enhancing students’ skills in product design, project planning, and the use of selected crafting methods and tools. A smart lamp can have various shapes and functions (figure 1).
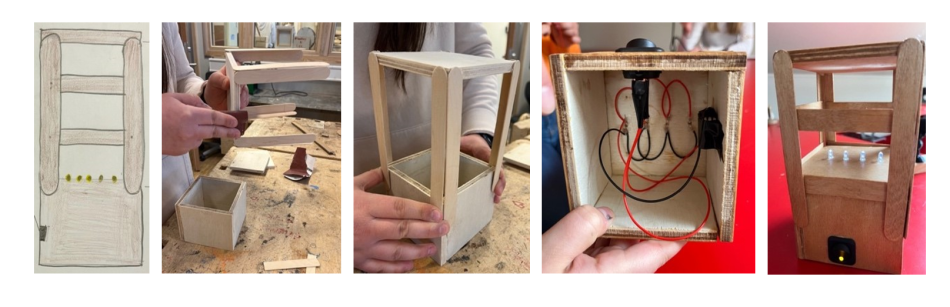
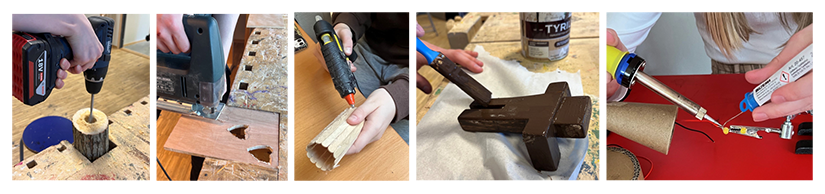
The project follows several design steps, interleaved with short booster courses that introduce students to required knowledge and skills as they need them [2]. In this way, we follow the ideas of integrated science, technology, engineering, arts, and mathematics (STEAM) teaching,[3] where school subjects are taught in a relevant cross-curricular context, rather than as isolated pieces of knowledge. Figure 2 shows an example of the progression from a sketch to the final product.
The project was developed for students aged 13–16. We ran it over 7 weeks using teaching hours from science, mathematics, and arts & crafts. In total, approximately 35 hours were required. However, the time can be reduced by focusing on the technical part (electric circuits, sensors, and programming) or by limiting the choice of materials for making the lamp.
Through this activity, students gain practical experience with electric components available for use in their lamp designs. It is assumed that students have prior knowledge of basic electric circuit concepts, such as voltage, current, resistance, closed versus open circuit, and series versus parallel connections. The activity takes approximately 1 hour.
Never directly connect (short-circuit) the 3V and GND pins on a micro:bit.
Guide students through the following tasks:
Some of the connections are shown in figure 3.
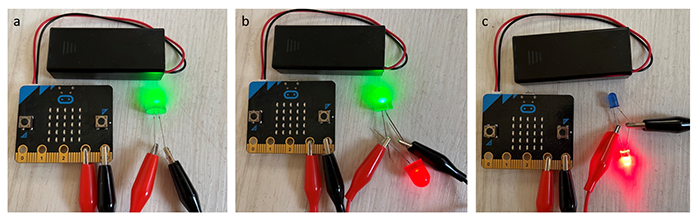
LEDs of different colours have different threshold voltages (1.6–4 V). If two LEDs with significantly different threshold voltages are connected in parallel, only the one with the lower threshold voltage will be lit (see figure 3c). However, some LEDs on the market have a built-in current-limiting resistor. Such LEDs can be connected in parallel, irrespective of the colour.
This activity guides students through different possibilities of controlling LEDs using micro:bit. It enables them to come up with smart function ideas for their lamps, for example
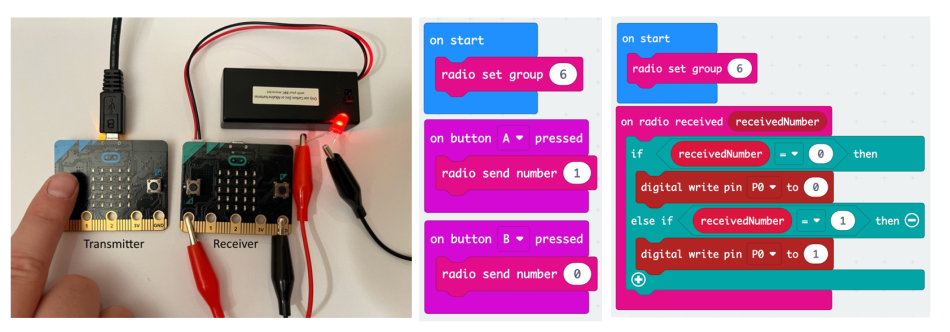
The micro:bit acts as a programmable switch that can turn LEDs on and off, or change their light intensity based on environmental light, sound, temperature, etc. Furthermore, LEDs can be controlled remotely in different ways using another micro:bit as a remote controller.
The online block-based editor MakeCode (makecode.microbit.org) is used to program the micro:bit. Students should have some prior knowledge of basic programming concepts (e.g. loops, logical expressions, variables) and some prior experience with programming the micro:bit by MakeCode. The activity takes approximately 2 hours.

Several code examples are provided in the supplementary material.
In this activity, students are encouraged to develop their own lamp designs. This gives them a feeling of ownership and enhances their engagement. Ideally, 5–6 hours distributed over 2 weeks are needed to allow the idea to mature. This activity can run in parallel with the first two activities.
This results in a construction drawing that includes the dimensions, required materials and tools, a circuit diagram, and a description of the smart functions. One example is shown in figure 6.

In this final activity, students build and program their smart lamps according to the construction drawing (see figure 7). This is the most time-consuming process, but also the most engaging as the students see their designs come to life. Approximately 20 hours distributed over 4 weeks should be planned for this activity.
Before starting to build, students can be offered short practical booster courses (Extension activity 1) to boost their skills in use of relevant tools.
In addition, students can be offered optional tools and materials covered in the booster courses.
Have students perform the following tasks:
The materials could be restricted to recycled/recyclable materials to focus on sustainability.
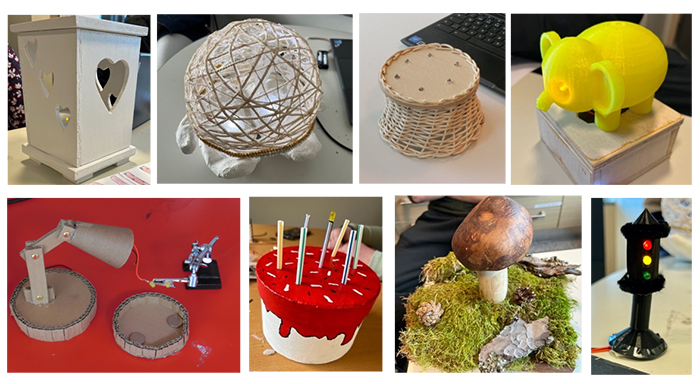
Students should be given the opportunity to steer the project according to their interests. In our school, some students spent considerable time finding materials for their lamp at home or in nature, while others worked intensely on refining the smart functions of their lamp. Figure 8 illustrates a large variety of student products.
The smart-lamp project puts traditional science content in a modern setting. The open-ended task enhances students’ creativity and offers valuable experience with problem-solving and time management. It can also be individually adapted to give all students the chance to succeed. The project both challenges and engages students to a high degree and gives them a great sense of ownership and achievement. It is nice to organize a viewing gallery (Extension activity 2) at the end of the project, where students get the chance to present their work.
This project requires collaboration between teachers of different subjects and a willingness to spend teaching time on cross-curricular projects that allow individual choice and in-depth work. It is a challenging project that requires a motivated coordinator. However, the payoff is providing students with meaningful and engaging science education that gives them insights into the importance of science in everyday life.
[1] Binkley M et al. (2012) Defining twenty-first century skills. In Griffin P, McGaw B, Care E (eds) Assessment and teaching of 21st century skills pp 17–66. Springer, Netherlands. ISBN: 9789400723238
[2] Norton S, Ritchie S M (2009) Teaching and learning science and mathematics through technology practice. In Jones A, de Vries M (eds) International handbook of research and development in technology education pp 419–429. Sense Publishers. ISBN: 9789087908775
[3] White D, Delaney S (2021) Full STEAM ahead, but who has the map for integration? – A PRISMA systematic review on the incorporation of interdisciplinary learning into schools LUMAT: International Journal on Math, Science and Technology Education 9: 9–32. doi: 10.31129/LUMAT.9.2.1387
Electricity and creating simple electrical circuits are part of the curriculum in most countries. This particular article offers a very nice opportunity for teachers to teach the construction of simple electrical circuits in a different, cross-curricular way. Students can combine the simple concepts of physics with arts and crafts, which makes the lesson more interesting and more creative.
Teaching science by using technology and not just standard lab equipment gives students an insight into how science and technology are nowadays combined.
The construction of smart lamps is at the same time a very good opportunity for teachers and their students to discuss in the classroom up-to-date environmental issues related to the contribution of technology to energy saving and consumption.
I found the activities very interesting and I would highly recommend implementing them in the classroom.
Kelly Giannakoudaki, physics teacher, Greece
Download this article as a PDF