Nanotechnology in school Teach article
Matthias Mallmann from NanoBioNet eV explains what nanotechnology really is, and offers two nano-experiments for the classroom.
Nanotechnology has become a popular buzzword in science and politics. This key technology is considered not only a major source of innovation in technology, medicine and other fields, but also one of the main challenges for the 21st century. European universities and high-level vocational training programmes already cover this technology extensively. However, although the word nanotechnology will be familiar to many high-school students, the subject is not widely taught in European schools. This article outlines several initiatives to increase awareness of nanotechnology among European science teachers, and details two nanotechnology experiments for the classroom.
What is nanotechnology?

window using nanotechnology
Image courtesy of NanoBioNet eV
Nanotechnology is not really anything new. It deals with entities and processes on the scale of 10-9 m (1 nanometre), which is the dimension of molecules and atoms – a scale that chemists, biochemists and cell biologists have worked with for centuries.
At the nanoscale, the properties of a material may change. For example, hardness, electrical conductivity, colour or chemical reactivity of minuscule particles of materials are related to the diameter of the particle. Specific functionalities, therefore, can be achieved by reducing the size of the particles to 1-100 nm.
A well-known application of early nanotechnology is the ruby red colour that was used for stained glass windows during the Middle Ages (see image). The colour is a result of gold atoms clustering to form nanoparticles instead of the more usual solid form. These small gold particles allow the long-wave red light to pass through but block the shorter wavelengths of blue and yellow light. The colour, therefore, depends both on the element involved (gold) and on the particle size; silver nanoparticles, for example, can give a yellow colour.
What is new, though, is the multidisciplinary approach and the ability to ‘look’ at these entities. The atomic force microscope, which was developed in the late 1980s, allows scientists to view structures at a nano-metric scale and to handle even single atoms via scanning probe microscopy. Now biologists can discuss steric effects of cell membranes with chemists, while physicists provide the tools to watch the interaction in vivo. Nanoparticles play an important role in the pharmaceutical industry (delivering active agents to the required part of the body) in the production of emulsion paint and cosmetics and in the optimisation of catalysts. Nanotechnology, therefore, has combined all natural sciences and creates cross-links between the different disciplines.
Initiatives for schools
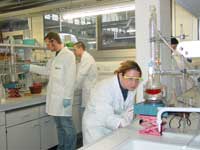
Image courtesy of Lehrstuhl für
physikalische Chemie, Universität
des Saarlandes
Some materials are already available to support science teachers in introducing their students to nanotechnology, although the materials tend only to be published in the national language. For example, the German Saarlab Initiativew1 offers lab days for whole school classes, while some European science museums and science centresw2 have exhibitions about nanotechnology or, like the German Nanotruckw3, bring people closer to the subject using touring exhibitions that can be booked for public events. Some universities, like the University of Cambridgew4, offer visits to schools, interactive lectures, seminars and workshops. Additionally, there are many online resources that provide information, films and games for schools and studentsw5.
To fill this gap, the NanoBioNet eVw6 not only provides vocational courses and training for teachers, but has developed a multilingual (German, English and French) experimental kit (the NanoSchoolBoxw7) to teach school students about nanotechnology. Some of the experiments in the NanoSchoolBox are suitable for demonstration experiments; others can be integrated without too much preparation into hands-on lessons under the guidance of the teacher.
The experimental school kit includes 14 experiments and five exhibits which deal with the following topics:
- The lotus effect and technical applications of nanolayers
- Functionality through nanotechnology (showing different effects of nanotechnological coatings, such as scratch resistance, fire protection and the increase in electrical conductivity through indium tin oxide)
- Use of titanium dioxide in nanotechnology
- Ferrofluids
- Nano-scaled gold clusters
Although the experiments are intended principally for chemistry lessons, the interdisciplinary structure of nanotechnology means that some of them are also suitable for physics or biology classes. Below are two examples.
Ferrofluids
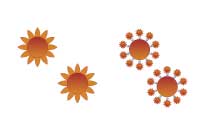
of ferrofluid particles
Image courtesy of NanoBioNet eV
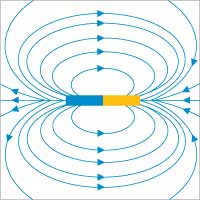
Image courtesy of NanoBioNet eV
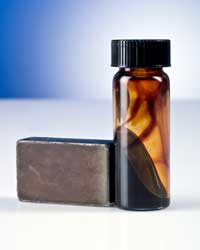
Ferrofluids are colloidal dispersals of extremely small ferromagnetic particles (i.e. particles that can be permanently magnetised by an external magnetic field), such as cobalt, nickel or iron, suspended in a hydrocarbon liquid. The particles are coated with a surfactant to prevent them from clumping together. Ferrofluids are the only magnetic materials in liquid form.
The NanoSchoolBox includes both ferrofluids for performing the experiment and instructions for making your own ferrofluids in the laboratory. Ferrofluids may also be bought from FerroTec GmbHw8.
In this simple experiment, the ferromagnetic particles align themselves with the magnetic field lines around a magnet, thus making the magnetic field visible.
Materials
- Ferrofluid
- Empty crimp-top glass tube
- Tenside solution (surfactant)
- Magnet
- Pipette
- Water
Procedure
- Fill the tube three-quarters full of water and add 2-5 drops of tenside solution (surfactant).
- Carefully use the pipette to add a few drops of ferrofluid, which will settle at the bottom.
- Close the tube tightly.
- Bring the magnet close to the ferrofluid.
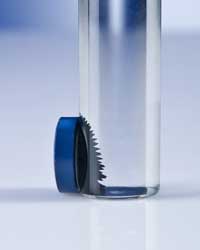
As the particles try to align themselves with the magnetic field, a typical ‘porcupine’ is formed, the prickles representing the magnetic field lines (see images). Surface tension of the fluids and gravity counteract the magnetic field with the result that ordered structures are created in the liquid as a reaction to the three forces.
- Trying moving the ferrofluid through the water with the aid of the magnet. Depending on whether the magnet is held parallel or vertically to the surface of the ferrofluid, the orientation of the magnetic field changes and, consequently, the orientation of the fluid changes.
- Shake the tube gently to disperse the ferrofluid in the water. As the ferroparticles do not dissolve, they eventually settle at the bottom. You can accelerate this process with the aid of a magnet, observing beautiful effects. To achieve this, draw the magnet past the side of the tube quickly and away again. In this way, you accelerate the ferrofluids and produce streaks, clouds, and so forth.

Safety notes
- Ferrofluids must be handled with great care and in a clean environment because they leave permanent stains.
- Wear a laboratory coat, gloves and protective goggles. If your skin comes into contact with a ferrofluid, wash the area with soap.
- Keep ferrofluids in a sealed container at all times in order to prevent evaporation.
- The ferrofluid and the materials soiled with the substance should be disposed of in the same way as motor oil (as hazardous waste or at a collection point) and not poured down the sink.
Nanoscale gold
Research scientists use the light-absorbing property of gold particles to detect biomolecules. For example, antibodies can be tagged by coupling them with gold particles. When a white light is shone on them, the red colour of the metal particles is visible. This is applied in some cases in home pregnancy tests, in which gold nanoparticles are finely distributed on the test strip.
The UltiMed® pregnancy test, for example, relies on this principle to detect human chorionic gonadotropin (hCG), a hormone released early in pregnancy by the fertilised egg and the lining of the uterus. hCG consists of two subunits: α and ?. On the test strip, α-subunits of hCG are immobilised, forming a line that will turn red to indicate a pregnancy. Elsewhere in the strip, colloidal gold particles are tagged with monoclonal antibodies specific to the ?-subunit of hCG.
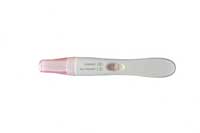
Image courtesy of kimkole / iStockphoto
When the strip is dipped in urine, the liquid allows the tagged gold particles to move through the strip by capillary action. If the urine contains hCG (i.e. if the woman is pregnant), ?-subunits of hCG bind to the tagged gold particles. When the ?-subunits bound to the gold reach the immobilised α-subunits, the α- and ?-subunits bind together, forming a gold-hCG complex. If the concentration of hCG is high enough, the complex is visible as a red line, indicating that the woman is pregnant. Further gold particles bind to a second line, indicating that the test (whether positive or negative) was correctly performed.
In the following experiment, we will produce nanoscale gold clusters, which are easily detected by their typical ruby-red colour. One way of producing nanoscale gold, described here, is the citrate method. This involves producing either colloidal gold or gold clusters in a solution.
A cluster, or nanoparticle, is a collection of 3 to 50 000 atoms. The diameter of the gold nanoparticles is generally between 12-18 nm. If the clusters are spatially distributed in another physical medium, the entire system is known as a colloid.

Image courtesy of Nicola Graf
The experiment is based on a redox reaction of tetrachloraurate (also known as tetrachlorauric acid or tetrachlorauric (III) acid trihydrate), in which gold ions are reduced to atomic gold clusters. The reductant sodium citrate (also called trinatriumcitrate dihydrate) not only reduces the gold but also acts as a dispersion medium to stabilise the gold clusters that are created.
By adding the reductant, the atomic coagulation of the metal ions is halted and the result is a colloidal cluster enclosed by a ligand case.
Those colloids are detected by the Tyndall effect. This occurs when light is shone through a colloidal suspension: the light path can be seen in the liquid as visible light is scattered by suspended, microscopically small particles, the diameter of which is in the order of magnitude of the wavelength of visible light (400-800 nm). In contrast, when light is shone through a solution without colloids (e.g. ink), the light passes through without being scattered, so the light path is not visible.
Materials
- Auric chloride solution, HAuCl4 (0.1 g auric chloride in 20 ml H2O)
- Citrate solution, C6H5Na3O7 x 2 H2O (5.7 g in 0.5 l H2O, filtered)
- Distilled water
- Hotplate or immersion heater
- Something for stirring (spoon, stirrer or similar), ideally a heatable magnetic stirrer
- 1 fireproof glass beaker (50-100 ml)
- Thermometer (up to 100 °C)
- Laser pointer (optional)
Safety note:
Auric chloride is caustic and harmful if swallowed.
Procedure
- Add 0.5 ml (approx. 15 drops) auric chloride solution to 28 ml distilled water.
- Heat the solution to 100 °C on the stirrer or hot plate.
- Once the solution reaches 100 °C and starts to bubble, add 1.5 ml citrate solution as quickly as possible, stirring vigorously.
The initial red colour of the auric chloride solution intensifies until it becomes a deep red. At temperatures between 85 and 90 °C, it will take approximately 5 minutes until the colour changes; at 100 °C, the reaction is even faster.
Depending on the size of the particles formed, you may get a violet colour instead of red.
- The gold colloids can be detected through the Tyndall effect. Use the laser pointer to shine light sideways through the solution. The light path can be observed as it passes through the solution.
Additional experiments
For comparison, repeat the experiment with 0.5 ml auric chloride solution and 50 ml distilled water. Compare the time needed for the colour change to occur.
If you increase the citrate concentration in a further experiment, the colloids will have a deep violet colour, a result of colloids of a different size forming.
Further information
For further information, please contact NanoBioNet eV: www.nanobionet.de
Email: info@nanobionet.de
Tel: +49 (0)681 685 7364
Web References
- w1 – The German-language website for the Saarlab Initiative can be found here: www.saarlab.de
- w2 – The website for Ecsite, the European network of science centres, can be found here: www.ecsite.net
- w3 – The Nanotruck website (in German or English) can be found here: www.nanotruck.de
- w4 – For more information on nanoscience from the University of Cambridge, see: www.nanoscience.cam.ac.uk/schools
- w5 – For a list of useful links about nanotechnology for schools, see: www.nanoscience.cam.ac.uk/schools/links.html
- w6 – The NanoBioNet eV website can be found at: www.nanobionet.de
- w7 – For more information on the NanoSchoolBox, see: www.nanobionet.de/12105_11931.htm
- w8 – Ferrofluids may be ordered from FerroTec GmbH: www.ferrofluid.de
- w9 – For more information on Nano2Life, the first European Network of Excellence in nanobiotechnology, see: www.nano2life.org
Resources
- Capellas Espuny M (2003) Renaissance artists decorated pottery with nanoparticles. ESRF Newsletter 38: 4-5. www.esrf.eu/UsersAndScience/Publications/Newsletter
Review
In spite of being a popular buzzword, looked on favourably by European citizens (see Eurobarometer 2005 survey), nanotechnology means something more futuristic than real to most people, including students.
Matthias Mallmann’s article, starting from ancient stained-glass windows, addresses the topic in a friendly way. Beginning with the resources for teaching nanotechnology available in Europe, he then presents new didactical material (NanoSchoolBox) by means of some hands-on experiences that can be performed with it.
I recommend this article to upper secondary-school science teachers willing to introduce nanotechnology by linking it to real-life applications. The material is also suitable for students interested in deepening their understanding of the topic with the help of the quoted web resources.
The style and level of detail are suitable for non-native English speakers provided they have a scientific background. The examples and suggestions given make it possible to use the article for linking different science subjects (physics, chemistry, biology) or for widening the activity to aspects related to history or to active citizenship (the safety issues).
Giulia Realdon, Italy


