Supporting materials
Download
Download this article as a PDF

With flying colours: Try some simple but striking experiments to illustrate temporal additive colour mixing, and create and mix coloured shadows.
Generally, very little time is dedicated to the study of light and colour in secondary curriculums, so students lack basic knowledge of this branch of physics when they leave school.
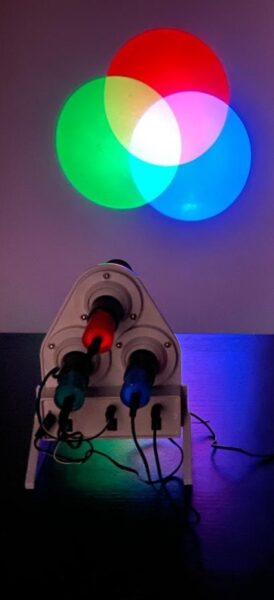
In the past, demonstrations of additive colour mixing relied on overhead projectors combined with red-, green-, and blue-coloured transparencies. Today, a more common approach is to use red, green, and blue light-emitting diode (LED) projectors. Here, we introduce other low-cost possibilities, for instance, coloured stickers. We also investigate coloured shadows by illuminating a white surface with three coloured lights and introducing an object in between.
These activities are suitable for students aged 11–16.
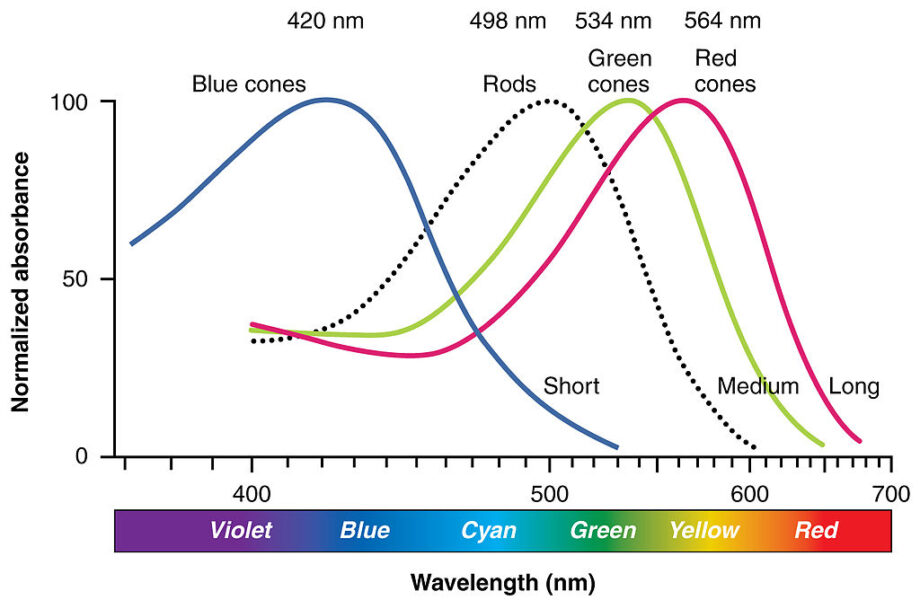
According to the theory of colour vision, developed by Thomas Young and Hermann von Helmholtzin the 19th century, we experience colour thanks to three different types of receptor cells (now known as cones) in our retina, each of which is most sensitive to red, green, or blue wavelengths of light. Young chose three principal colours because he found that he could produce any colour of the spectrum (as well as white) by a mixture of three overlapping lights set to appropriate intensities. He also found that this could be achieved with a range of wavelengths; this means there is a certain degree of arbitrariness to the definition of the three primary colours.[1]
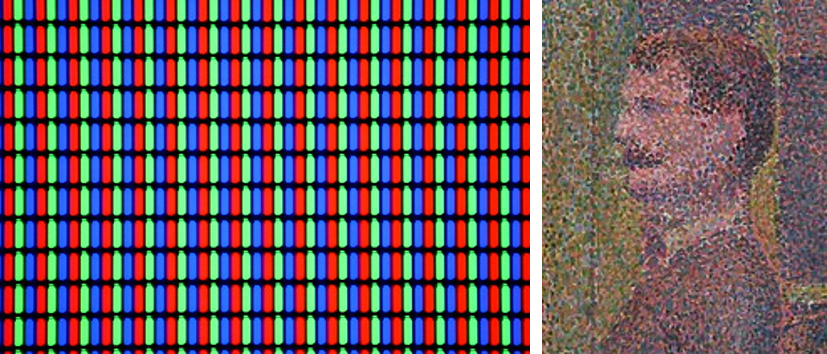
The Young–Helmholtz theory has led to the development of the so-called red, green, blue (RGB) model. The RGB model was applied in the first experiments of early colour photography, and it is used today to produce colour in computer, television, and mobile phone displays.
In additive colour mixing, combining the three primary colours, red, green, and blue, in equal proportions yields white, whereas mixing any two primary colours in equal proportions yields the so-called secondary colours: yellow, cyan, and magenta. When the additive mixture of two colours produces white, these colours are said to be complementary that is, cyan and red, magenta and green, and yellow and blue.
Additive mixing can be demonstrated in a straightforward manner by projecting different overlapping coloured lights onto a screen. We call this simple additive mixing. However, due to our eyes’ limited reaction time and spatial resolution, we also perceive colour mixing in other less-obvious circumstances:
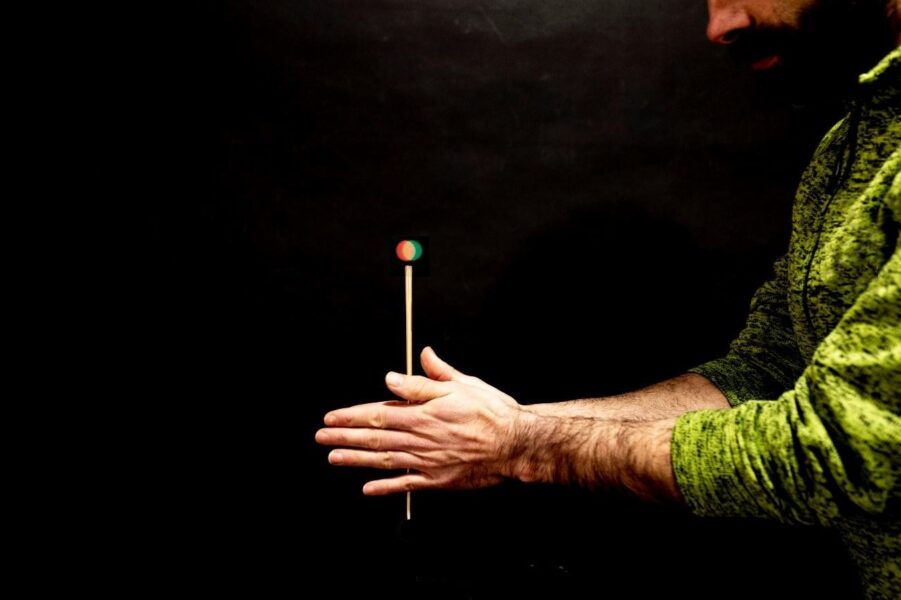
In 1826, John Ayrton Paris invented the thaumatrope, a toy consisting of a disc with an image on each side, which, when revolved rapidly using twisted strings, created the illusion that both images were superimposed. This device is also called a Faraday Wheel, after British physicist Michael Faraday, who later used it to investigate the phenomenon of retinal persistence.[2]
This first activity explores the temporal additive mixing of two primary colours using cardstock paper and a stick. Students will be able to see for themselves that additive colour mixing does not yield the colours expected from childhood experience of mixing paint or clay. They will also be able to observe the phenomenon of retinal persistence.
An alternative is to build a setup with a motor to spin the sticks; this is more helpful for whole-class discussions.[3, 4] See the supporting material for details of how to build the motor setup for an optional alternative activity. Another simple alternative to Activity 1 can be found in Ref. [5].
This activity takes approximately 20 minutes, not including making the cards.
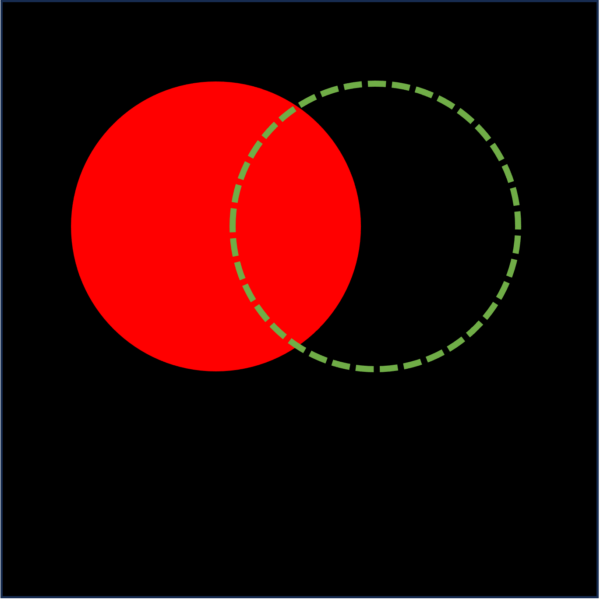
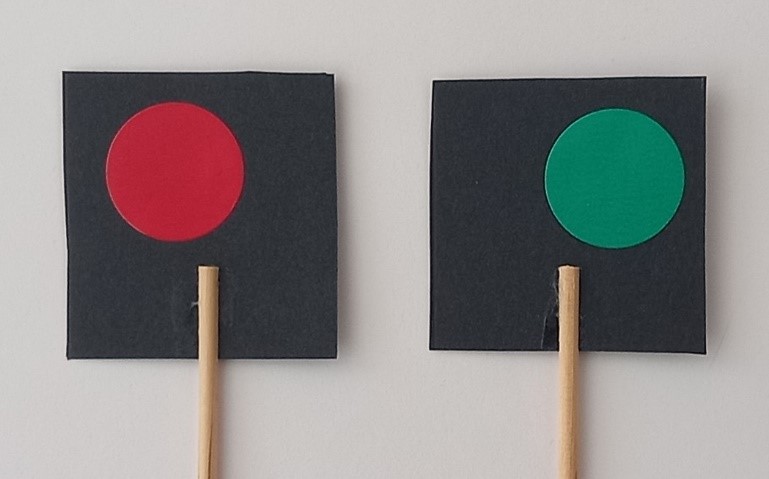
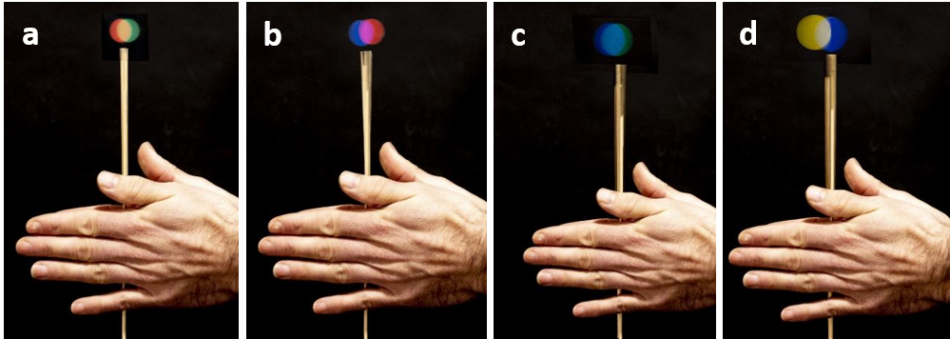
It is important for students to realize that in additive colour mixing we speak of mixing light of different colours. When mixing paints (i.e., pigments), it is subtractive colour mixing that occurs, that is, each of the mixed materials absorbs (subtracts) certain wavelengths of the incoming (white) light. Students are typically more familiar with subtractive colour mixing due to their experience of mixing different colours of paint or clay, so this point should be clearly made.
As holder and card rotate, we observe temporal additive mixing of the two colours on the card: red and green flash in quick succession, activating the cones sensitive to those two primary colours in our retina. When mixing two complementary colours, such as blue and yellow, we see white in the overlapping area. The light reflected from the yellow sticker activates the cones that are sensitive to red and green, whereas the light reflected from the blue sticker activates the cones sensitive to blue light.
This activity uses an LED ball that flashes red, green, and blue sequentially at a frequency high enough for it to appear white when at rest. As in Activity 1, the phenomena of additive colour mixing and retinal persistence are explored. The activity takes around 10 minutes.
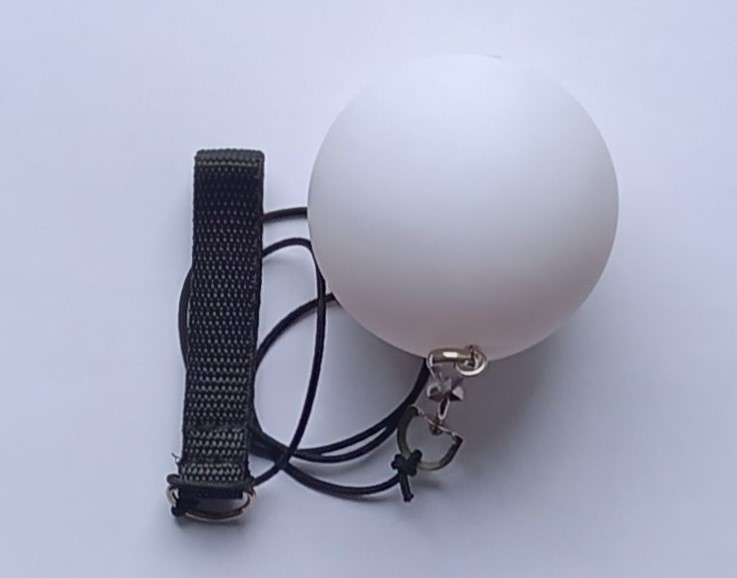
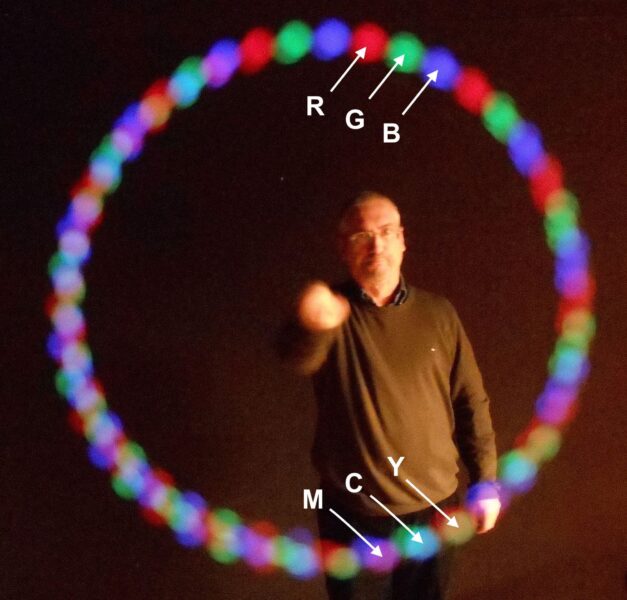
The LED ball contains three high-intensity LEDs (red, green, blue), which, when switched on, flash sequentially at high frequency. However, when the ball is at rest, we perceive a steady white light due retinal persistence. The ball is not quite white but has a pinkish glow, because the red LED is somewhat more intense than the green and blue LEDs.
When the ball is swung around on its tether, however, it is possible to observe all three colours individually, as the ball is in a different position each time the LEDs flash. If we reduce the speed of the ball, the red, green, and blue lights begin to overlap and we observe magenta, yellow, and cyan.
If we ask students what colour shadows are, most will respond that shadows are black. However, shadows may take different colours, as we see in this activity,[4] which takes around 20 minutes to complete.
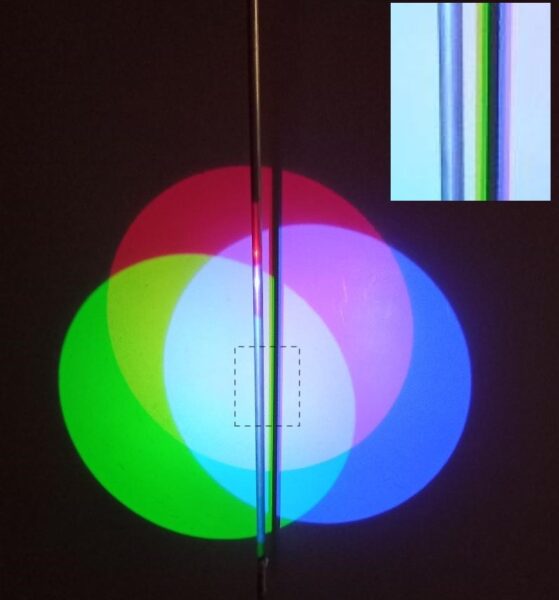
Due to the slightly different positions of each of the three LEDs, the rod generates three shadows. Each of these shadows forms as the object blocks one of the three lights. In each case, the shadow’s colour corresponds to the combined effect of the two lights that have not been blocked by the object.
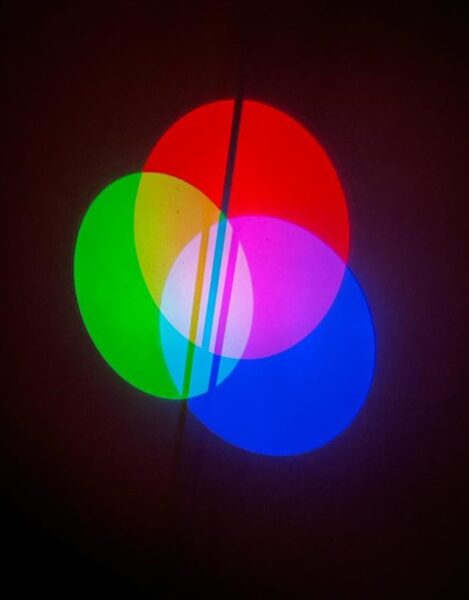
The yellow shadow forms where the rays coming from the blue light are blocked by the object. Because the light from the red and green LEDs does reach that region, the colours combine, giving the shadow a yellow colour.
In the same way, the magenta shadow forms where the green light is blocked by the object. The red and blue light in that region mixes, giving rise to a magenta shadow. Finally, in the region where the red light is blocked by the object, blue and green light mixes, giving rise to a cyan shadow.
If we bring the object closer to the screen, the shadows approach each other and eventually begin to overlap: the superposition of the yellow and cyan shadows produce green, as this corresponds to the blockage of both red and blue lights, while the superposition of the cyan and magenta shadows produces blue, as this corresponds to the blockage of both yellow and green light. The combination of all three shadows leads to the familiar black shadow.
This set of experiments can be easily performed in the classroom and helps students become familiar with the concepts of additive colour mixing and retinal persistence, as well as understand the origin of complementary colours and coloured shadows. The content touches on other curriculum topics encountered in physics (light), biology (vision), and art (colour mixing). Regarding the last of these, students will become aware of the difference between additive and subtractive colour mixtures, typically being more familiar with the latter from childhood experience with paints or clay.
[1] Gregory RL (1990) Eye and Brain: The Psychology of Seeing chapter 7. Princeton University Press, Princeton. ISBN: 0691048371
[2] Kuhn A, Westwell G (2012) A Dictionary of Film Studies 1st edition. Oxford University Press. ISBN: 9780199587261
[3] Caamaño Ros A et al. (2011) Física y Química. Investigación, Innovación y Buenas Prácticas pp 123–127. Grao. ISBN: 978-84-9980-081-3
[4] Presentation of the activity “Luz, color y óptica cromática”: https://www.youtube.com/watch?v=D7NpdJDP2ac
[5] Cortel A (2004) Simple experiments on perception of color using cardboard turbines. The Physics Teacher 42: 377. doi: 10.1119/1.1790349
Download this article as a PDF
Through the looking glass: unlock the secrets of anamorphosis, where art and science meet to create mind-bending illusions!
Have you ever seen a blue cow? A blue apple? Or a blue tree? Blue is rare in nature, so why are some plants and animals…
Take a CD and a cereal box, and what do you have? With a little help from Mark Tiele Westra, your very own spectrometer! Time to explore the delights…