


From the bottom of our hearts: a hands-on demonstration of the mammalian heartbeat Teach article
Using nothing but a pig’s heart, a knife and a supply of water, you and your students can investigate how the heart pumps.
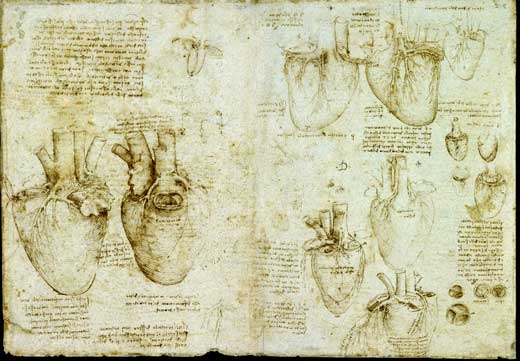
coronary vessels by Leonardo
da Vinci. Da Vinci’s drawings
and notes record both his
remarkable powers of
observation and his inability
to reconcile what he saw
with the traditional
understanding of the heart
at the time. Blood circulation
was not discovered for
another hundred years. Click
on image to enlarge.
Public domain image; image
source: Wikimedia Commons
Leonardo da Vinci was one of the first people to look carefully at the heart and describe what it did. His drawings of the heart and its valves are masterpieces of scientific art (figure 1), and he made remarkable observations about the way that blood flows through the vessels and chambers and activates the arterial valves.

heart, showing the structures
involved but explaining very
little about the function.
A: Right ventricle; B: left
ventricle; C: tricuspid valve
(atrioventricular); D: mitral
valve (atrioventricular),
E: aorti valve (arterial);
F: pulmonary valve (arterial);
G: aorta; H: pulmonary
artery; I: pulmonary vein; J:
superior vena cava;
K: inferior vena cava;
L: right atrium; M: left atrium.
Click on image to enlarge.
Image courtesy of Edmond Hui
Nevertheless, da Vinci never fully understood how the heart pumps, because he was unaware of the circulation of blood in the body. He could see the arteries and veins, but not the capillaries that connected them.
He was also hampered by the prevailing view at the time: that the heart moved blood to transport heat from the liver to the muscles, and that the function of the lungs was to cool the blood. So to da Vinci, the heart appeared to pump blood into vessels that branched into ever-smaller vessels – essentially dead ends. And where did the blood flowing into the heart come from? Without knowing this, he could not reconcile the large volumes that the heart could clearly pump with the fact that there was apparently nowhere for the pumped blood to go.
Today, the circulation of blood is well understood, but only a small proportion of people have actually witnessed the pumping action of the mammalian heart. Hearts are cryptic organs, hidden inside living animals; exposing the heart usually causes the animal to die. Even in open-heart surgery, the valves and the flow of blood are obscured by the opaque heart tissues. Modern medical imaging systems can produce spectacular displays of the heart in action, but these images are difficult for laypeople to interpret and impossible to create in schools. The biomechanical functioning of the heart is thus so obscure that in popular culture the organ is primarily thought of as a metaphor for emotion.
School biology lessons document the dual circuit of the vascular system and name the parts of the heart, but do not really explain how the blood is propelled, or why the heart is arranged as it is. Try searching the Internet for demonstrations of the heart and you will find thousands of diagrams and other teaching resources. However, we found none that actually showed the pumping action of a real mammalian heart.
Investigating the mammalian heart for ourselves
We wanted to discover for ourselves how the mammalian heart actually pumps. We started with the idea that we should be able to make the heart pump by squeezing it manually, much like a simple plastic hand pump.
We obtained an undamaged pig’s heart and tried manually compressing it under water. We also tried pumping it while attempting to run water into the atria from the tap; this was difficult as the atria were flaccid and had multiple openings. Neither approach seemed to work – no water was expelled from either the pulmonary artery or aorta.
After this failure, we re-examined both the heart and our initial understanding of its function, and began to dissect it. First, we completely removed both atria, which resemble floppy bags with holes in them. The remainder, literally the bottom of the heart, consists of a pair of open ventricles with the aorta and pulmonary artery rising between them. The system is visually and mechanically very simple – clearly just a pair of pumps. At first sight, there were no signs of the atrioventricular valves: they were hanging down like curtains, close to the walls of the ventricles.
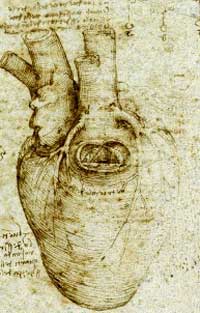
coronary vessels by Leonardo
da Vinci.
Public domain image; image
source: Wikimedia Common
To identify which ventricle was connected to which artery, we ran water into one of the ventricles from the tap. To our surprise, the atrioventricular valve immediately closed inwards towards the stream of water (figure 4). As da Vinci had described for the arterial valves, it was not pressure, contraction or compression that activated the atrioventricular valves, but the actual movement of the liquid. We found that by manually compressing the heart while water was flowing into the ventricles, we could close the atrioventricular valve completely and produce a dramatic spurt of water from the artery.
We realised that in our earlier attempt, the atria had been blocking the flow of water into the ventricles. Now, however, we had an unobstructed flow and were able to manually reproduce the pumping action of the heart. We could see not only how the contraction (or manual compression) of the ventricles moves the liquid, but also the precise action of the valves – something very seldom seen by anyone but a heart surgeon.
Initially, we had imagined that the atrioventricular valves had robust, hinged or elastic flaps (cusps) that responded to pressure differences. How wrong we were! Instead, the cusps are membranous and flaccid, like parachutes attached to the ventricular walls – billowing out when the flow of liquid inflates them, and prevented from turning inside out by ‘heartstrings’ (chordae tendineae) that work like parachute cords.
When the blood moves from the ventricle into the artery, another valve (the arterial valve) stops the high-pressure blood from leaking back into the ventricle. By trimming the aorta and pulmonary artery closer to the ventricles, we were able to observe these valves opening and closing as well.
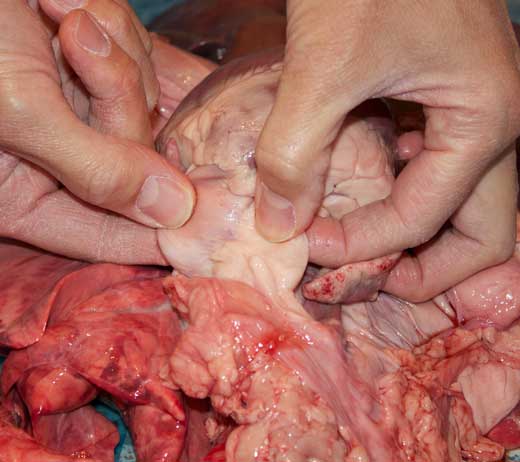
The pulmonary artery and
aorta can be manually
isolated from surrounding
tissues, ready to be cut.
Click on image to enlarge.
Image courtesy of Edmond Hui
On a personal level, we have been amazed. To sort through the internal organs of a pig, remove the heart and then discover all this intricate detail for ourselves has been a scientific adventure. We were also struck by the realisation that we had not properly understood the available resources, and that what had seemed to be a complex and obscure subject was in fact fully accessible to school-age students.
Demonstrating a beating heart in the classroom
We believe that this demonstration of the heart pumping mechanism is novel, yet it is easy to repeat in any school laboratory. After the activity, the students should have understood the functional anatomy of the heart, directly observed the motion and function of the four heart valves, and grasped the importance of flow to the motion of the valves.
The pumping mechanism alone can be demonstrated in just a few minutes. However, a full demonstration – with student participation and a discussion of the heart’s connections to surrounding organs and the circulatory system – can productively occupy two hours.
The activity is suitable for any age of secondary-school students (11+).
Materials
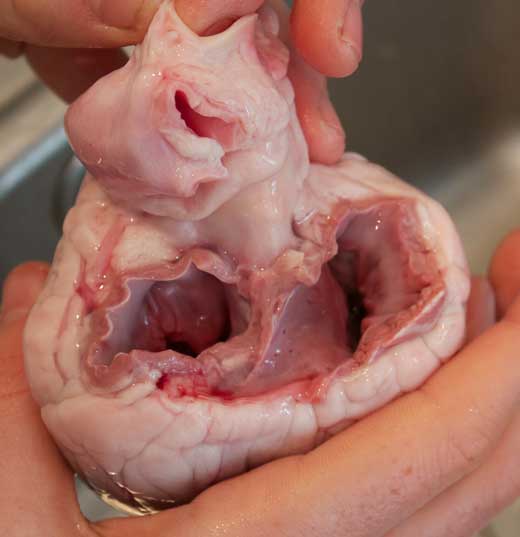
removed and the atrial walls
trimmed down to the tops of
the ventricles. The two holes
are the openings into the
ventricles. The heart is held
in the correct orientation for
the demonstration, with the
forefinger of the right hand
ready to compress the right
ventricle. Click on image to
enlarge.
Image courtesy of Edmond Hui
For each group, you will need:
- A pig or sheep heart. The heart fully attached to the liver and lungs is known in the UK as a ‘full pluck’, and can be requested from a good butcher or local abattoir.Alternatively, you can use pre-packed hearts from the supermarket. In this case, make sure you buy some spares, as they have normally been trimmed by cutting across the atria. The aorta and pulmonary artery may also have been cut very short but if the ventricles are undamaged, the demonstration will work.
- A sharp knife or scalpel
- Running water.
Procedure
Preparing a full pluck
- Remove the pericardium and separate the heart from the lungs by cutting the pulmonary artery and vein as far from the heart as possible (figure 2). The vena cavae and aorta will already have been cut when the organs were removed from the body cavity.
- Identify the light coloured and elastic-walled aorta and pulmonary artery; the dark vena cavae and the pulmonary vein; and the atria. Remove the atria, trimming their walls close to the tops of the ventricles (figure 3). Be careful not to damage the aorta and pulmonary artery, which rise from the centre of the heart. The heart is now ready for use.
Preparing a supermarket heart
- Trim any vestiges of the atria down to the ventricular wall.

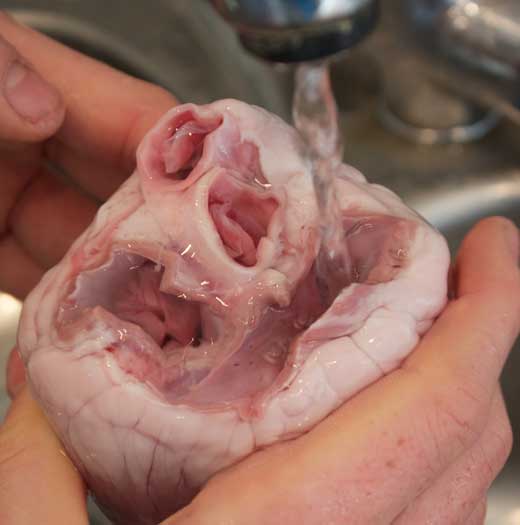
water enters the right
ventricle, the tricuspid valve
closes inwards. The stream
of water is flowing into the
centre of the right ventricle.
The tricuspid valve has
closed inwards against the
incoming stream. The left
hand is supporting the aorta.
Click on image to enlarge.
Image courtesy of Edmond Hui
Performing the demonstration
Identify the left and right ventricles; the demonstration works better on the thinner-walled right ventricle. Turn on the tap so that a smooth, continuous stream of water is flowing. Hold the heart so that the stream enters the centre of the opening of the right ventricle. The tricuspid valve should close inwards to touch the incoming stream of water (figure 4).
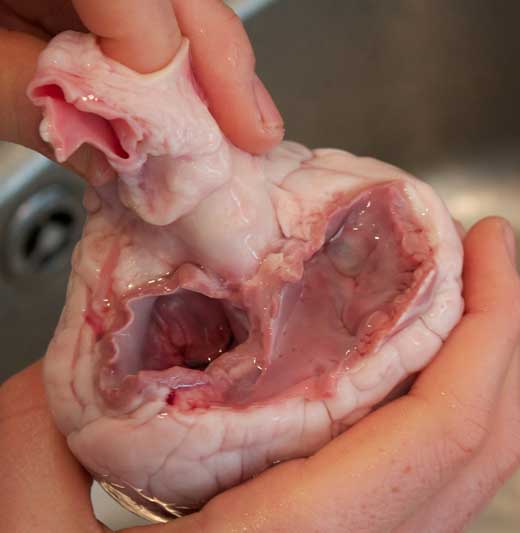
Image courtesy of Edmond Hui
If you now compress the heart, the valve will close completely and water should be expelled from the pulmonary artery (figure 5). Squeeze rhythmically to mimic the action of a beating heartw1. If you trim the aorta and pulmonary artery close enough to the heart, you should be able to see the arterial valves (figure 6).

Click on image to enlarge.
Image courtesy of Edmond Hui
Further investigations
aorta and pulmonary artery
close enough to the heart,
you should be able to see the
arterial valves. Click on
image to enlarge.
Image courtesy of Edmond Hui
- Attach surgical tubing to the outflow vessels, then measure the water pressures achieved when you compress the heart.
- Challenge your students to prove that the heart is a pair of independently functioning pumps by dissecting away an entire ventricle. Using a second heart, repeat the exercise using the other ventricle. These isolated ventricles should function when manually compressed.
- In live animals, the two ventricles contract simultaneously, propelling blood first through one ventricle and eventually through the other. Despite their markedly different morphology, therefore, over time, the two ventricles must average precisely the same volume of blood per beat. How is this equilibrium achieved? Given their observation that the thinner-walled right ventricle is easier to compress manually than the left ventricle, the students should consider the implications for cardiopulmonary resuscitation, which is essentially this demonstration performed with the heart in situ.
- This demonstration is only possible once the atria have been removed. Ask your students to research the function of the atria.
Acknowledgements
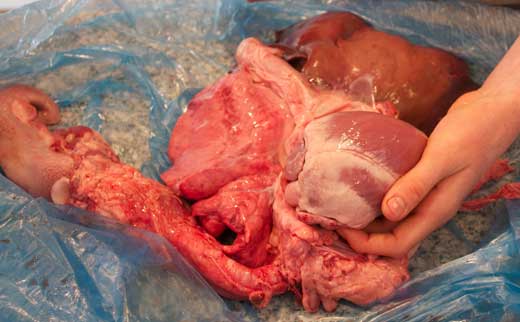
Archie Taplin holds a pig’s
heart, having just removed
the pericardium. The liver can
be seen at the top of the
picture, the lungs are on the
left, and the trachea extends
to the tongue on the far left.
Click on image to enlarge.
Image courtesy of Edmond Hui
We are grateful to the TED organisation and Teddington School, without which neither of us would have made these observations. Laverstoke Park Farm supplied the full plucks with great care and attention. A number of heart experts generously answered our basic questions on heart anatomy and function, including Dr Andrew Ho (Evelina Children’s Hospital, London); Professor David Firmin (Imperial College, London); Dr Gary Ruiz (King’s College Hospital, London); Professor David Celermajer (University of Sydney); Dr Louise Robson (University of Sheffield) and Martin Clayton (The Royal Collection, Windsor Castle). Nonetheless, any errors and omissions in this paper are entirely our own.
Web References
- w1 – A video of the demonstration is available on Youtube.
- w2 – Archie Taplin’s talk for the school’s TEDxTeddington conference was the inspiration for the authors’ investigation of the heart’s anatomy and function.
- w3 – In the ‘Leonardo da Vinci: Anatomy’ app for the Ipad, Martin Clayton, curator at Windsor Castle, tells the story behind Leonardo da Vinci’s life-long ambition and reveals the mind of a scientist who was centuries ahead of his time.
Resources
- The following scientific papers about heart anatomy are remarkably accessible and were helpful in the preparation of this paper:
- Ho SY (2002) Anatomy of the mitral valve. Heart 88(suppl. 4): iv5–iv10. doi: 10.1136/heart.88.suppl_4.iv5
- Ho SY, Nihoyannopoulos P (2006) Anatomy, echocardiography, and normal right ventricular dimensions. Heart 92(suppl. 1): i2–13. doi: 10.1136/hrt.2005.077875
Review
The article shows how important curiosity can be: in this case, the desire to better understand the physiology of the mammalian heart led to the discovery of a simple but effective strategy to study how blood is pumped.
Although novel, the strategy is so simple that it could be used with students of almost any age. With younger students (ages 11-14), the teacher should demonstrate the activity; older students (ages 15-19) should be able to work autonomously in groups.
The authors also suggest some further investigations, which would extend the educational value of the activity and create interdisciplinary opportunities involving mathematics. Furthermore, the historical information in the introduction would be an excellent starting point for discussions with older students about the history of science and the relationship between science and technology.
Betina Lopes, Portugal