Further fantastic feats: falling and bouncing Teach article
Roll up, roll up! We bring you some more fantastic feats to challenge and entertain – and to showcase some physics, too.

In a previous article, I presented some intriguing tricks to try at home or in the classroom (Featonby, 2016). All the tricks – even familiar ones, such as the tablecloth-snatch trick – were based on the principles of Newtonian mechanics, as the solutions revealed.
Here, I present another selection of challenges that you’ll be able to solve by applying some simple physics principles, as revealed in the solutions below.
Feat 1: Tunnel ball
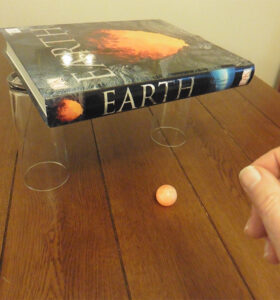
formed by a book and two
glasses
David Featonby
The challenge here – to make a ball bounce through a tunnel – may seem easy, but it’s more difficult than it appears at first.
Materials
- One high-bounce rubber ball
- One heavy, large-format hardback book
- Two tall drinking glasses (or other similar-sized supports for the book)
- A table or other level surface
Procedure
Make a tunnel with the book lying across the drinking glasses (or other supports), as shown in figure 1.
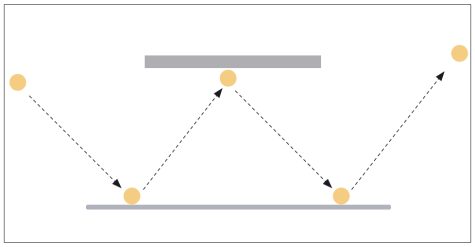
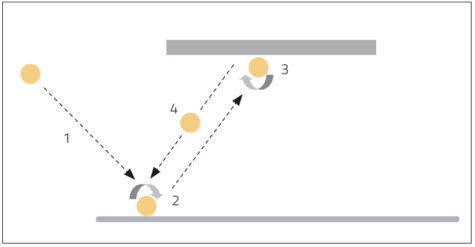
The challenge is to try to make the ball bounce in the following way, forming a W-shaped path (figure 2):
- First bounce: in front of the tunnel
- Second bounce: on the underside of the tunnel (book)
- Third bounce: outside the tunnel
David Featonby/Nicola Graf
It comes as a surprise to most people that the ball does not follow a W-shaped path, but usually returns to the sender as if it has struck a reflecting wall in the tunnel.
So how can you make the ball pass through the tunnel as required? And can you explain what’s going on?
This feat can be performed using different-sized tunnels – for example, a table with a flat underside (with the floor as the lower surface).
Feat 2: Cork bounce
Here, the trick is quite easy to do; the challenge is to explain why it works.
Materials
- One standard wine-bottle cork, preferably made from real cork
- A table or other level surface
Procedure
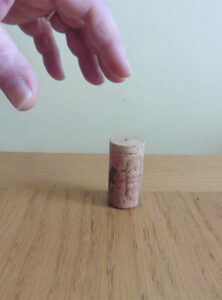
- Hold the cork about 10 cm above the table.
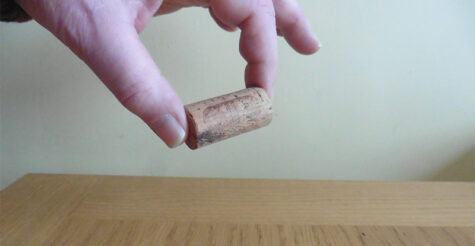
- Try to drop the cork so that it lands standing on one end (figure 3). How should you hold the cork before you drop it to achieve this result? And can you explain why?
David Featonby

David Featonby
Once you’ve mastered this feat and worked out how best to drop the cork to make it bounce upright, you can try it with other cylindrical objects – such as the cardboard inner tube of a toilet roll, or any slightly flexible tube.
In fact, this challenge is easier with the toilet roll tube than with the cork. And there are plenty more tube-shaped items you can try this with: all the objects shown in figure 4 were successfully bounced into a vertical standing position.
not as simple as it seems.
David Featonby
Feat 3: Card drop
The aim of this challenge is to find a reliable way to drop a playing card into a hat, from a height of about 1.5 m.
Materials
- Some standard-sized playing cards
- A hat with a crown that keeps its shape when placed upside down, or a similar-sized bowl, box or other open container
- A table or other level surface
Procedure
- Place the hat upside down on the table.
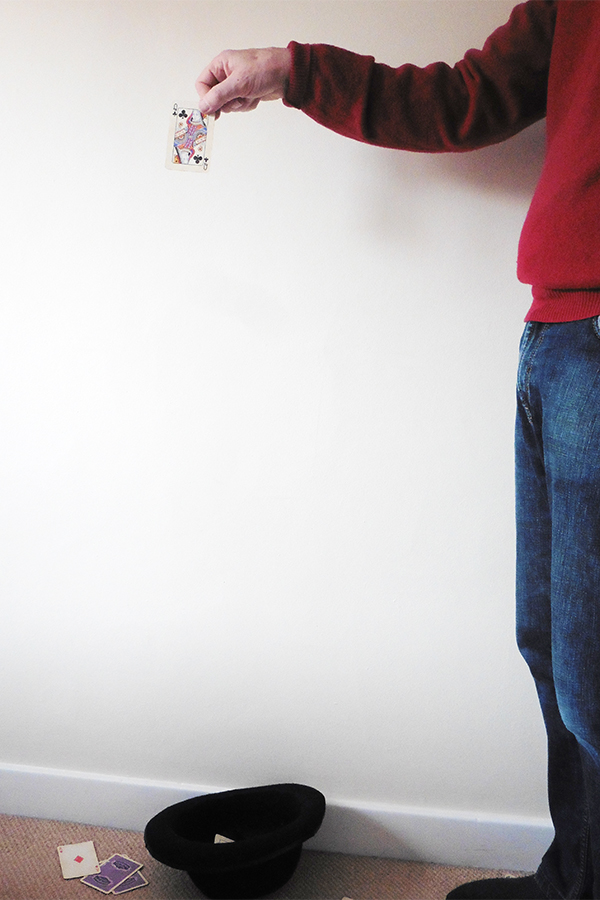
- Take a card and hold it about 1.5 m above the hat (figure 5).
Try to drop the card so that it lands inside the hat. How should you hold the card before you drop it to achieve this result? And can you explain why?
Solutions
Feat 1: Tunnel ball
The reason that the ball usually bounces back towards the thrower, rather than continuing forward, is explained by one word: spin.
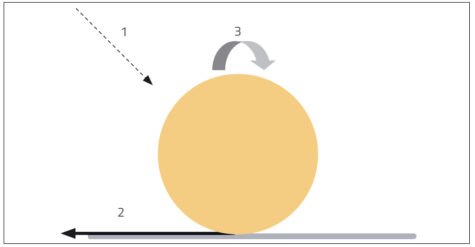
The spin can be seen most easily using a ball with markings on it, such as a basketball. If you throw a basketball at an angle to the ground, after bouncing it immediately starts to spin. This is due to friction between the ball and the ground (see figure 1).
David Featonby/Nicola Graf
In the challenge, friction between the ball and the table gives the ball a forward spin at the first bounce, in the same direction in which the ball is travelling. So when the ball hits the tunnel roof, it has a backwards spin relative to the underside of the roof (figure 2) because the top part of a spinning ball must be turning in the opposite direction to the bottom part.
This backspin causes the ball to return along its original path, back towards the thrower. So, how can you overcome this spin and make the ball pass through the tunnel as intended?
David Featonby/Nicola Graf
For the ball to follow a W-shaped path through the tunnel, it must strike the table (and then the roof of the tunnel) without spin. The spin is caused by the friction at the point of contact, because friction opposes the motion between two surfaces in contact – so one side of the ball is slowed down, but not the other.
To minimise the spin, the friction also needs to be minimised. The easiest way to do this is to change the surface of the ball. If the ball is immersed in water for a second, its wet surface will then skid over the table and upper surface of the tunnel without spin, and the ball will follow a W-shaped path through the tunnel, as most people initially expect (figure 3).

David Featonby/Nicola Graf
A challenging extension of this feat is to work out the direction and size of the spin at different stages of the ball’s motion. Taking a film of a large, patterned ball (such as a basketball) and watching it in slow motion is a good way to make this easier.
Feat 2: Cork bounce
The secret here is in how you hold the cork (or other cylinder) before you drop it.
- Hold the cork horizontally but at a very slight angle (it’s almost impossible not to do so), and at a height above the table of about 1.5 times the length of the cork (figure 4).
- Drop the cork. It should bounce and finish up standing on its end – at least 50% of the time.
- Keep practicing to find the best height for your cork and table.
The basic explanation is that when the cork falls, one of its ends will strike the table before the rest of the cork. This results in a force applied to only one end of the cork, producing a turning effect. This makes the cork rotate enough to stand on its end.
David Featonby
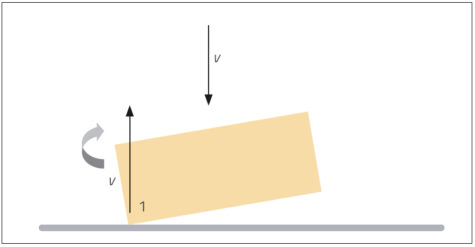
However, videoing the fall and watching it in slow motion has revealed a more complex sequence than described above, as the diagrams here illustrate.
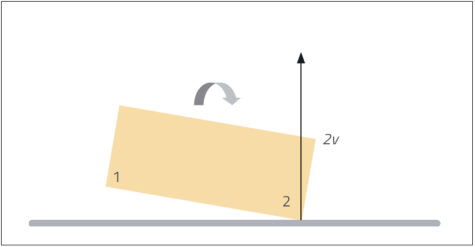
The cork is falling at speed v when the first end hits the table. Assuming this is an elastic collision, this end bounces back upwards at speed v (see figure 5).
David Featonby/Nicola Graf
This change in momentum at one end of the cork causes it to rotate about its centre of gravity, here as a clockwise movement. This rotation makes the opposite end (end 2) of the cork move at the same speed about its centre. But for end 2, the movement due to rotation will be in the same direction as its fall. So when end 2 of the cork hits the table, it is moving at speed 2v (v from its fall plus v from the rotation), and will also rebound at speed 2v (see figure 6).
David Featonby/Nicola Graf
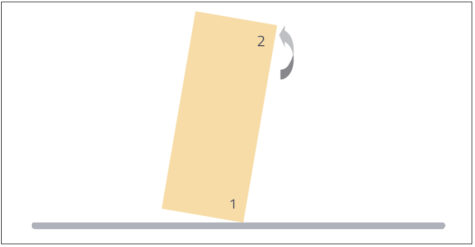
The rebound momentum of 2v makes the cork rotate in the opposite direction (here anticlockwise), so that it rotates to a vertical position (see figure 7).
David Featonby/Nicola Graf
Finding the best height for the drop and getting the cork to stand upright is very much a trial-by-experiment process. There are many factors involved that will vary significantly from cork to cork, and between different surfaces.
horizontally before dropping it
David Featonby
All the other tubes can be made to stand on end in the same way. The ease with which this happens varies considerably – and the cork is probably the most difficult. What else could you bounce into a vertical position by producing a turning force?
Feat 3: Card drop
When trying this challenge, most people will hold the card vertically before dropping it. From this position the card will invariably move sideways during its fall, and it will usually miss the hat – even if dropped from directly above it.
This sideways shift is due to pressure from air movements caused by the falling card itself. Even though they are very slight, these movements will produce enough force on the side of the card to move it sideways, away from the hat.
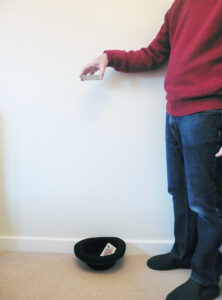
The trick is to hold the card horizontally, as shown in figure 8. In this position, the area of the card that is exposed to sideways air movements is much smaller – just the edge of the card. This means there is much less chance of a significant sideways force, so the card’s fall is almost vertical – directly into the hat below.
For even greater theatrical effect, try performing this feat with banknotes.
References
- Featonby D (2017) Fantastic Feats. Science in School 39: 45–47.
Resources
- For a more detailed analysis of dropping cards from greater heights, read the explanation on the Naked Scientists website.
Review
This article describes some simple but enjoyable experiments that illustrate important principles of mechanics and dynamics. It shows how bouncing balls or cylindrical objects move, depending on their spin or applied forces, and how this movement depends on friction and other factors. These experiments are simple to perform, and show interesting effects.
The article could also be used as a comprehension exercise. Questions could include:
- How does spin affect the movement of a ball?
- Does spin depend on the type of surface?
- How do spin and friction depend on each other?
- What applications are connected to the experiments described in the article?
Gerd Vogt, physics and technology teacher, Higher Secondary School for Environment and Economics (Yspertal), Austria


