
Supporting materials
Download
Download this article as a PDF


Lactase tablets for managing lactose intolerance can be used in the classroom to explore the biochemistry of sugars and the properties of enzymes.
Lactose intolerance is a common phenomenon,[1] based on the absence or insufficient production of the digestive enzyme β-galactosidase (lactase).[2] Affected people are unable to break down the disaccharide lactose (figure 1, top) into its monosaccharide subunits, glucose (Glc) and galactose, and they may suffer from diarrhoea and flatulence[3] after eating lactose-containing foods. In response, a growing market for lactose-free foods has emerged. Alternatively, affected individuals may choose to take lactase in tablet form to help them digest lactose-containing foods. In milk alternatives, such as oat milk, the sugar maltose (figure 1, bottom) can be found. The minor structural differences between lactose and maltose are the spatial position of a single hydroxy group and the type of glycosidic bond between the monosaccharide units (figure 1, red highlights).

Here, we present activities addressing the curricular topics enzymology and sugars using scientific methods that are suitable for students aged 14–18 years. Students investigate the activity of lactose tablets on two structurally closely related sugars, lactose and maltose, in solution as well as in whole milk and oat milk. These experiments demonstrate that the enzyme lactase is specific to the substrate lactose, while maltose cannot be broken down. Additional experiments address why lactase-intolerant individuals should not take lactase tablets on an empty stomach, thus revealing the pH dependence of enzymes. In addition, students can investigate the effect of temperature on enzymes and why these drugs must be protected from heat, thereby exploring the impact of enzymes, or lack thereof, on everyday life.
The Fearon test[4] is used to detect sugars throughout the experiments since it enables easy, safe, and colourful differentiation of sugars.[5]
In this preparatory activity, students are introduced to sugar detection using Fearon’s reagent on various sugar solutions as well as whole milk and oat milk.
The reduction of 1,4-linked disaccharides, such as maltose, lactose, and cellobiose, can be detected with Fearon’s reagent through the formation of a bright-red dye. In contrast, monosaccharides, such as glucose, will produce a yellow dye, while β-1,2-linked disaccharides, such as sucrose, will not lead to a colour change. The mechanism of dye formation with Fearon’s reagent is not fully explained, to date; however, there are well-founded hypotheses supported by a growing body of empirical evidence.[7]
This activity takes about 15 minutes.
Equipment per group:
Chemicals:
Observations:
Test tubes 1 (Lac), 2 (Mal), 5 (whole), and 6 (oat) are red in colour.
Test tube 3 (Glc) is yellow in colour.
Test tube 4 does not appear to change colour.

Interpretation: Experimental results show that 1,4-linked disaccharides (lactose, maltose) can be detected using Fearon’s reagent by a red colour. One or both of these sugars are present in both whole and oat milk. In addition, glucose (and other reducing monosaccharides) can be detected in solution by the formation of a yellow dye.
The Fearon test is used as a tool to investigate the activity and substrate specificity of the enzyme lactase, which is taken in tablet form as a food supplement by lactose-intolerant individuals. Specifically, in this activity, we explore the effects of lactase on two structurally related sugars, lactose and maltose (figure 1), as well as on whole milk and oat milk.
This activity takes about 20 minutes.
Equipment per group:
Chemicals:
Note: It is important to use tap water and not distilled water to prepare enzyme solutions, as it contains certain ion species, for example, calcium, which can act as an enzyme cofactor.
Observations: In test tubes 1 (Lac) and 3 (whole milk), a yellow colour appears during incubation in the water bath following the addition of Fearon’s reagent, while a red dye forms in test tubes 2 (Mal) and 4 (oat milk; figure 3, compare top and bottom images).

Interpretation: The absence of red dye in test tubes 1 (lactose) and 3 (whole milk) indicates the disappearance of 1,4-linked disaccharides from these liquids, while the appearance of a yellow dye points to the presence of glucose, a known product of lactose breakdown (figure 1, top). These results demonstrate the successful breakdown of milk sugar (lactose) to glucose and galactose by lactase.
In contrast, a red dye still forms in test tubes 2 (Maltose) and 4 (oat milk) following lactase treatment. This indicates that maltose cannot be digested by lactase, thus demonstrating the substrate specificity of this enzyme and that oat milk contains maltose, or a different 1,4-linked disaccharide, that cannot be digested by lactase.
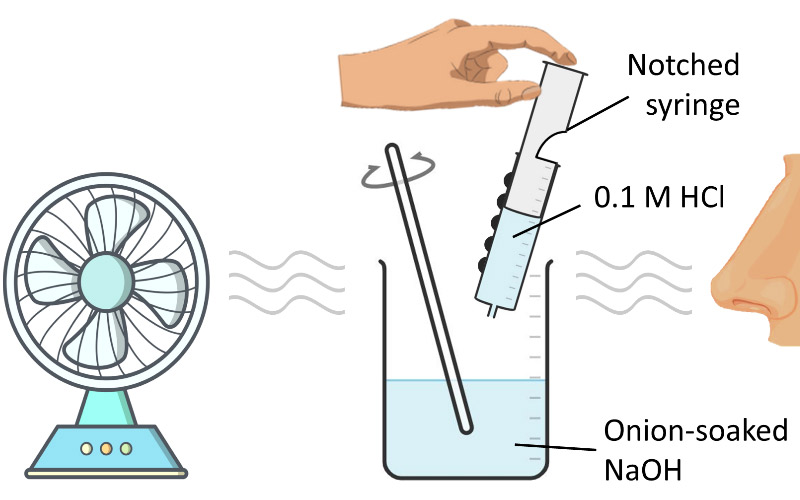
Instructions on the packaging of lactase tablets typically warn against taking the drugs on an empty stomach. In this activity, we scrutinize this disclaimer experimentally. Lactase ingested in tablet form has to pass through the human stomach, an acidic environment that contains hydrochloric acid at differing concentrations, depending on the filling level. Therefore, we simulate the exposure of lactase to ‘gastric acid’ in an empty stomach through preincubation in hydrochloric acid and assess its digestive performance following this treatment.
This activity takes about 25 minutes.
Equipment per group:
Chemicals:
Notes
Observation: Unlike in a previous experiment (Activity 2) without preincubation with hydrochloric acid, the formation of a red dye is observed in all four assays (figure 4). These results are identical to those obtained for the Fearon tests on lactose, maltose, whole milk, and oat milk without prior lactase digestion (figure 2, bottom).

Interpretation: Enzyme activity is highly dependent on the environmental pH value. By dissolving the lactase tablet in 0.1 M hydrochloric acid, we simulate the ingestion of lactase tablets on an empty stomach. The persistence of red-dye formation using Fearon’s reagent and the absence of yellow-dye formation – indicating glucose formation as a result of lactose breakdown (as observed during a previous experiment without acid pretreatment; figure 3) – demonstrate the loss of lactase activity under low-pH conditions like those in an empty human stomach. This can be explained by changes to the 3D structure of the enzyme through acid denaturation.
Instructions on the packaging of lactase tablets typically also warn against exposing the drugs to heat, for example, taking them with hot drinks. As an optional extension activity, you can explore the influence of heat on enzyme activity. Details are given in the supporting material.
[1] European Food Safety Authority (EFSA) (2009) Scientific opinion on the substantiation of health claims related to lactase enzyme and breaking down lactose (ID 1697, 1818) pursuant to Article 13(1) of Regulation (EC) No 1924/20061. EFSA Journal 7: 1236–1249. doi: 10.2903/j.efsa.2009.1236
[2] Swallow DM (2003) Genetics of lactase persistence and lactose intolerance. Annual Review of Genetics 37: 197–219. doi: 10.1146/annurev.genet.37.110801.143820
[3] Ingram CJE et al. (2009) Lactose digestion and the evolutionary genetics of lactase persistence. Human genetics 124: 579–591. doi:10.1007/s00439-008-0593-6
[4] Fearon WR (1942) The detection of lactose and maltose by means of methylamine. The Analyst 67: 130–132. doi: 10.1039/an9426700130
[5] Ruppersberg K et al. (2020) How to visualize the different lactose content of dairy products by Fearon’s test and Woehlk test in classroom experiments and a new approach to the mechanisms and formulae of the mysterious red dyes. Chemistry Teacher International 2: 1–11. doi: 10.1515/cti-2019-0008
[6] Ruppersberg K, Rautenstrauch H (2023) Zucker unterscheiden: Herstellung und Anwendung von Fearon’s Reagenz. Unterricht Chemie 193: 49–50.
[7] Ruppersberg KM, Kussler M (2023) Über die rote Farbe bei Zuckernachweisen. Nachrichten aus der Chemie 71: 68–73. doi: 10.1002/nadc.20234133798
The article exhibits a high degree of rigor, both in its experimental design and in the presentation of results. The methodology appears sound, and the data analysis is robust. This activity can serve as an excellent illustration of the crucial role of chemistry in understanding biological phenomena. By showcasing how a sound understanding of chemistry is integral to the study of biology, it reinforces the importance of a strong foundation in mathematics, physics, and chemistry for students pursuing careers or further studies in the life sciences.
Antonio Pedro Fonseca
Science Teacher/Microbiology Professor (invited)
Download this article as a PDF

Learn about a variety of biochemical aspects of honey through a series of simple experiments using the sugary product of bees.


How can AI systems like those developed to beat humans at games help unlock the secrets of protein…


Discover simple adaptations to apparatus and experiments that make practical chemistry more accessible to students with vision impairment.