My favourite experiments – connecting teachers and ideas Teach article
All teachers have at least one favourite experiment that they are eager to share. Read on to learn more about monthly experiment sharing sessions and discover some low-cost physics experiments to try out in your own classroom.
Science is universal, but how we teach it varies greatly from one place to another. All teachers have at least one favourite experiment that they particularly love to share, and new ideas are always being created, evolved, and shared by amazing teachers around Europe and beyond. However, some ideas can be slow to cross barriers, whether they be geographic, cultural, linguistic, or curricular. With ‘My Favourite Experiments’, Michael Gregory has made it his goal to facilitate the spread of good ideas between teachers. Since 2017, he has cycled through over 30 countries (including all 25 mainland EU states) asking educators the question “What’s your FAVOURITE EXPERIMENT?” and sharing their answers on his YouTube channel.
He also runs monthly online experiment sharing meetings for teachers, and some physics examples from a recent session are featured in this article.
The online experiment sharing sessions

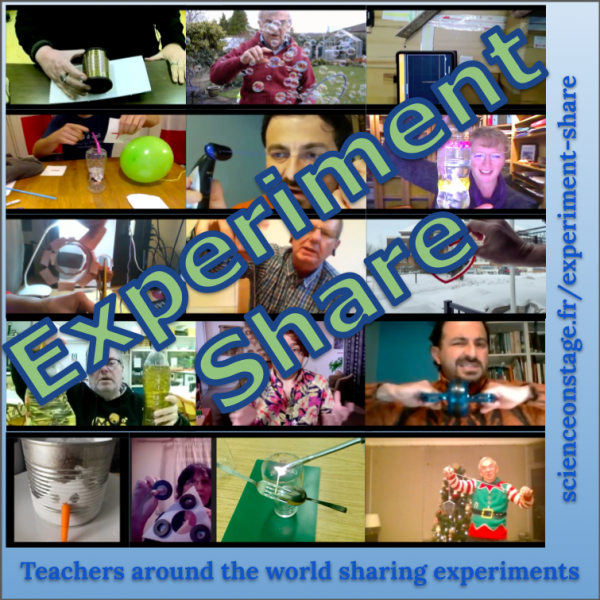
The online ‘experiment shares’ are monthly meetings online for teachers to share their favourite experiments.[1] Experiments have been shared by teachers from Canada, Greece, Italy, Romania, Serbia, Germany, Ireland, UK, Brasil, USA, France, Portugal, Bulgaria, Albania, and Croatia, and the list continues to grow!
Most months feature eight to ten experiments from around the world, and cover topics ranging from primary school science to advanced physics topics, with most being appropriate for a wide range of ages, usually upper primary to lower secondary (approx. 10-16 years old).
The goal is for teachers to share experiments with each other, so everyone is encouraged to prepare a short demo of one of their current favourite experiments. Teachers who are not yet ready to share experiments of their own are also very welcome to come along to watch, but active participation is encouraged.
For more information, including dates of upcoming events, please see https://www.scienceonstage.fr/experiment-share/.
To give you a taste of what to expect in these monthly experiment sharing sessions, we’re sharing a small sample of highlights from a recent meeting in this article. Using simple and inexpensive materials, these experiments can show some surprising phenomena. The entry barrier should be low enough that you can try them out immediately in your own classroom, either as a quick demo to pique the interest of younger students or in greater detail to teach more advanced physics topics. This selection features physics experiments; however, the monthly meetings also include biology, chemistry, geology, and general science.
Activity 1: Pythagoras’ cup – Panagiotis (Takis) Lazos, Athens, Greece
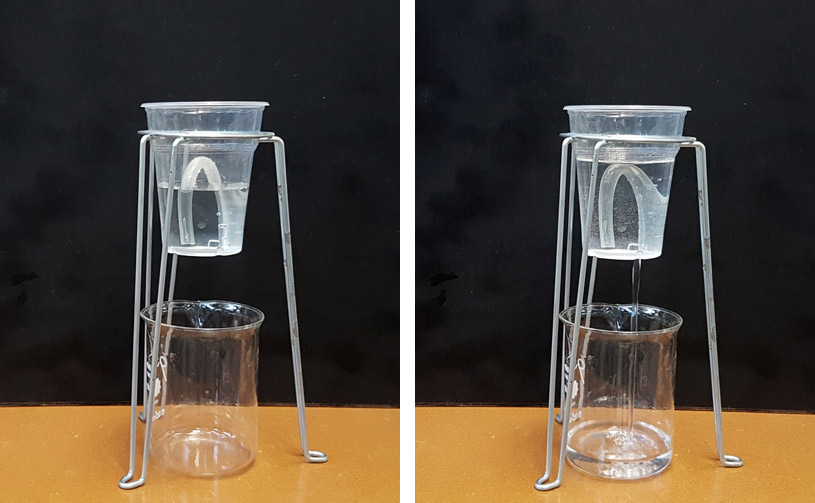
A Pythagoras’ cup, also known as a Tantalus cup or a greedy cup, is a cup that contains a syphon, which will automatically drain the contents of the cup if it is filled beyond a certain point. This is a fun demonstration of pressure in communicating vessels (tube and cup) and the syphon principle.[2] It can be constructed in roughly 20–30 minutes, and demonstrated in less than 5 minutes.
Curricular connections:
- primary – inquiry/observation (questioning “why does the cup empty”, “what do you see”, “what do you infer”, etc.)
- middle/secondary school – pressure, syphon principle, engineering, and construction (students can make, evaluate, and improve their own designs)

Image courtesy of Panagiotis (Takis) Lazos
Materials
- A transparent plastic cup or bottle
- A length of flexible plastic tube (around 25 cm)
- Hot glue
Procedure
- Pierce a hole in or near the bottom of the cup.
- Glue one end of the plastic tube, so it can drain through the hole, and seal the connection with glue as necessary, so the cup doesn’t leak.
- Bend the tube such that the other end is inside the cup near the bottom. The top of the bend should be lower than the top of the cup, and the height of the bend will determine the maximum fill level.
- The cup should hold water (without leaking) when filled to a height lower than the bend in the tubing, but, when this level is exceeded, the water in the tube will create a syphon, which will drain the entire contents of the cup.
Discussion
Pythagoras’ cups made of clay and other materials are often sold as souvenirs in Greece, Cyprus, and the Eastern Mediterranean. Made from opaque materials, it is impossible to see inside, and it is often difficult for students to understand the relatively simple principles at play. By making their own transparent versions in the lab, they can gain a more intuitive understanding of pressure in fluids.
Activity 2: The simplest motor in the world – Gordana Varnica, Požega, Serbia
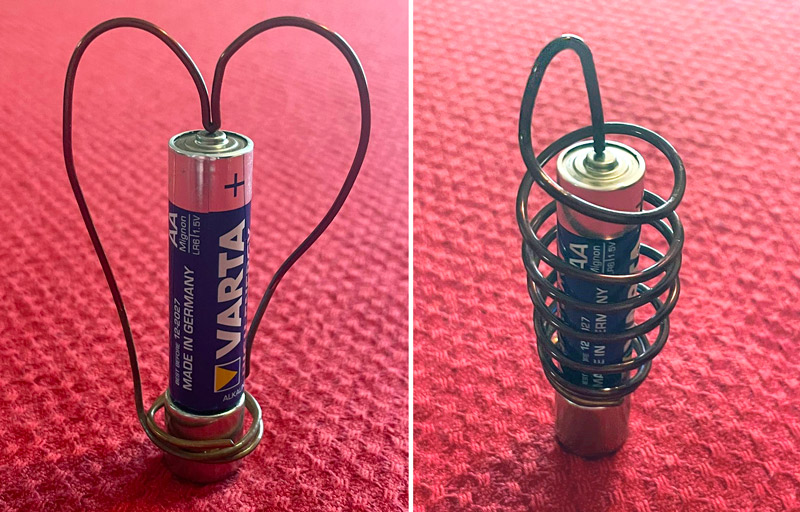
This simple homopolar motor is a fun and easy demonstration of the Lorentz force – a current-carrying wire in a magnetic field will experience a force perpendicular to both the flow of current and the magnetic field.[3] This can be set up in minutes, or can be used for longer discussions on electromotive force, with students being asked to consider the direction of the magnetic field and current to predict the direction of force.
You can watch the recording of the meeting and a video of the experiment.
Curricular connections:
- primary/middle school – creating a simple circuit and the conversion of electrical to kinetic energy
- secondary school – electromagnetic induction, Lenz law, and an introduction to electric motors and dynamos

Image courtesy of Gordana Varnica
Materials
- Neodymium battery – round/coin size or smaller
- Battery (AA, AAA, or similar)
- Copper wire
Procedure
- Stand the battery on the magnet
- Bend the wire so that it can sit with one end on the top of the battery and the other end completing a circuit through the magnet to the bottom of the battery.
- The wire should experience an electromotive force due to the electric current flowing through a magnetic field. With some care, it should be possible to bend/place the wire in such a way that it will spin around the battery continuously.
Discussion
Simple homopolar motors like this were one of the first demonstrations of electromagnetism two centuries ago, and they still manage to fascinate generations of young scientists today!
Activity 3: Beer-bottle thermometer – Michael Gregory, Paris, France
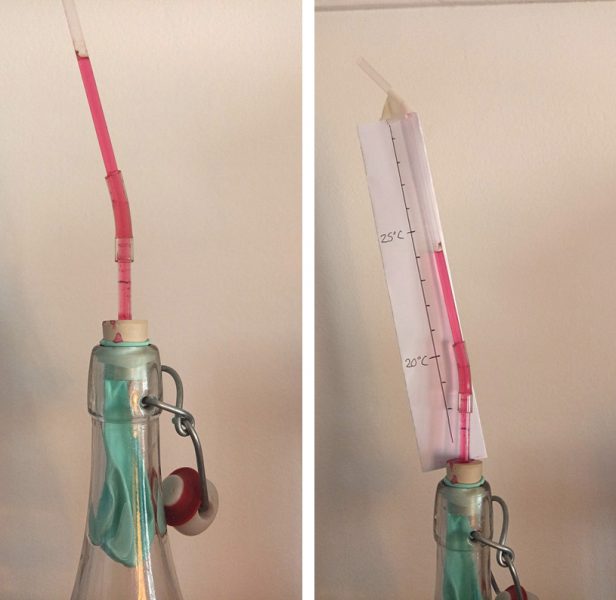
Make a simple gas thermometer from an empty glass bottle and a handful of simple materials.[4] Quick and easy to make, this can be done in a single 45-minute lesson in primary school to demonstrate a simple thermometer, or for a more advanced lesson in secondary school (approx. 14–18 years old), the thermometer can be calibrated and results extrapolated for an experimental calculation of absolute zero.
Curricular connections:
- primary – difference between temperature and heat, types of thermometers, and measuring temperature
- middle school – expansion of gases/thermal expansion in general, measurement theory, and calibration
- secondary school – gas laws/thermodynamics, taking measurements and evaluating uncertainty and sources of error, extrapolating data graphically and algebraically, and experimental calculation of absolute zero

Image courtesy of Michael Gregory
Materials
- Empty glass bottle (beer, wine, juice, etc.)
- One-hole stopper of suitable diameter to fit the bottle
- Balloon
- Thin-diameter transparent tubing
- Water (may be coloured for better visibility)
For calibration
- Lab thermometer
- Warm/cold water
Procedure
- Insert tubing into the stopper, allowing 1–2 cm of extra length below the bottom of the stopper.
- Insert the balloon into the top of the bottle and carefully fill with water (the balloon should not completely cover the opening before it is full, or else the pressure of air inside the bottle will prevent the balloon from filling).
- Once the balloon is full, insert the stopper into the bottle. Normally, once a seal has been formed, the stopper will displace its own volume of water up the tube, and so, your starting temperature should have a few centimetres of water visible above your stopper.
- The thermometer should now be ready to use to demonstrate changes in temperature.
- Calibration – the thermometer can be calibrated by placing it in two water baths of different known temperatures. Within reasonable uncertainty, the thermometer can be considered to operate at constant pressure, and therefore, an increase in volume is proportional to an increase in temperature, and a linear scale can be used to both interpolate and extrapolate between the known temperatures.
Discussion
This simple gas thermometer can be used for a rough experimental measure of absolute zero, by extrapolating the calibration until the volume of gas in the bottle is zero. To do so, the height of water in the tube should be converted into volume, so we can extrapolate to find the temperature at which the volume of the gas in the bottle should be zero. This can be done graphically or algebraically, depending on the learning outcomes of this calculation.
For more details on calibration and troubleshooting, please see this document.
Summary
Awesome teachers around Europe are doing excellent experiments every day, and reflective practitioners learn from their experience, always improving, tweaking, and coming up with new experiments. My Favourite Experiments is a collection of projects to gather and share some of the best experiments across Europe and around the world, and these monthly experiment sharing meetings are a way of keeping up with some of the best ideas, as they are continually being improved by great teachers like yourself.
This is a small sample of the nearly 100 experiments that have been shared by tens of teachers during the first year of these monthly meetings. Many of the best educators in Europe look forward to getting together each month to share their newest favourite experiments. I hope you’ll join us next month to share in the fun!
References
[1] Experiment share welcome page: https://tinyurl.com/ExperimentShare
[2] 6 November 2021 experiment share recording: https://youtu.be/MvXm83_E6YA?t=1983
[3] 20 December 2021 experiment share recording: https://youtu.be/OOEdxqagN48?t=198
[4] Beer-bottle thermometer instructions: https://tinyurl.com/MFE-Thermometer
Resources
- Watch full recordings and written descriptions of past online experiment shares.
- Browse the experiments shared during the my favourite experiment cycle tour.
- Students who are interested in sharing experiments may be interested in the twin project Young Enthusiastic Scientists (YES!) International.
- Find free virtual science camps, including Particle Physics for Kids.
- View and take part in an annual homemade science video festival for students and teachers.
- Run physics experiments with objects you can find in your house: de Winter J (2022) Physics with everyday objects: springy sweets, a universe in your pocket, and drawing circuits. Science in School 56.


