Molecular gastronomy in the chemistry classroom Teach article
Alginate bubbles are useful in chemistry lessons as well as in molecular gastronomy.
Molecular gastronomy is a new trend in haute cuisine, with chefs providing their guests with novel and strange culinary experiences using liquid nitrogen, gels and foams. One of the techniques that is becoming more well known is the use of alginate spheres containing different fruit juices or flavours. Even if you don’t frequent Michelin-starred restaurants, you may have come across these spheres in bubble tea.
Bubble tea, originally invented in Taiwan in the 1980s, spilled over from Eastern Asia to Western countries some years ago. It consists of a tea-based drink that also contains fruit jellies, tapioca or alginate spheres, filled with fruit juice or syrup.
Making and examining the behaviour of alginate bubbles can be fascinating and can be used in inquiry-based learning in the sciences.
In this article, we suggest how alginate bubbles can be used to teach various scientific concepts, presenting scientific phenomena in an aesthetic fashion. We introduce how to make alginate bubbles and present three example experiments, each of which can be performed in a one-hour lesson: an acid-base reaction, chemo-luminescence with redox chemistry, and thermal convection with a thermochromic effect.
Forming alginate bubbles

NaCl solution (no
crosslinking)
Image courtesy of Nicola Graf
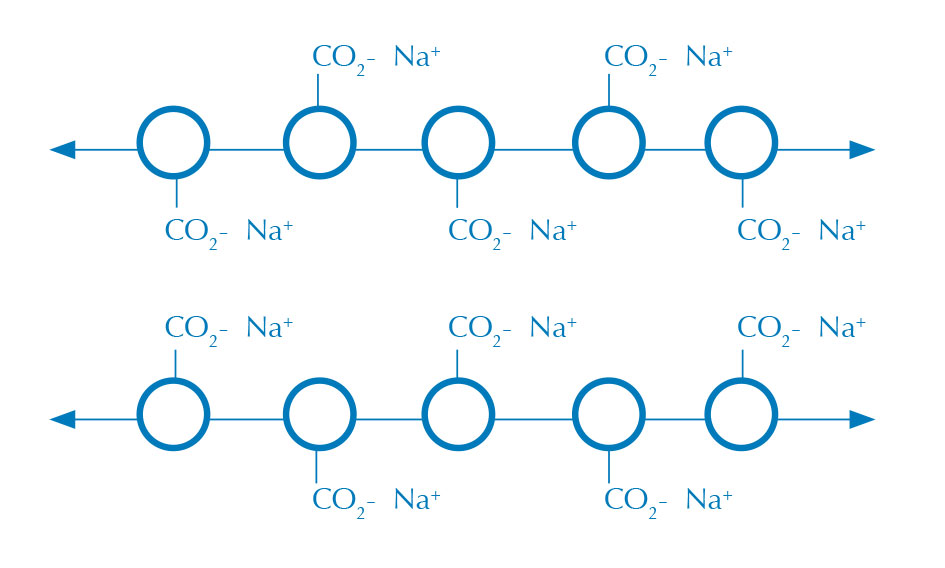
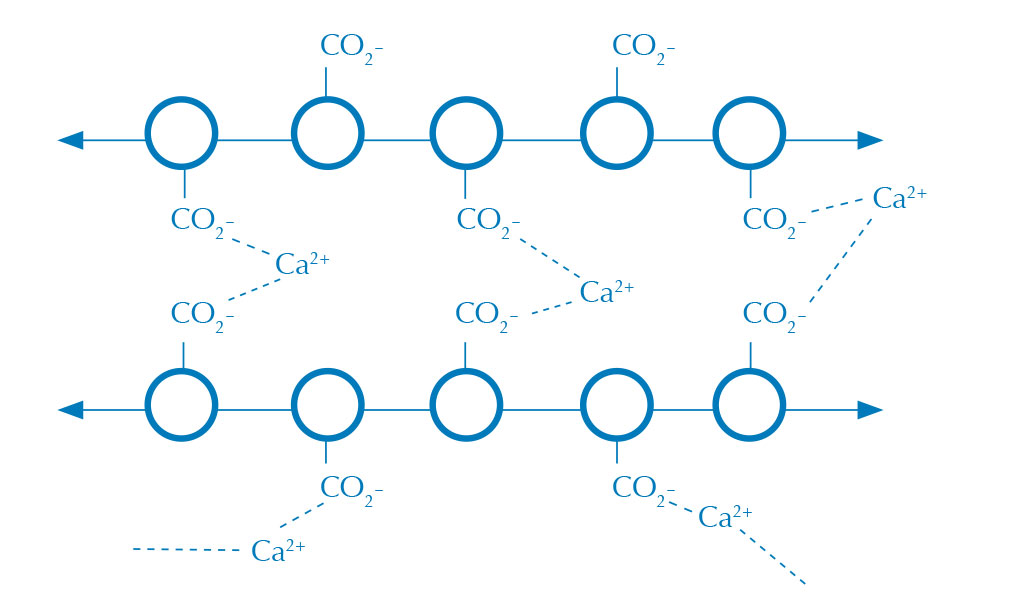
Alginate bubbles are formed when an aqueous alginate solution (figure 1) comes into contact with a solution containing calcium ions, creating a membrane of calcium alginate where the two solutions meet (figure 2). Alginate is a long polysaccharide that becomes cross-linked in the presence of a divalent cation, such as calcium, to make a water-insoluble gel.
Materials
- 2 g sodium alginate (Na(C6H806))
- 100 ml distilled water
- 10 ml 0.5% calcium chloride (CaCl2) or 1% calcium lactate solution (Ca(C3H5O3)2
- Two 250 ml beakers
- Dropper pipette or spoon
- Glass rod or other stirrer
- Sieve or spoon
Procedure

CaCl2 (crosslinking)
Image courtesy of Nicola Graf
- Mix the alginate and water in one of the beakers.
- Wait at least 15 minutes until all the alginate has dissolved.
- Pour the calcium ion solution into the other beaker.
- Add drops of the alginate solution to the calcium ion solution with a pipette or a spoon. Stir the calcium solution as you do this to prevent the alginate spheres sticking together.
- The bubbles are stable and can be removed from the calcium ion solution with a spoon or sieve.
When the liquids come into contact, gelatinous calcium alginate is formed, encapsulating the alginate solution in spheres. If other compounds are also added to the alginate solution, such as flavours, colouring agents, or indicators, they are also encapsulated.
Acid–base bubbles
Materials
- 2 g sodium alginate
- 500 ml distilled water
- 10 ml 0.5% calcium chloride or 1% calcium lactate solution
- Three 250 ml beakers
- Dropper pipette or spoon
- Glass rod or other stirrer
- Sieve (optional)
- Indicator solution
- Assorted acids and bases
Procedure
- Follow the procedure above for forming alginate bubbles but add an acid–base indicator to the alginate solution just before adding the alginate to the calcium solution.
- Remove the bubbles and place them in a beaker containing the rest of the distilled water.
- Note the colour of the spheres.
- Systematically add different acids and bases to the water and note how the colour of the bubbles changes.
Although the indicator solution is inside the bubbles, the alginate membrane can exchange hydroxide or hydronium ions (hydrated protons) between the bubbles’ contents and the surrounding liquid. Changing the pH value of the surrounding liquid by adding an acid or a base will therefore change the pH of the liquid inside the spheres, and so the indicator will change colour.
While technical indicators can be used in the classroom, pH-sensitive extracts of red cabbage or garden radish peel could be used at home.
Luminescent bubbles
Alginate bubbles can be used to illustrate the phenomenon of luminescence by simply adding a luminescent compound to the alginate solution before the bubbles are formed. One easy way to do this is to use riboflavin (vitamin B2), which fluoresces under UV light. Although you can use pure riboflavin, you can also extract it from a food such as an instant custard powder that contains it.
Materials
Extracting riboflavin (optional):
- One pack instant custard powder containing riboflavin (also known as E101)
- 200 ml distilled water
- Beaker
- Stirrer
- Funnel with filter paper
Making luminescent bubbles:
- Two spatula tips of riboflavin powder (C17H20NaO6)
- 2 g sodium alginate
- 100 ml water
- 10 ml 0.5% calcium chloride or 1% calcium lactate solution
- Two 250 ml beakers
- Dropper pipette or spoon
- Glass rod or other stirrer
- Sieve (optional)
- UV source
- 15–20 ml saturated sodium dithionite solution (Na2S2O4)
- 15–20 ml hydrogen peroxide (20%-35%)
Procedure
- To extract the riboflavin from the instant custard powder, place about 8 g of powder in 200 ml water. Stir well for about 10 minutes and filter.
- Follow the procedure for making alginate bubbles, but add the riboflavin to the alginate solution just before spherification.
- Shine UV light on the bubbles that are formed. They should fluoresce, emitting a yellow-green light.
- Turn the UV light off and the bubbles will stop fluorescing.
- Turn the light back on.
- Add the sodium dithionite to the beaker containing the alginate bubbles. You should notice that the luminescence is turned off, because the sodium dithionate crosses the membrane around the alginate bubbles and reduces the riboflavin inside.
- Add hydrogen peroxide to oxidise the riboflavin, turning the luminescence on again.
Thermo bubbles
Adding a thermochromic ink to the alginate solution can help to illustrate the phenomenon of convection. In Japan, a special thermo ink based on a lactone of crystal violet (and not to be confused with the thermo inks used in thermo printers) is sold to illustrate heat-related phenomena in physics.
Materials
- 2 g sodium alginate
- 100 ml distilled water
- 10 ml 0.5% calcium chloride or 1% calcium lactate solution
- Two 250 ml beakers
- Dropper pipette or spoon
- Glass rod or other stirrer
- Sieve
- 3–5 ml thermochromic ink
- Heatproof beaker filled with water
- Heat source
Procedure
- Make the bubbles as described above, but add the ink to the alginate solution just before spherification.
- Place the resulting bubbles in a heatproof beaker of water.
- Heat the beaker until the bubbles start to rise.
The alginate bubbles will move to show convection: rising as they become less dense when heated, and then cooling and sinking back down as they become more dense again. At the same time, the alginate bubbles will change colour, showing that convection is associated with a change in temperature.
Acknowledgements
Part of this work was funded by the Teaching Enquiry with Mysteries Incorporated (TEMI) project (Peleg et al., 2015), supported by the European Union under the 7th Framework Programme for Research Funding “Science in Society” under Grant Agreement No. 321403.
References
- Peleg R et al. (2015) The magic sand mystery. Science in School 32: 37-40.
Resources
- To learn more about molecular gastronomy, see:
- Davies E (2014) From methional to fried chicken. Science in School 30: 44–48.
- To learn more about spherification in molecular gastronomy, see: www.molecularrecipes.com/spherification-class/basic-spherification
- A video showing how to make an edible water ‘bottle’ from alginate can be found at: www.youtube.com/watch?v=YLjzsfgk198
- Videos of all the experiments described here can be found on the TEMI Youtube channel. See: www.youtube.com/channel/UC62-j3UpwF-Z5yh84umnxIQ
- For a podcast about sodium alginate, see the Chemistry World website.
- A German-language description of using bubbles for inquiry-based learning, following the TEMI philosophy, can be downloaded from the website of the TEMI team at the University of Bremen, Germany. See: www.chemiedidaktik.uni-bremen.de/temi/index.html. An English translation will soon be published in the Book of Science Mysteries on the TEMI website: www.teachingmysteries.eu
- Spherification can be used in many other experiments. For an activity in which ‘algal balls’ are used to explore photosynthesis, for example, see www.saps.org.uk or use the direct link: http://tinyurl.com/qxwcafa
- Most of the chemicals and equipment you will need for these investigations are easily sourced from standard school science suppliers. If you cannot find a supplier of the Japanese thermochromic ink, you should be able to buy thermochromic slurries for aqueous use from specialist dye manufacturers such as SpecialFX & Coatings in the UK. See: www.sfxc.co.uk
Review
Our curiosity is always attracted by changes of colour, position, shape and light. Using such changes in our teaching can help our students to enjoy science more. The first and second activities would be suitable for students aged 15-16, whereas the third activity, involving convection and luminescence, would also be suitable for younger students, aged 11-14.
After the activities, the teacher could ask why bubbles were used, leading to a discussion of the chemical and physical properties of matter.
Enrico Capaccio, Istituto Superiore S Bellarmino, Montepulciano (Siena), Italy


