Hearing waves: how to build a loudspeaker Teach article
Explore the science of sound and electromagnetism with this practical build-it-yourself activity.
Humans have made music since prehistoric times: from the rhythmic beating of sticks or stones by our early ancestors, to the creation of complex symphonies in recent centuries. Today, we can listen to music anytime and anywhere, thanks in part to loudspeakers in our smartphones or mp3 players. It’s something most students do every day, yet how many understand how loudspeakers actually work?
This article describes how to build a loudspeaker using simple materials (Capell Arques, 2011). The activities allow students to directly observe a widespread and surprisingly straightforward application of the physics of sound and electromagnetism in a fun and motivating way.

mtmmonline/pixabay.com, CC0
How does a loudspeaker work?
A loudspeaker converts an electric current into sound (changing electrical energy into acoustic energy) using two main components: a magnet and a wire coil. When an electric current flows through the coil, it produces a magnetic field (as described by Faraday’s law of induction), transforming the coil into an electromagnet.
The current produced by an audio signal is not constant, however; it alternates rapidly between positive and negative values. This means that the current in the coil continuously switches directions, as does the polarity of the magnetic field induced by this current. If we now bring a permanent magnet with a constant magnetic field close to the coil, the permanent magnet and the electromagnet (the coil) interact, rapidly switching between attraction and repulsion, resulting in to and fro movements (vibrations) of the magnet and coil. These vibrations are passed on to the surrounding air. When they reach our eardrum, our brain interprets the vibrations as sound if the frequency is in the audible range (between 20 Hz and 20 kHz).
In our setup, we use a neodymium disc magnet, and we fix the coil and magnet to old CDs or DVDs for support. When the coil-CD is placed on top of the magnet-CD, and the coil is connected to the audio signal, the coil and magnet interact. Since the magnet-CD is much heavier than the coil-CD, we can disregard the vibration of the magnet-CD and only consider the vibration of the coil-CD.
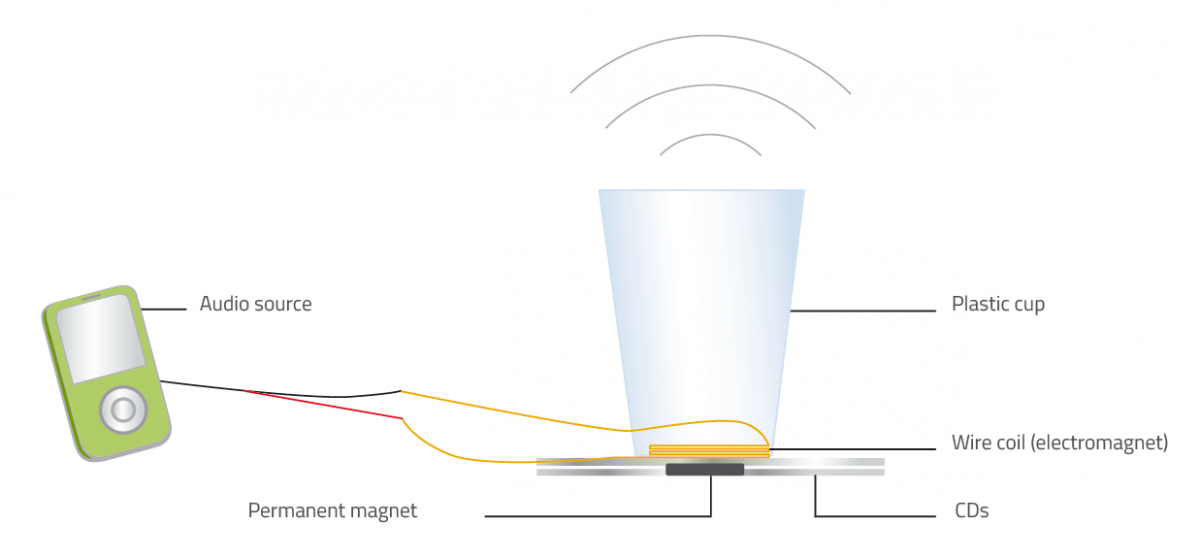
Elizabeth Goiri
Activity 1: Building the loudspeaker
The activity can be carried out by students aged 14–16 and will take about 50 minutes. We suggest working in groups of 3–4 students.
Materials
To build one loudspeaker:
- A neodymium disc magnet, about 20 mm in diameter and 10 mm in depth
- Enamelled copper wire, 0.2 mm in diameter and about 3.5 m in length
- 3.5 mm audio cable, mono or stereo (see figure 1 to determine the type of cable you have). Old earbuds can also be used. Note that the procedure requires the cable to be cut.
- Toothpick
- Two old CDs or DVDs
- Two crocodile cables
- Wine cork
- PVA glue
- Sandpaper or cutter blade
- Scissors or wire strippers
- Tape
- Plastic cup
- Audio signal source with an audio jack socket (e.g. computer, mp3 player, smartphone)
Safety note
Take care when handling neodymium magnets to avoid damaging electrical equipment or trapping fingers between two magnets. Caution should also be taken when stripping the audio cables with scissors or wire strippers.
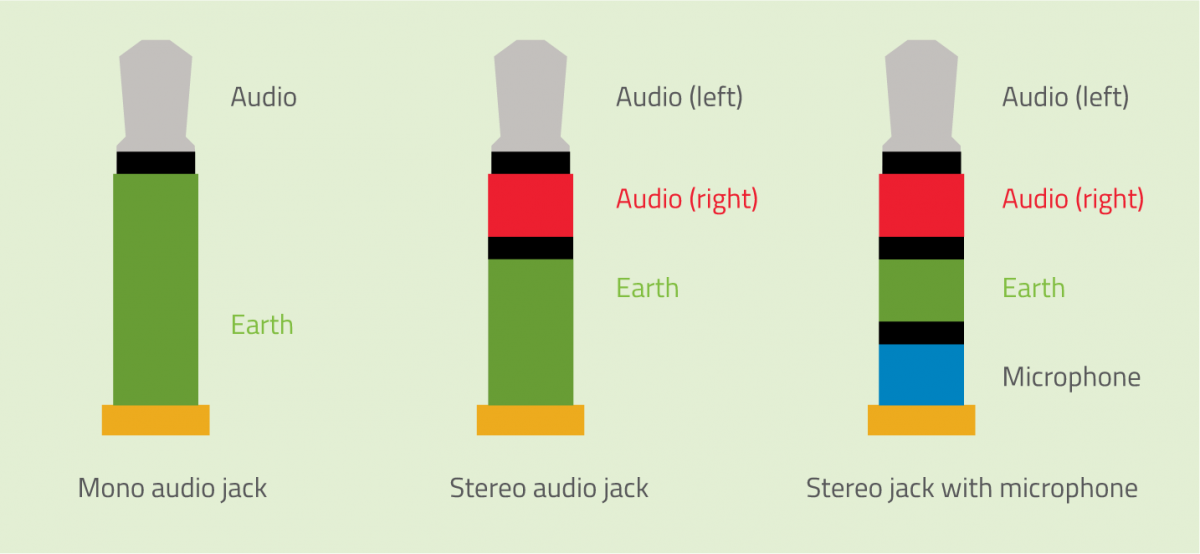
Elizabeth Goiri
Procedure
- Coil about 50 turns of copper wire around the wine cork as compactly as possible, keeping 5–10 cm of loose wire at the start. You will need to remove the coil from the cork when you are finished, so don’t wind it too tightly. You can place a toothpick between the cork and the wire to maintain a gap.
- Cut the wire, leaving about 40 cm to spare at the end.
- Carefully remove the coil from the cork. Wrap the long piece of spare wire around the coil to keep it from coming apart, leaving just 5–10 cm of wire at the end, as shown in figure 2.

Figure 2: The coil for the loudspeaker is created by winding copper wire around a wine cork.
Elizabeth Goiri
- Use sandpaper or a cutter blade to remove the enamel from the last 1–2 cm of both ends of the wire.
- Glue the coil to the centre of a CD using PVA glue (the disc will serve as a support for the coil).
- Using a pair of scissors or wire strippers, cut and strip the audio cable to expose the wires inside. Normally earth wires are bare and audio wires are covered in plastic (figure 3).
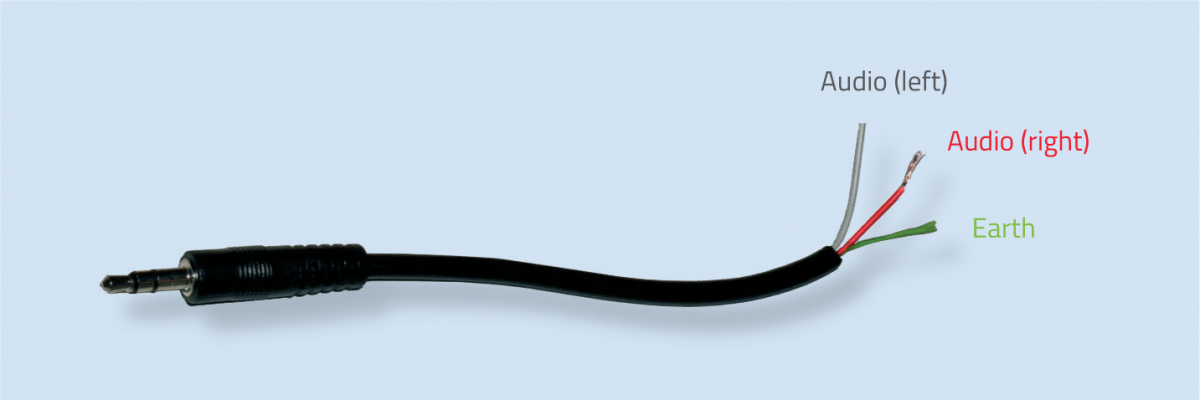
Figure 3: A stripped stereo audio cable shows two audio wires and one bare earth wire.
Elizabeth Goiri
- Connect the audio wire to one end of the coil and the earth wire to the other end of the coil using the two crocodile cables. In the case of a stereo cable, connect only one of the audio channels to the coil (left or right audio wire) and leave the other unused.
- Glue or tape the neodymium disc magnet to the centre of a second CD (figure 4).
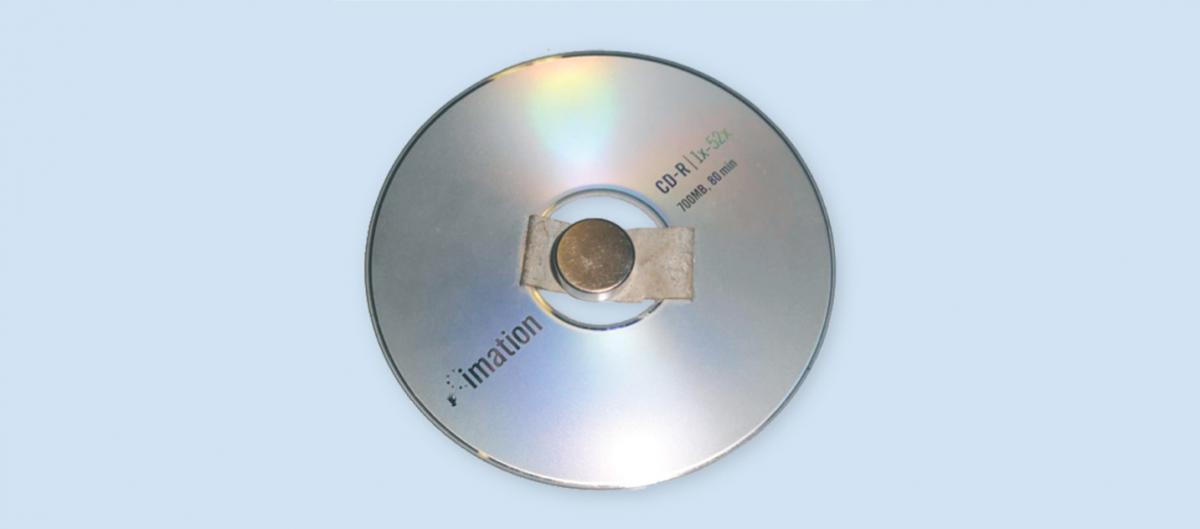
Figure 4: Using tape or glue, the magnet is fixed to a CD for support.
Antxon Anta
- Place the magnet-CD on a flat surface (magnet side up) and position the coil-CD on top (coil side up).
- Connect the audio jack to your audio source (figure 5). In our experience, a computer is the most reliable source, as the current from some smartphones can be too weak.
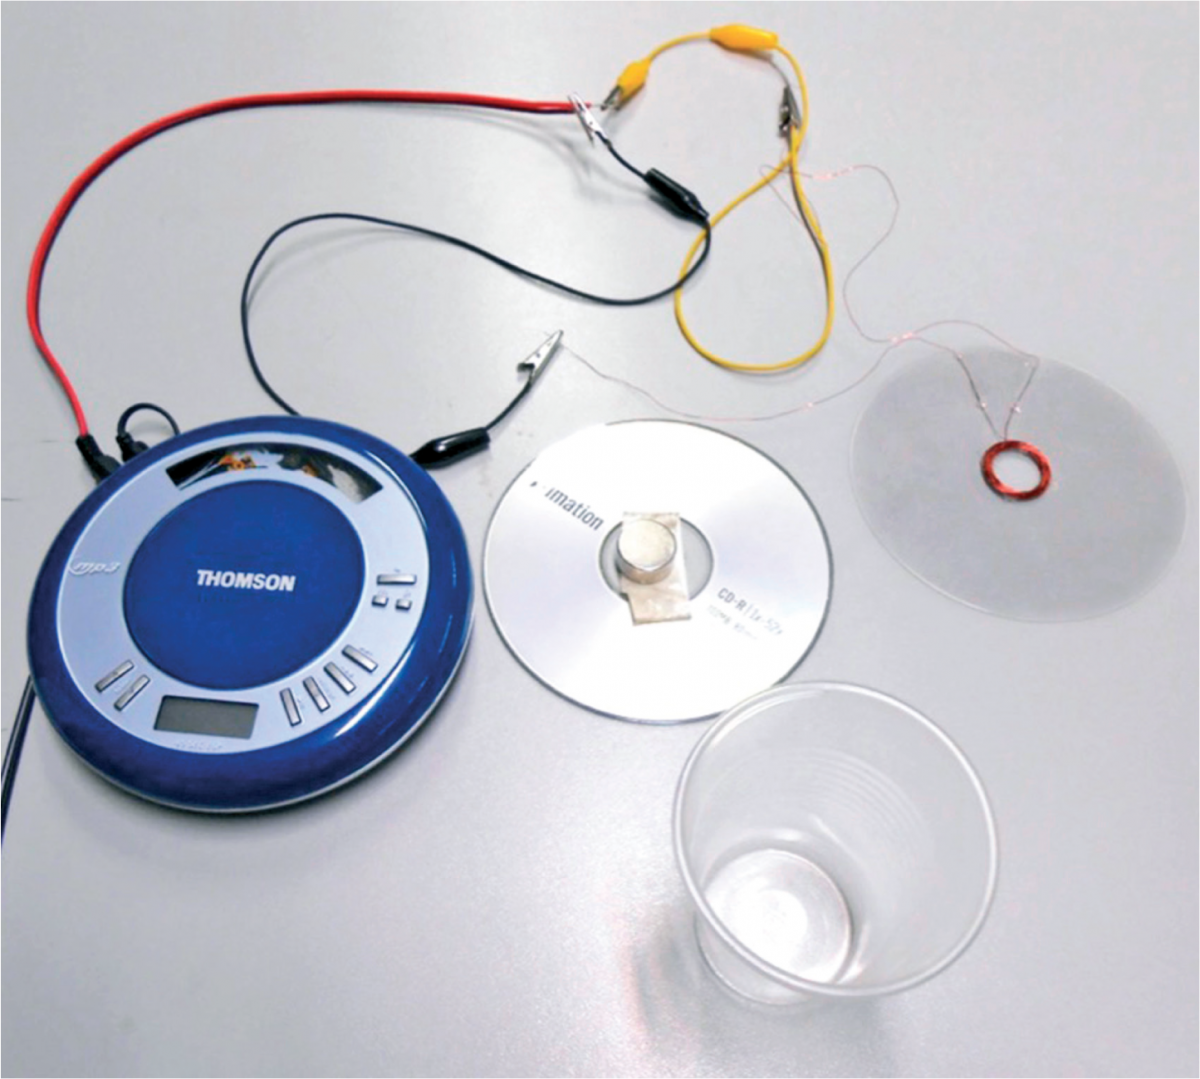
Figure 5: The components of the loudspeaker, using an mp3 player for the audio source
Antxon Anta
- Play a song or audio file and turn the volume all the way up. If properly connected, you should hear the sound faintly but clearly. Depending on the strength of your magnet, you might even be able to feel the coil vibrate when you touch it.
- To increase the volume, press the plastic cup against the coil.
- Vary the distance between the coil and the magnet by moving the CDs. How does this affect the volume, and why?
Sounds and waveforms
Volume (the amplitude of vibration) and pitch (the frequency of vibration) are determined by the shape and form of the transmitted current as a function of time, i.e. the waveform. All the information about the sound encoded by the audio file is contained in this waveform. The waveform essentially describes the time dependence of all three components – the electric current, the induced magnetic field and the vibration of the coil.
A wonderful tool for studying sound (waveform, amplitude, pitch, timbre) is to use the open source audio software Audacityw1. In the next activity, students use this software to view the waveform of the sound that is played through the homemade loudspeaker.
Activity 2: Visualising waveforms
From the activity, students should understand that the waveform they see has the form of the time-varying current that is transmitted from the audio source to the coil. This current induces a changing magnetic field through the coil, again with the same waveform. Students should work in the same groups as before; the activity will take approximately 20 minutes.
Materials
- Homemade loudspeaker
- Computer with Audacity software installed
- Audio files of your choice
Procedure
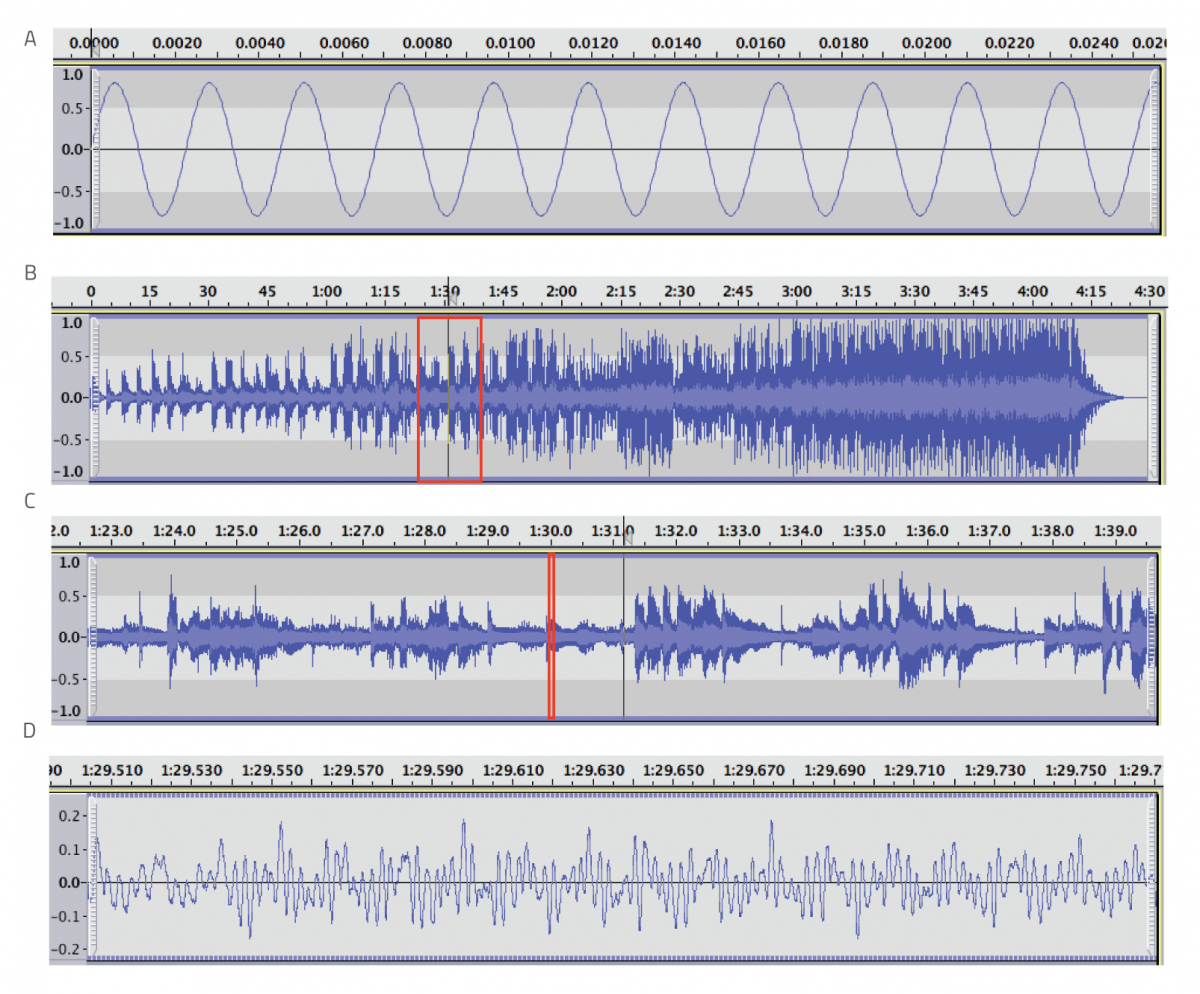
- Begin by generating a pure (sinusoidal) tone through the loudspeaker using Audacity (Menu: Generate > Tone). Students will see the generated wave on the screen (figure 6A). Play the tone through the speaker.
- Next, import an audio file such as a song (Menu: File > Import > Audio).
- Use the zoom function to see the waveform clearly. Figure 6 shows successive zoom images of the waveform of Van Morrison’s ‘The Healing Game’. If we zoom in far enough, the actual waveform becomes visible.
- Experiment with the software, exploring differences in amplitude and waveform when scrolling through the audio file.
- Audacity shows the length of a selected time interval at the bottom of the screen. Use this feature to estimate the timescale of the vibrations by measuring the time intervals from peak to peak.
Elizabeth Goiri
Discussion
In our experience, students find this project to be a simple and fun way to understand the physics behind a loudspeaker. The following questions can help evaluate how well the students have understood the concepts involved.
- What is a loudspeaker? Name the main components.
- What devices do you use that work using a coil and a magnet to produce sound?
- What is the sequence of events that results in the production of sound from the loudspeaker?
- What is the purpose of pressing the plastic cup against the coil?
- What effect does increasing or decreasing the distance between the two CDs have?
- What would happen if we removed the permanent magnet fixed to the CD?
- What type of interaction causes the coil to vibrate?
- What does the waveform (as seen in Audacity) describe?
- How is the vibration of the surrounding air related to the vibration (displacement) of the coil?
- What can you deduce about the timescales involved in the vibrations from viewing these waveforms?
Other ideas
Our project can be adapted or supplemented in a number of ways, for example:
- For a variation, glue the coil to the bottom of a paper or plastic cup and connect it to an audio source using the audio cable. Bring the opening of the cup to your ear and hold a magnet close to the coil to hear the soundw2.
- Carefully ‘dissect’ a pair of old earbuds to identify the components inside them (e.g. coil, magnet)w3.
- Illustrate the operation of the phonograph (the mechanical version of a loudspeaker) for an alternative way to understand the relationship between sound and waveformsw4.
References
- Capell Arques C (2011) Construcción de un altavoz con dos CD. Revista Eureka sobre Enseñanza y Divulgación de las Ciencias 8(Núm. Extraordinario): 422–426
Web References
- w1 – Audacity is free audio software that is available to download from the Audacity website.
- w2 – Visit the Exploratorium website for instructions on how to build a cup speaker.
- w3 – For a guide to dismantling earbuds and headphones to find out how they work, visit the Explain that Stuff website.
- w4 – For instructions on how to build a gramophone, visit the Exploratorium website.
Resources
- The Explain that Stuff website provides useful information on how loudspeakers work.
Institutions
Science on StageReview
Electromagnetism is often considered to be a hard topic to grasp, but this article illustrates an interesting and novel application that allows teachers to incorporate active learning into their lessons.
The topic is suitable as a demonstration for students aged 11–14 and can be used with students aged 14–16 as an activity to explore how a loudspeaker works. To build on the activity, teachers could organise a class competition to find the loudspeaker with the best sound quality, and discuss the reasoning with their students. For older students (e.g. aged 16–19), the article could be used as a starting point to introduce the notion of eddy currents, with students researching the effect that these currents have on the sound quality of the speaker.
The principles outlined in this activity could also be linked to seismology, with students using the electromagnetic coil to pick up oscillations caused by vibrations (e.g. tremors), which they can view in Audacity.
Colin Oates, physics teacher, Scotland, UK
