


Go bananas for biochemistry Teach article
Learn about a variety of biochemical processes with these quick, simple experiments using one of the world’s favourite fruits.
Bananas are one of the most popular fruits across the world – over 100 billion of them are eaten every year. They are not only a staple food for millions of people, but also an essential source of income and employment, especially in Latin America.
Along with plantains, bananas are part of the Musa genus, which includes around 70 species. Today, however, most sweet bananas come from a single variety called Cavendish. These bananas are cultivated using asexual reproduction so they are genetically identical. This loss of biodiversity, however, leaves them particularly vulnerable to parasitic attacks – as is currently happening in a global infection by the fungus Fusariumw1.
Perhaps surprisingly, bananas also provide a good way to understand biochemical processes. In this series of quick activities involving bananas, students can learn about sugar metabolism, starch storage, melanin production and the molecules responsible for the banana flavour. The activities are suitable for secondary school students and involve chemistry at several different levels.

Hanna_photo/Shutterstock.com
Activity 1: Measuring sugar content with a refractometer
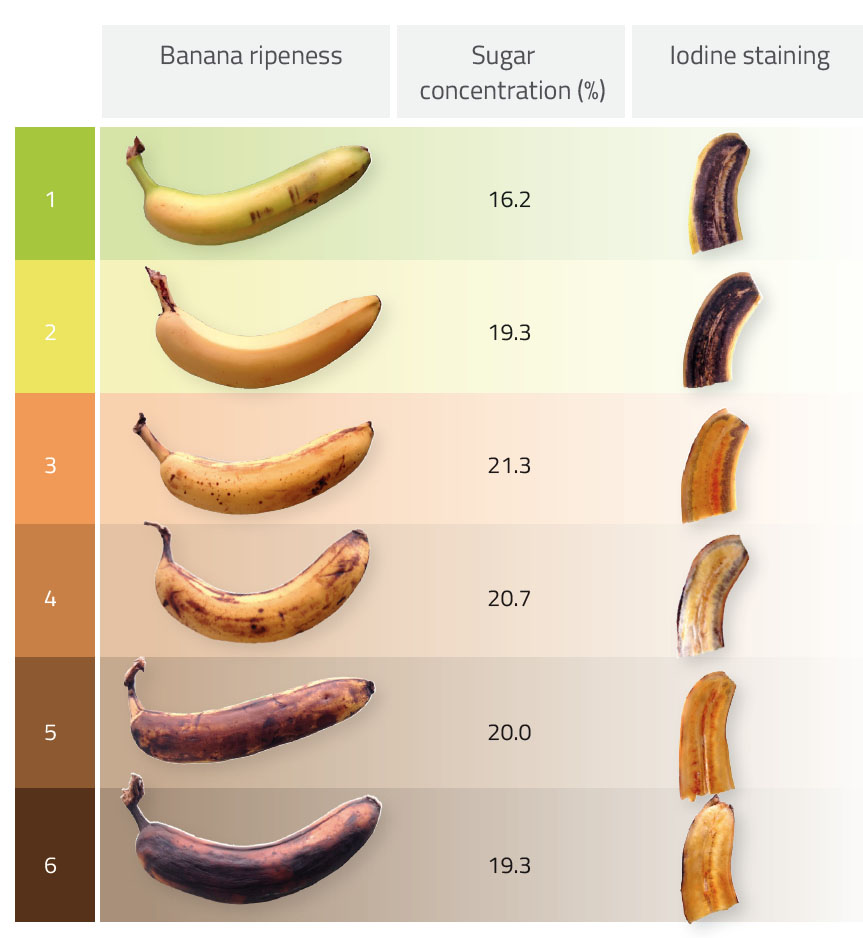
Before starting, present your students with six bananas of differing ripeness (see bananas 1–6 in table 1, which are numbered in terms of increasing ripeness). Which banana do your students guess is the sweetest? Most students vote for the black banana, but is their assumption correct? Students can conduct a blind tasting test to judge which sample tastes sweetest. Do their taste buds identify the correct answer? To find out, students then measure the sugar content of various bananas using a refractometer. The activity will take around 20 minutes.
Materials
- Bananas of varying ripeness (three bananas for each of the six degrees of ripeness, i.e. 18 bananas in total)
- Multiscale refractometer
- Fork
- Bowl
- Soft damp cloth
Procedure
- Peel the least-ripe banana (banana 1 in table 1) and break off a piece about 3 cm in length.
- Using a fork, mash the banana in a bowl until you get a semi-fluid pulp.
- Smear some pulp on top of the prism assembly of the refractometer. Close the daylight plate so the pulp spreads across the entire surface of the prism without any air bubbles or dry spots.
- Hold the refractometer in the direction of a natural light source and look into the eyepiece. You will see a circular field with graduations showing the % Brix – the number of grams of sucrose in 100 grams of sample (e.g. 1 g sucrose in 100 g sample = 1% Brix). You may have to focus the eyepiece to see the graduations clearly.
- Record the sugar content in % Brix.
- Clean the instrument (both the daylight plate and the top of the main prism assembly) using the cloth.
- Repeat these steps for at least three different bananas of the same ripeness and then calculate the mean sugar content (see table 1 and figure 1).
- Repeat the activity until you have recorded and calculated the sugar content for bananas 1–6.
starch content for bananas of varying ripeness
Jill Skarvan

Jill Skarvan
Activity 2: Analysing starch content with iodine
Here, students use Lugol’s iodine solution to test for the presence of starch in different bananas, showing that the amount of starch declines during the ripening process. This activity takes approximately ten minutes.
Materials
- Bananas of varying ripeness (three bananas for each of the six degrees of ripeness, i.e. 18 bananas in total)
- Lugol’s iodine solution: 2% potassium iodide with 1% iodine in water (I3K)
- Kitchen knife
- Brush
Procedure
- Cut each banana in half lengthways.
- With a brush, cover the surface of the banana with Lugol’s iodine solution.
- Wait one minute and compare the different results (see table 1).
Discussion
During the ripening process, the enzyme amylase catalyses the breakdown of starch (a polysaccharide) to simple sugars – first to maltose (a disaccharide) and then to glucose (a monosaccharide). In the activity, the banana with the highest sugar content (in the form of monosaccharides and disaccharides) is banana 3 in table 1. After this stage of ripening, the sugar content starts to decline because the majority of the starch has been converted into simple sugars and the banana continues to use glucose for cellular respiration.
This phenomenon is also demonstrated by the reaction with Lugol’s iodine staining: unripe bananas have a higher starch content than ripe bananas, as shown by a darker staining with Lugol’s iodine solution. With further ripening, the staining is considerably reduced due to the lower amount of starch.
In a blind tasting test, students might not choose the banana with the highest sugar content as the sweetest. Other factors that can affect the taste include the softness of the banana and its water content. Moreover, since amylase is also present in our saliva, foods that contain lots of starch (but little sugar) start to taste sweet after chewing, as the amylase breaks down some of the starch into sugar.
Discuss some of the following questions with your students:
- Which banana is sweetest?
- Why does the sugar content increase at the start of the ripening process but decline towards the end?
- How does the starch content change during the ripening process?
- Is there more starch in bananas at the beginning of the ripening process compared to the end, or less starch? Can you explain why?
- Is sweetness purely connected to the amount of sugar present, or do other factors influence the sweetness?
Activity 3: Locating the starch ‘storage room’
In this activity, students prepare microscopic specimens using banana pulp from the most and least ripe bananas. Under the microscope, students can view the cellular organelles that store starch (amyloplasts) and understand why these organelles disappear during the ripening process. This activity takes approximately 15 minutes.
Materials

banana pulp for viewing
under the microscope
Samuel Ginsburg
- Banana pulp from activity 1 (bananas 1 and 6 from table 1)
- Lugol’s iodine solution
- Microscope
- Microscope slides
- Cover slips
Procedure
- Smear a small amount of the banana pulp onto a microscope slide and add one drop of Lugol’s iodine solution (figure 2).
- Place the cover slip on top of the sample. Using the microscope at a magnification between 100x and 400x, try to locate the organelles that store starch in the banana.
- Repeat steps 1 and 2 with the other sample of banana pulp.
Discussion
Amyloplasts are responsible for the synthesis and storage of starch granules through the polymerisation of glucose. In unripe bananas, staining with Lugol’s iodine solution turns the starch and amyloplasts a deep purple colour (figure 3). In riper bananas, there is no reaction with the solution, because the amount of starch is reduced and the amyloplasts are no longer present in these samples (figure 4).
Discuss some of the following questions with your students:
- Why is iodine added to the banana sample?
- What is the name of the organelle that stores starch in plants?
- What differences can you see between these organelles in the different banana samples and why?

Samuel Ginsburg

Samuel Ginsburg
Activity 4: Turning bananas black
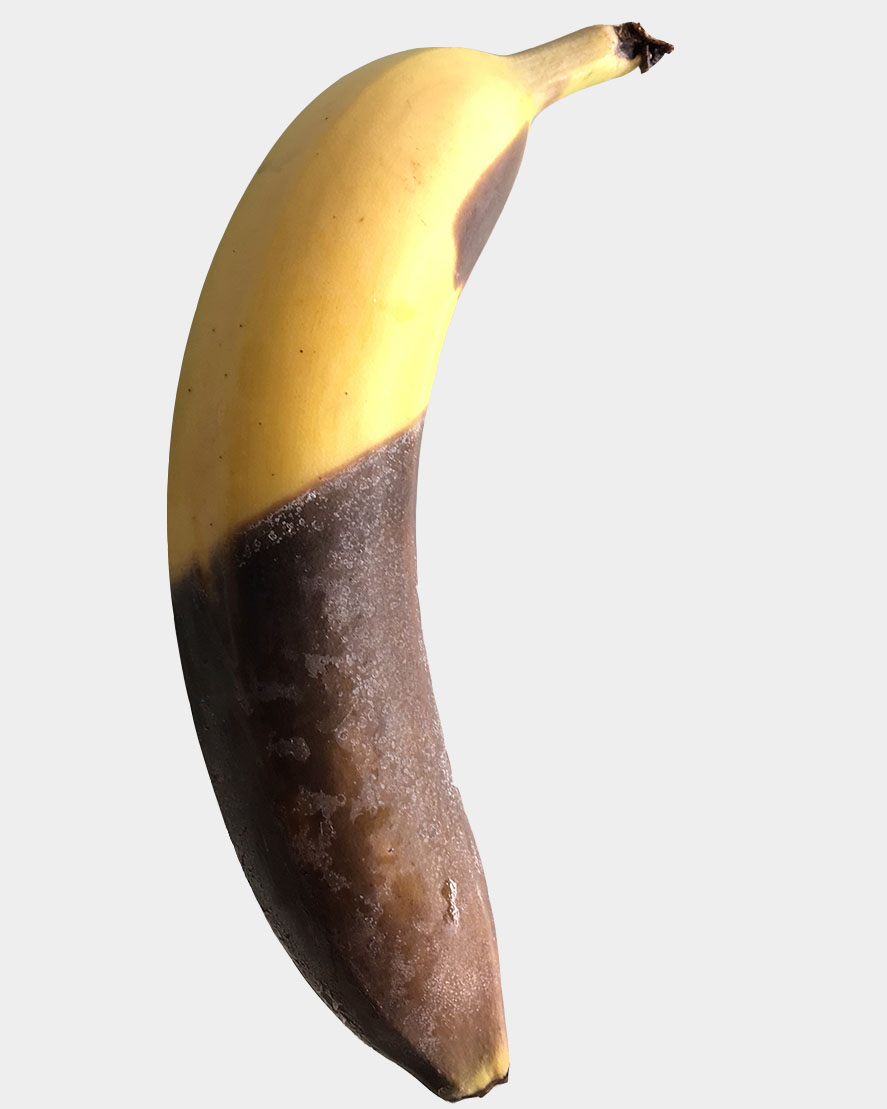
a banana in boiling water, the
skin turns black due to the
production of melanin.
Sacha Glardon
Students learn about the effect of melanin production and cell damage in bananas in this simple activity, in which a banana is submerged in hot water, causing the skin to turn black. The activity takes approximately five minutes.
Materials
- Yellow banana (e.g. banana 2 from table 1)
- 1 litre beaker containing boiled water
Procedure
- Dip half of the banana into the hot water.
- After one minute, the submerged half of the banana will turn black (figure 5).
Discussion
When the banana is submerged in hot water, its cells are exposed to heat, causing cell damage. In response, the dark pigment melanin is produced, which results in the banana skin turning black. This pigment protects external cells (in both plants and animals) from ultraviolet damage and also counteracts the presence of free radicals due to its antioxidant properties. Melanin is produced from the oxidation of the amino acid tyrosine, which is catalysed by a copper-containing enzyme called tyrosinase. When the cells of the banana are damaged, tyrosinase is released. Melanin production does not affect the ripening process, but since riper bananas are older and have therefore suffered more cell damage, they are browner.
Discuss some of the following questions with your students:
- Why does the banana turn black?
- What causes this colour change?
- Does submerging the banana in hot water speed up the ripening process?
- What is the difference between a banana submerged in hot water and a naturally black banana?
Activity 5: Making artificial banana flavouring
This activity is suitable for students aged 16–19 and involves synthesising artificial flavours. Using 2-methyl-1-butanol, students can produce the organic compound isoamyl acetate (3-methylbutyl ethanoate), which has a scent similar to bananas and pears. Or, using 1-pentanol, students can produce the compound amyl acetate (pentyl ethanoate), which has a scent similar to bananas and apples. The activity will take approximately 15 minutes. You may wish to divide your class so that one half produces isoamyl acetate, and the other half produces amyl acetate. Groups can then compare scents.
Materials
- Acetic acid (CH3COOH)
- 2-methyl-1-butanol (C5H12O) or 1-pentanol (C5H12O)
- Sulfuric acid (H2SO4)
- Boiling stones
- Bunsen burner
- Test tube
- 500 ml beaker
Safety note
This experiment involves the use of sulfuric acid. Students should wear safety glasses and gloves, and follow the usual safety rules for chemistry classes. As with any chemistry experiment, students should not taste the flavouring. See also the general safety note.
Procedure
- Pipette 2 ml of acetic acid into a test tube.
- Add 2 ml of 2-methyl-1-butanol or 1-pentanol to the test tube.
- Mix the educts and add one drop of sulfuric acid.
- Heat the mixture over the Bunsen burner flame for approximately two minutes, without boiling. Adding boiling stones to the test tube will help avoid superheating. Take care to turn the opening of the test tube away from people.
- Pour the content of the test tube into a 500 ml beaker to intensify the smell.
Discussion
Isoamyl acetate and amyl acetate are the main components of banana flavouring, although flavour manufacturers usually keep their exact recipes a secret. Isoamyl acetate is produced by a condensation of 2-methyl-1-butanol with acetic acid, whereas amyl acetate is produced by a condensation of 1-pentanol with acetic acid. Both esterification reactions are catalysed by sulfuric acid (figure 6). As with all fruits, the natural flavour of banana is a mixture of several componentsw2, so it is difficult for artificial flavours to copy the flavour and smell exactly.
Discuss some of the following questions with your students:
- What do the products of the reactions smell like?
- Which molecule is responsible for the typical banana flavour?
- What is the difference between an artificial and a natural flavour and why do they smell different?

Sacha Glardon
Extension activities: Uncovering more about bananas
There are a number of additional experiments you can carry out to learn more about the biology and chemistry of bananas, as well as to link to other interdisciplinary topics. For example, you could:
- Isolate banana DNA to understand that all living organisms (including bananas) contain DNA, which stores the genetic information that is passed from parent to offspring.
- Demonstrate cellular respiration by placing a banana in an airtight container and using CO2 and O2 sensors to measure the changing levels of these compounds.
- Understand more about the breakdown of starch, its effect on blood sugar levels and the storage of glycogen in the liver by measuring your blood sugar level every 15 minutes after consuming a banana (if permitted in your country).
- Investigate the importance of biodiversity in relation to disease outbreaks.
- Explore the historical, economical and ethical factors linked to the trade of bananas.
Web References
- w1 – One of the most destructive diseases currently affecting bananas is caused by the fungus Fusarium. Learn more by visiting the website of the United Nations’ Food and Agriculture Organization.
- w2 – James Kennedy, a chemistry teacher from Australia, has created a fun graphic showing the list of ingredients in an ‘all natural banana’.
Resources
- Read more about the production and trade of bananas by visiting the Banana Link website.
- Learn about the history of bananas in a video from National Geographic.
Institutions
Science on StageReview
This article describes a selection of simple but meaningful experiments using a common fruit (banana) to understand some basic metabolic processes. For example, the ripening process (and the consequent changes in colour and sweetness) is used to illustrate the conversion of starch into maltose and glucose. To get the full benefit of these activities, students should understand the difference between simple and complex sugars. Teachers can use the suggested questions to start a discussion, building on them to maximise the learning outcomes of the activities.
Monica Menesini, secondary school science teacher (retired), Italy