


Measuring the explosiveness of a volcanic eruption Teach article
Using effervescent heartburn tablets, model the action of volcanoes to measure the intensity of the explosions and create your own measurement scale.
public domain
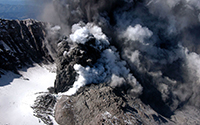
Mount St Helens, Pinatubo, Vesuvius, Pelee, Krakatoa. These volcanoes have become famous, or infamous, for significant eruptions that caused havoc to the land, ecosystems and planetary atmosphere. It would therefore seem logical that measuring and comparing the intensity and destructiveness of volcanic eruptions would be a task for geologists. Employing basic models of volcanoes that use effervescent heartburn tablets, students can measure the intensity of their explosions and create their own scale in experiments taking 80–90 minutes.
Well-known rating scales exist for describing and classifying natural phenomena, such as the Richter scale for earthquakes, the enhanced Fujita scale for tornadoes, and the Saffir-Simpson scale for hurricanes. Students will therefore not be surprised to hear that a scale exists for measuring volcanic eruptions; it’s just that it is nowhere near as well known as the others mentioned.
Volcanologists have developed a logarithmic scale called the volcanic explosivity index (VEI) to measure the intensity of an eruption. Eruptive episodes are rated from 0 to 8, however, because the scale is logarithmic, an eruption classified as a 2 on the VEI is ten times more explosive than an eruption rated as a 1, while a VEI of 3 is 100 times more explosive than a VEI of 1. Logarithmic scales are fairly common throughout science, and representative examples that students should become familiar with are the Richter scale, the pH scale and the Hertzsprung–Russell diagram. The logarithmic aspect of explosivity is based on the volume of tephra that is expelled during an eruption (tephra is the material, such as lava, ash, and rock, that is ejected from the volcano). Volcanologists also look at the plume height, or how high the erupting cloud of ash reaches into the atmosphere during an eruption. How far into the surrounding area the erupting gas and tephra are blown is also considered.
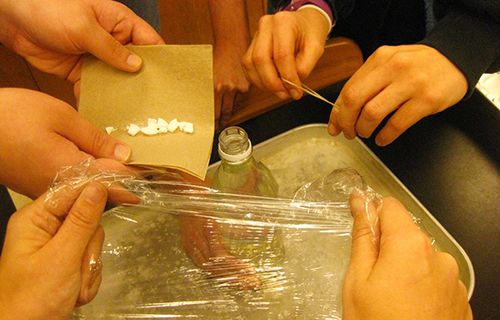
Image courtesy of Christopher Roemmele
Comparing the 1980 Mount St Helens (a VEI-5) disaster to a VEI-8 eruption is like comparing a firecracker to a briefcase of C-4 explosive. Although Mount St Helens caused a significant level of damage to the surrounding region, the explosion produced by a VEI-8 eruption would be 1000 times greater, causing widespread destruction for hundreds or even thousands of miles. On the other end of the spectrum, volcanic activity at Kilauea in Hawaii is non-explosive, churning out lots of lava and tephra without explosive fanfare. So if Mount St Helens is a firecracker, then Kilauea resembles a melted chocolate bar oozing out of its packaging.
Why do volcanic eruptions behave so differently? Although each behaves in a unique way as the result of many variables, it is possible to make some generalisations about explosivity based on the nature of the magma – the molten rock and other materials underneath the surface of the volcano. Magmas that are silica-rich are often very viscous, with large amounts of trapped gas, and they tend to erupt violently because the gases cannot escape easily. The more viscous the magma, the larger the energy needed to expel gases within it. These trapped gases build up pressure until they achieve enough force to blast out of their confinement and are released in a single, explosive event. Low explosivity occurs when magma has a low viscosity. Gases escape readily from such magmas, and fluid lava burbles out periodically and non-explosively. As an analogy for students, try blowing through a straw into a glass of milk, and notice how easily bubbles form and rise to the top and burst: this is analogous to the low-silica, low-viscosity mafic lava. Then repeat using a milkshake. But wear a towel! It is much more difficult to blow a bubble, but when you do, the milkshake explodes outward, causing a large upheaval.
Modelling eruptions
This activity allows students to create pressurised gas within closed plastic bottles. Before doing this activity with students, collect several 500 ml plastic bottles and remove the labels. Indigestion or heartburn tablets such as Alka-Seltzer® are the source of gas as these tablets contain both citric acid and sodium bicarbonate, which react to form carbon dioxide once they are mixed with water. Each group of students should start with six tablets, although be sure to keep a large quantity on hand for errors and failed eruptions. The groups will measure how much material each ‘volcano’ produces by catching the ‘lava’ in a flat container and then measuring the volume collected.
Increasing the amount of Alka-Seltzer changes the pressure inside the model volcanoes and thus the magnitude and style of eruption. Changing the temperature of the water will also affect the eruption. Students can then determine the resulting effect on the eruption and create their own VEI rating.
Materials
- 500 ml plastic bottle
- Water
- 6 effervescent heartburn tablets
- Washing-up liquid
- Metre rule
- A large flat tray
- Measuring cylinder
- Safety goggles
- Rubber bands
- Plastic food wrap
- Toothpicks
- A stopwatch or timer
- Lab coats
- Paper towel (optional)
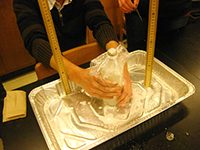
Image courtesy of Christopher Roemmele
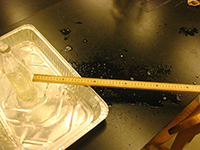
Image courtesy of Christopher Roemmele
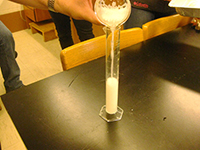
Image courtesy of Christopher Roemmele
Procedure
- Develop and write a hypothesis, considering what will happen when the tablet is added to the liquid, and what will happen as the number of tablets increases and the temperature of the water changes.
- Fill the plastic bottle with water, level with the bottom of the cap screw.
- Add about ½ teaspoon of washing-up liquid to the water.
- Place the bottle in the centre of the tray.
- Break the tablets into pieces (making sure hands are dry) to fit them through the bottle neck. We also recommend that the tablet pieces are placed on a towel and slid into the bottle when the experiment is ready to begin.
- One student should slide the tablet into the bottle, while another covers the opening with plastic wrap, and a third secures the plastic tightly with a rubber band (using multiple loops) at the top of the bottle to prevent air from entering. Teamwork and co-ordination are key to this sequence, so it should be practiced in a dry run several times until the students can perform it in about 8 seconds.
- The reaction should be plainly visible immediately. After less than a minute, one person should poke a hole in the plastic to allow the eruption to occur (use judgment as to when to poke the hole, as the intensity of the eruption may force the plastic and rubber band off on its own).
- The rest of the students must be ready to record the approximate height of the eruptive plume and the lateral distance it travels, using metre rules.
- Measure the duration of the eruption with a stopwatch.
- When the eruption is deemed complete, the tephra collected in the tray should be poured into a measuring cylinder. If some tephra has erupted explosively beyond the pan, or has perhaps hit the ceiling, estimate the missing quantity (which is not difficult since it will likely be visible as sudsy water).
- Record the observations and features of the eruption in a data table.
- Repeat steps 2–11 but using two and then three tablets.
- If time allows, repeat the experiment using water at a different temperature or a different liquid entirely (e.g. vegetable oil).
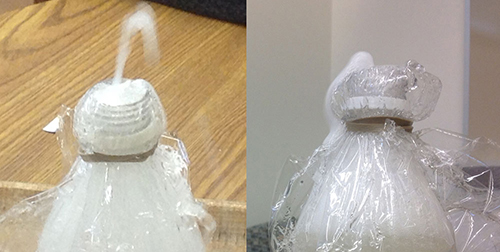
Image courtesy of Steven Smith
Based on a combination of their data and observations, students can assess the eruptions and create a VEI scale of their own. They should be able to support or reject their hypotheses, and describe patterns underlying how and why things happened the way they did, and explain their VEI scale. A more formal lab report, as per the individual teacher’s format, can also be completed, but be sure to have students re-state the purpose of the activity and the relevance and application of VEI and studying volcanoes to science and society in general.
Resources
- The United States Geological Survey has produced a useful table of data about VEI.
- An interactive volcano simulator by Alaska Museum can help your students explore the explosivity of volcanoes even more.
- For more Science in School articles on volcanoes, see:
- Capellas M (2007), Recovering Pompeii. Science in School 6: 14.
- Pathmanathan SM (2015) Experimenting with storytelling. Science in School 34: 41.
- Strolin P (2013) The secret life of volcanoes: using muon radiography. Science in School 27: 6.
Review
Most science teachers are probably familiar with “chemical volcanoes”, but this article presents a novel and interesting use of this classical activity. In fact, the authors propose using a chemical volcano to devise and build a customised VEI scale, helping students to fully understand the meaning of this scientific and technical instrument.
The article is written in a plain and enjoyable style, which presents scientific information interspersed with vivid metaphors linked to common experience. The methodological approach is enquiry-based and involves making hypotheses and testing them by modifying experimental conditions, another added value that makes this activity very suitable for promoting scientific reasoning.
Finally, it is a beautiful example of science communication, soundly researched and funny at the same time: if I see a picture of Kilauea, I won’t be able to help thinking of “a melted chocolate bar oozing out of its packaging”.
Giulia Realdon, Italy