States of matter & phase transitions Teach article
This article was originally published as a CERN teaching module.
Explore phase transitions between different states of matter through a series of engaging hands-on experiments.
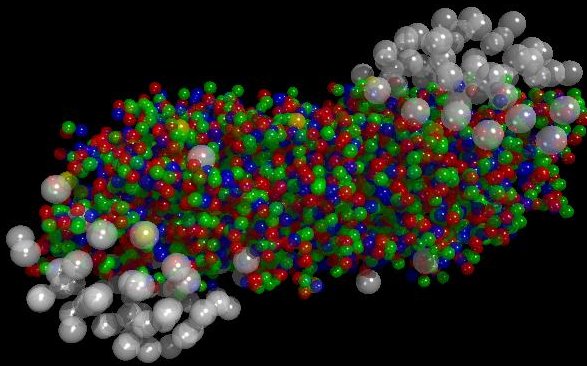
Matter occurs in different states: solid, liquid, gaseous and plasma. When external conditions (such as temperature or pressure) change, the state of matter might change as well. For example, a liquid such as water starts becoming a gas when it is heated to its boiling point or starts to freeze when it is cooled to its freezing point. A state of matter with very high energy is plasma. Here, some of the orbital electrons are not bound to atoms or molecules anymore. Hence, plasma is a gas of free electrons and ions.
Phase transitions often occur in nature, but they are also used in many technologies. In particular, several particle detectors rely on phase transitions. Furthermore, high-energy physics research can create an even more energetic state of matter, the so-called quark-gluon-plasma.
Therefore, high-energy physics provides a fruitful and exciting context to discuss states of matter and phase transitions with your students. Moreover, there are several fun experiments that allow students to study phenomena on their own. Below, we highlight some of our favourite experiments and explain how to link them to CERN physics and technologies. When using these experiments with students, make sure to let them predict the outcome of the experiment first, before conducting the experiment and observing the result.
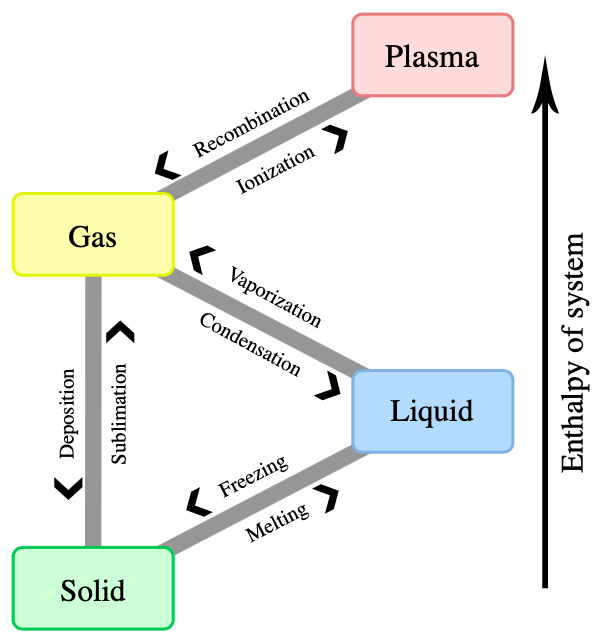
Vaporization – liquid to gas
When you heat water up to its boiling point, bubbles of water vapour start to form as water changes from a liquid to a gaseous state. Similarly, when opening a bottle of sparkling water, bubbles start to form. Here, the decrease in pressure caused by opening the lid starts the vaporization process.
An interesting effect can be observed at surfaces that provide tiny impurities, for example, cellulose fibres inside a glass. These impurities provide starting points for bubbles to form, so-called nucleation sites. When pouring sparkling water into a glass, small amounts of gas get trapped inside or around small dust particles such as cellulose fibres.
A very similar principle forms the basis of the bubble chamber particle detection technique. Bubble chambers are filled with a superheated liquid that basically really wants to turn into a gas. Therefore, any small disturbance or impurity will start the bubble formation process inside a bubble chamber. Indeed, when ionizing particles fly through this superheated liquid, they will ionize the molecules on their way. These ions will then act as nucleating sites and bubbles will form around them. In this way, the track of an ionizing particle leaving a trail of ions can be visualized when taking photographs of the bubble trails at the right moment. (Find out more about bubble chambers here.)
Today, bubble chambers are no longer used for research at CERN. However, they have recently found a new role in dark matter research, for example, in the PICO project in Canada.
Hands-on experimentation with vaporisation: dancing raisins in sparkling water
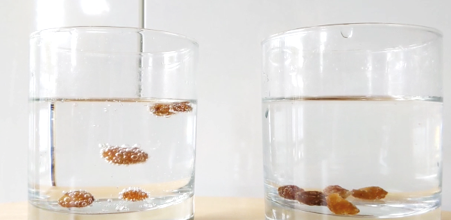
One of our favourite experiments is the ‘dancing raisins experiment’ that allows students to study the role of nucleation sites in sparkling water.
Materials
- A glass
- Sparkling water (or any other sparkling and transparent drink)
- A few raisins
Procedure
- Fill a glass with a sparkling liquid.
- Add a few raisins.
- Observe the raisins, in particular, their movement.
Modifications
- You can also study other types of potential ‘dancers’ or other types of sparling liquids for example, different types of noodles, frozen blueberries, lentils, corn etc. Try to find the best combination.
- Add the raisins directly to a bottle of sparkling water and compare their movement with the lid on and off.
Explanation
The raisins will soon start moving up and down in the sparkling water. What happens? The surface of the raisins is not as flat at the surface of the glass. Instead, the surface of raisins includes many tiny fibres that act as nucleation sites. Hence, tiny bubbles of carbon dioxide gas form at the surface of the raisins. When enough gas bubbles are attached to the surface of a raisin, it will start to rise to the surface (buoyancy, Archimedes’ Principle). Once the raisins reach the top, the bubbles pop because they are exposed to the air. Without their ‘floating devices’ the raisins will sink again.
Melting – solid to liquid
When the internal energy of a substance increases, e.g. by applying heat or pressure, a solid will eventually become a liquid. For example, ice cubes or a wax candle start melting when applying heat, whereby the pressure remains constant. However, solids such as ice or wax differ in their melting points. Whereas ice melts at a temperature of about 0°C, wax melts at about 40°C. When a substance reaches its melting point, the temperature of the substance does not increase further even if constant heat is applied, as long as there is some solid left to melt. Thus, the applied heat for melting a solid is also referred to as latent heat. Only when all the solid has turned into a liquid state does the temperature begin to rise again.
Hands-on experimentation with melting: cooling bath
Among all the experiments in which students can study the melting process, making a cooling bath may be the coolest. All joking aside, it’s indeed really cool! In addition, cooling is essential for running the LHC. Check out CERN’s cryogenics webpage for more information.
The minimum temperature of a regular ice-water mixture is the melting point of ice at 0°C. You could use such a mixture as a cooling bath, e.g., for cooling a bottle of lemonade. However, there is one trick to make your cooling bath even cooler, i.e. to cool your lemonade more efficiently. The melting point of a substance such as ice can be depressed by adding a salt such as sodium chloride. Hence, an ice-water-salt mixture ends up at a lower temperature than an ice-water mixture.
Material
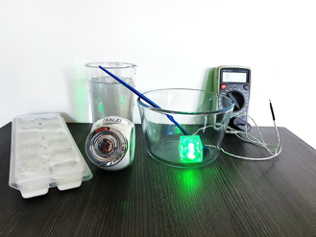
- Water, cold
- Salt
- Crushed ice (alternatively: ice cubes, plastic bag, and hammer), the ratio salt : ice must be 1 : 3
- Thermometer (alternatively: multimeter with a temperature sensor, up to -20°C)
- Beaker glass, 600 ml
- Beaker glass, 400 ml
- Spoon
Safety Note
- Use a cold-resistant glass.
- Supervise younger students when working with cooling baths.
Procedure
- Put the 400 ml beaker glass in the 600 ml beaker glass to create an insulating container.
- Add crushed ice to the internal beaker glass.
- Add enough cold water to cover the ice.
- Measure the temperature of the water-ice-mixture (should be about 0°C).
- Add salt (remember, the ratio salt : ice must be 1 : 3).
- Stir the mix until the ice melts.
- Measure the temperature of the water-ice-salt-mixture (should be up to -20°C).
Hands-on experimentation with melting: buoyancy of ice
Another really cool experiment is to study how melting icebergs affect sea level or how melting ice cubes affect the level of your sugary summer drink.
Since salt (or sugar) water is denser than water, the buoyant force exerted on ice is bigger. Thus, ice cubes don’t sink as much in salt (or sugar) water as they would in water. Therefore, the level of the salt (or sugar) water rises, when the ice cubes melt, whereas it remains the same for water. This effect occurs, for example, when the ice cubes in your sugary summer drink melt. Unfortunately, it also reinforces the negative effects of climate change: Icebergs are large chunks of ice that break off from glaciers (e.g. in Greenland). They are made of water, not salt water. Thus, sea level rises not only when icebergs drift into the sea, but also when they melt. However, the additional effect of the melting ice is comparatively small.[1]
Material
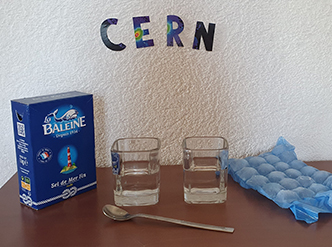
- water, cold
- Salt (or sugar)
- 6 ice cubes
- 2 Beaker glasses, 50ml
- Spoon
Procedure
- Fill the 2 beaker glasses half full with water.
- Add 3-4 tea spoons of salt (or sugar) in one beaker glass and stir.
- Put 3 ice cubes in each beaker glass.
- Add water to the salt (or sugar) water until the liquid level is the same in both beaker glasses and stir.
- Mark the liquid level on both beaker glasses.
- Wait until the ice cubes have melted.
Additional information
One can also observe that the ice cubes melt slower in salt (or sugar) water than in water. This is another consequence of the higher density of salt (or sugar) water in comparison to water.
Did you know that CERN is engaged with the Sustainable Development Goals? Find out more about how CERN contributes to a better planet on the CERN knowledge transfer website.
Condensation – gas to liquid
The cloud chamber was one of the first particle detectors. Here, the most important aspect is a supercooled supersaturated alcohol vapour, which is essentially a very cold and very wet gas, that really wants to become a liquid. Indeed, any disturbance of this vapour might start the condensation process. When high-energy ionising particles fly through this vapour layer, they leave a trail of ions behind. These ions then trigger the condensation process acting as condensation nuclei. Therefore, the trail of ions turns into a trail of small drops that can be observed with your eyes or a camera under the right lighting conditions. This relatively easy principle allowed particle physicists to record particle tracks already 100 years ago.
Today, the CLOUD experiment at CERN investigates cloud formation to find out more about climate change. Interested? Watch a TEDEd lesson by Kirby, Richer, & Comes (2016): Cloudy climate change: How clouds affect Earth’s temperature.
Hands-on experimentation with condensation: cloud in a bottle
There are several experiments in which your students can study condensation. The cloud in a bottle experiment shows in an impressive way, how a rapid decrease in pressure can trigger the phase transition condensation. There are several videos and instructions on how to make a cloud a bottle online. Depending on the effort and equipment, the effect will be impressive to observe even as a demonstration or easy to do in a safe way as a hands-on experiment. Thus, we highlight our favourite two methods below. If you have access to dry ice, you can also let your students build their own cloud chamber using dry ice and isopropanol alcohol.
1. Impressive demonstration
Material
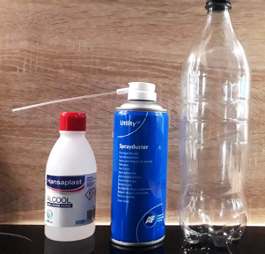
- 30 ml of disinfectant (about 70% alcohol, or purer alcohol)
- A bottle of spray duster
- A 1 l transparent PET bottle
- Water and flour
Safety note
- Wear safety goggles to protect your eyes against splashes of alcohol and unforeseen expansions of your PET bottle.
- You should also wear gloves to protect your skin from alcohol, especially, if you use very pure alcohol.
Procedure
- Make a small hole into the lid of the bottle to squeeze in the tube of the spray duster.
- Use a flour-water mixture to seal the opening (alternatives: blue tack, playdoh, glue …).
- Add 30 ml of disinfectant (or relatively pure alcohol) into the PET bottle and turn the bottle to make sure the inner surface is covered with alcohol.
- Put on the lip carefully, all connections need to be airtight.
- Add about 20 pumps of spray duster into the sealed bottle.
- Carefully open the lids (attention, pressure build-up!).
- Now you should see a very dense cloud consisting of drops of alcohol in your bottle.
Modifications
- You can also use a ball or bike pump to increase the pressure inside the bottle – however, you might need to add some additional condensation nuclei in this case.
- Additional condensation nuclei: open the lid, squeeze the bottle gently and blow out a match in front of the lid, release the pressure of the bottle to soak in some of the smoke particles (the smoke will provide additional condensation nuclei).
- It also works with water instead of alcohol, but it’s not that impressive.
2. Easy hands-on experiment
Material
- 10 ml of disinfectant (about 70% alcohol, or purer alcohol)
- A 0.5 l transparent PET bottle
- A match
Safety note
- Wear safety goggles to protect your eyes against splashes of alcohol.
- Wear safety gloves to protect your skin from alcohol, especially, if you use very pure alcohol.
- Make sure to monitor students during this activity.
- If the students are young, only the tutor or teachers uses the matches to make sure no student accidentally sets the alcohol inside the bottle on fire.
Procedure
- Add the disinfectant (or pure alcohol) into the PET bottle.
- Close the bottle with the lid.
- Turn the bottle to make sure the inner surface is covered with alcohol.
- Now, open the lid, squeeze the bottle gently and blow out a match in front of the lid.
- Release the pressure of the bottle to soak in some of the smoke particles (the smoke will provide additional condensation nuclei).
- Close the lid.
- Squeeze the bottle as much as you can and release the pressure of your hands suddenly.
- Now, you should see a cloud appearing inside the bottle.
References
The melting of ice floating on the sea introduces a volume of water about 2.6% greater than that of the originally displaced sea water: Noerdlinger PD, Brower KR (2007) The melting of floating ice raises the ocean level. Geophysical Journal International, 170:145-150. doi: 10.1111/j.1365-246X.2007.03472.x
Resources
- Watch a video of the raisins experiment on Twitter or Facebook.
- You can download the video of the raisins experiment from CERN CDS Videos.
- States of matter and supercooling: an overview.
- More experiments on phase transitions and states of matter.


