This activity was presented at the Science on Stage Festival 2024.
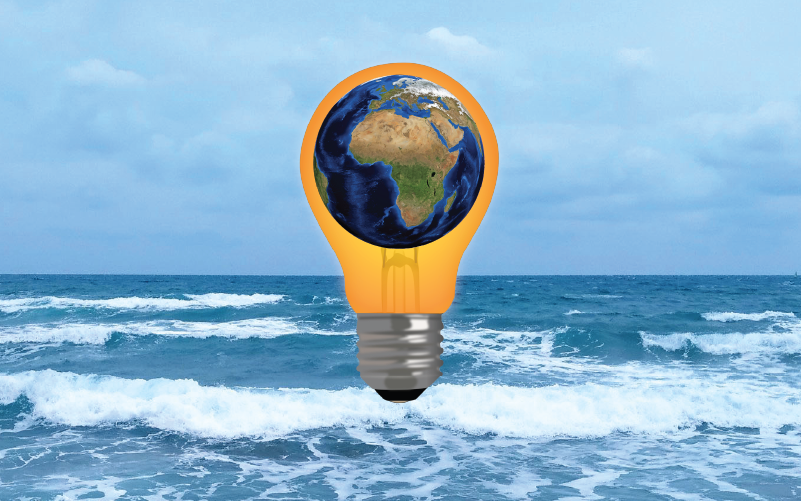
Go with the flow: build a model using simple materials to convert the energy of water waves into electricity and explore key concepts relating to energy.
Image: Sea waves: Image courtesy of the author. Lightbulb: ClkerFreeVectorImages/Pixabay. Globe: Qimono/Pixabay.
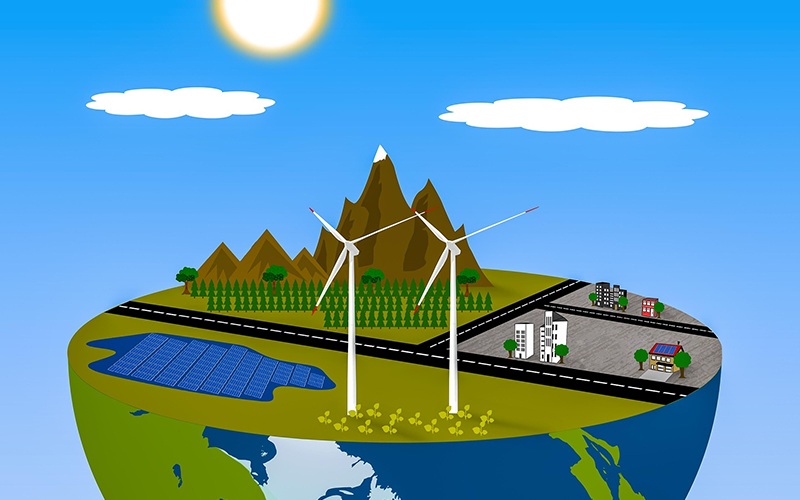
Energy, in all its forms, is an integral part of human life. Due to rapid development, the demand for energy has risen sharply, leading to excessive use of fossil fuels. These materials have limited reserves, and their combustion has harmful effects on the Earth and, by extension, on humans. As a consequence, there has been a need to turn to nature in search of energy from inexhaustible sources, such as the sun, wind, and sea. The energy of sea waves (wave power) is a renewable source. Harnessing and utilizing it can offer multiple benefits. Many countries are trying to exploit the power of waves, and the vast amounts of mechanical energy that travels with them, in order to convert mechanical energy into kinetic and, subsequently, electrical energy.[1]
The following activities, through steps of the investigative method, will enable students to:
Learn about natural phenomena that can provide exploitable forms of energy to help solve the energy problems the Earth faces, in an ecological way.
Investigate sea waves as a renewable energy source that can be converted into useful electrical energy.
Understand physical concepts and quantities, as well as the laws connecting them.
Assemble and operate materials and instruments in the school laboratory to perform the experiment, draw conclusions, and become familiar with the experimental process.
Students can watch a video of the experiment to get an overview of the activities.
Curriculum connections
These activities involve concepts such as energy conversion, mechanical energy, kinetic energy, electrical energy, electromagnetism, alternating current (AC), direct current (DC), full rectification of AC to DC, capacitors, and photodiodes.
These activities are suitable for students aged 16 and above, but they can also be presented as a demonstration for younger students.
Experimental setup
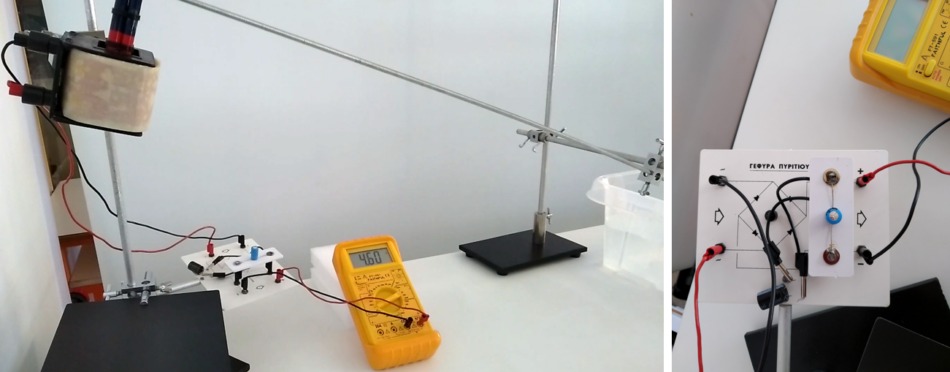
The construction of the experimental setup, which converts the energy of water waves into electrical energy, follows the design shown in scheme 1.
Scheme 1: 1) Container of water, 2) floating body, 3) metal rod, 4) bar magnet, 5) coil, 6) light-emitting diode (LED; photodiode) Image courtesy of the author
The setup should be assembled by the teacher before the lesson begins.
Watching a video of the experiment will be very helpful.
Materials
Rotating mechanism for wave production in water
Plastic container with water
Metal rod (70 cm)
Metal rod (60 cm)
Plastic float
Counterweight (conical base)
Coil (24 000 turns)
Bar magnet
Metal rods attached to parallelogram support bases
Metal connectors
Metal clamp forceps
G-type clamps
Metal rings
Image courtesy of the author
Fix the 60 cm metal rod horizontally between two vertical metal rods, attached to bases, using metal connectors and rings so that it can rotate freely.
Connect the 70 cm metal rod perpendicularly to the middle of the 60 cm rod using a metal connector. The connection point of the 70 cm rod is about 27–30 cm from one end. The plastic float and the counterweight are attached to this end, while a magnet is attached to the other end.
Place this assembly on one side of the plastic container so that the plastic float can float on the water.
To another metal rod with a base, connect the silicon bridge at a lower point, and place the coil higher, using clamp forceps. Position the coil so that the magnet can enter and exit it when the experimental setup is set in motion.
On the opposite side of the container, install a mechanism that, when rotated, creates waves in the water.
Use wires for the connections indicated in the activities.
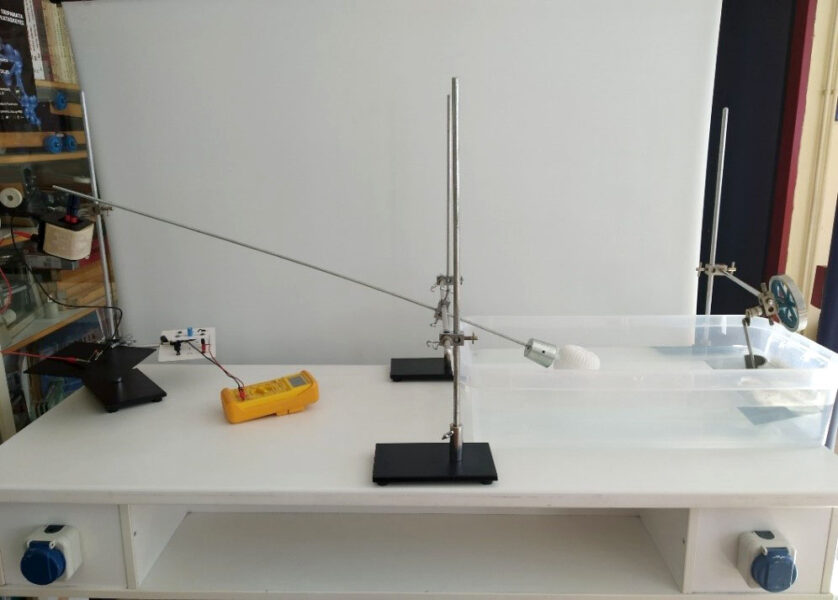
The setup may require several adjustments and tests before the lesson.
Activity 1: Conversion of wave energy into electrical energy
In this activity, an experimental setup is constructed and operated to harness wave energy for the generation of electrical energy using a magnet–coil system. Through investigating the operation of the setup and conducting experiments, students explore the principles of electromagnetic induction and understand how wave energy can be converted into electricity, providing a practical application of physical laws.
The materials, experimental setup, and execution of the experiment present no danger. However, we must always be careful and follow laboratory safety rules.
Procedure
Introduce the concept of wave power using the wave power infosheet or other resources.
Initially, using batteries, wires, and LEDs, students should experiment by constructing simple electrical circuits and observe that the photodiodes light up when a current flows through them in a specific direction (correct polarity).
Through observation, the students are asked to identify the connecting elements of the simple circuit and the setup, and to predict the outcomes of wave creation in the container and of the movement of the magnet in relation to the LED’s light emission. The connection is the replacement of the simple circuit’s battery with the whole setup.
Using a rotating mechanism, they manually create waves in the water. The waves set the plastic float in motion, which in turn moves the magnet connected to it through the metal rod. As the magnet enters and exits the coil, an induced voltage is generated, causing the LED, which is connected through a closed circuit to the coil, to light up and turn off accordingly (scheme 2).
Scheme 2: A circuit diagram showing the LED connected to the electromagnetic coil Image courtesy of the author
The students discuss and answer question 1 from the worksheet: When the induced electric current passes through the LED, it flashes. Why does this happen? Answer: the LED blinks because the induced current is alternating.
Students should then answer question 2: How would you connect two LEDs to the ends of the coil in parallel with each other, so that they: A. Light up and turn off simultaneously? B. Light up and turn off alternately? They should suggest and construct a circuit layout for each question part: one where the LEDs have the same polarity (A) and one with opposite polarity (B).
Students should then consider what energy transformations occur during the operation of the device (question 3). Answer: the mechanical energy of the water waves is converted into the kinetic energy of the system (body–metal rod–magnet), which is subsequently converted into electrical energy in the coil.
Discussion
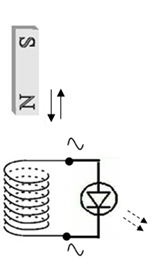
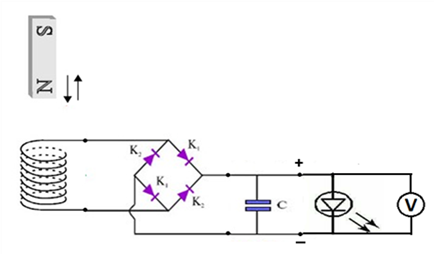
Sea waves can provide a magnet with the kinetic energy needed to generate electrical energy in a magnet–coil system due to induction. The successive waves that reach a floating body connected to the magnet cause the magnet to move relative to the coil. As a result, electrical energy is continuously generated. When a magnet is set in motion relative to a coil, an induced voltage appears at its ends; this voltage increases as the number of coil turns increases, when a stronger magnet is used, or when the magnet moves faster relative to the coil (Faraday’s law). Considering the observation that the speed at which the magnet enters and exits the coil plays a significant role in the electrical current generated, students will, through guided discussion, conclude that waves with shorter periods are more efficient. This will result in quicker movement of the magnet and, consequently, greater electrical energy production. It is important to emphasize and discuss with the students that, although we use the term ‘electric energy production’, energy is not produced but transferred from one body (or system of bodies) to another or transformed from one form to another. Therefore, it is a conversion of wave energy into electrical energy.
Activity 2: Storage of electrical energy from waves in a capacitor
Through experimentation and voltage measurements, students will understand the function of a capacitor as a storage medium for electrical energy generated by waves and they can calculate the amount of stored energy. They will also comprehend the importance of converting AC into DC for energy storage in a capacitor.
The required time for this activity is 30 minutes.
Materials
The materials from Activity 1
Silicon bridge (rectifier)
Capacitor (10 000 µF)
Digital multimeter
Procedure
Electricity generation through wave action is repeated, and following scheme 3, the students connect a silicon bridge to the coil using wires, according to the teacher’s instructions. The silicon bridge is intended to fully rectify AC into DC. Subsequently, they connect a capacitor to the DC output terminals of the bridge and set the setup in motion.
Scheme 3: A circuit diagram showing a silicon bridge, capacitor, and voltmeter connected to the electromagnetic coil Image courtesy of the author
They measure the voltage across the capacitor with a digital voltmeter (figure 1) and, consequently, the electrical energy stored in it, which is the energy obtained from the water waves.
Figure 1: Left: The modified setup with a silicon bridge, capacitor, and voltmeter connected. Right: A closeup of the connection through the silicon bridge and capacitor Image courtesy of the author
The potential energy (U) of the charged capacitor can be calculated using the following formula: where, C is the capacitance of the capacitor, and V is the voltage across its terminals. Using this formula, students calculate the energy stored in the capacitor when the voltage reaches a specific value (question 4).
Discussion
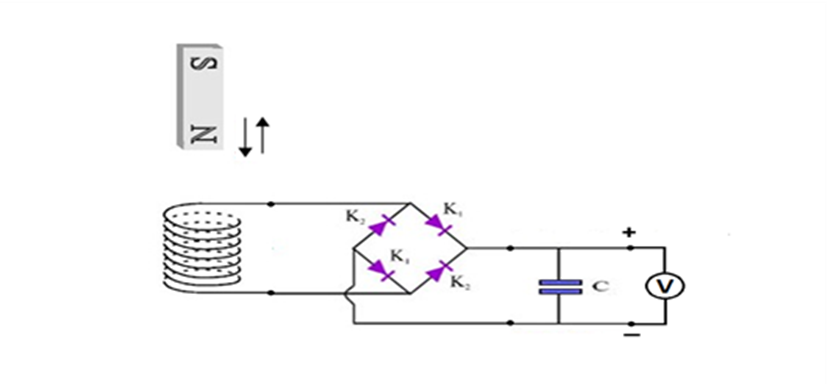
After electrical energy production from waves (Activity 1), in Activity 2, students will observe experimentally and calculate the storage of this energy in the capacitor. During the discussion, the teacher asks for their response and justification of whether rectifying AC to DC is necessary for the capacitor to store energy.
Activity 3: LED light emission and consumption of stored energy
In this activity, students investigate the operation of LEDs and how wave energy can be utilized to power them. Through experimental measurements, they examine the relationship between voltage and LED light emission and gain an understanding of the process of energy consumption and storage.
The required time for this activity is 25 minutes.
Materials
The setup from the Activity 2
Different-coloured LEDs with a light-emitting voltage of 1.5–2.5 V
Black card to help make the LEDs visible
Digital multimeter
Procedure
Students should connect different LEDs in parallel across the capacitor. These are powered by DC due to rectification (scheme 4), and therefore, light up continuously. Placing the LEDs against black card helps to make them more visible.
Scheme 4: A circuit diagram showing a silicon bridge, capacitor, LED, and voltmeter connected to the electromagnetic coil Image courtesy of the author
They then measure the voltage across the LEDs using a digital multimeter (figure 2). Students should observe that the LEDs start to light up when the voltage exceeds certain values, which differ for different LEDs. They should complete the table in the worksheet, measuring the voltage at which each LED lights up.
Figure 2: The setup with a LED connected to the capacitor Image courtesy of the author
During the LED’s light emission, the voltmeter will show a nearly constant value. When the students disconnect the LED and set the device in motion again, the voltage will continuously increase. Answering question 6 should help students recognize that energy is consumed by the LED when it is emitting light, and when it is disconnected, the energy from water waves is stored in the capacitor.
Discussion
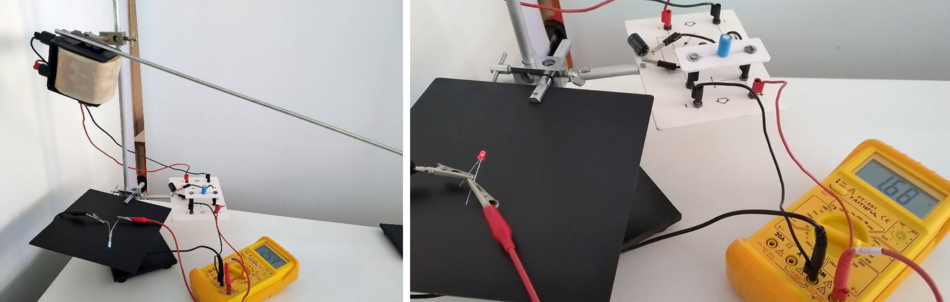
The LED is a photodiode, and for it to emit light, it must be fed by current in the correct direction (correctly polarized). It exhibits relatively low resistance in one direction and very high resistance in the opposite direction. When the voltage across the photodiode is below a specific threshold, the current is small. Conversely, when the voltage exceeds this threshold, the current increases rapidly, causing the LED to emit light. By following the steps in Activity 3, students experiment and reach conclusions about how the LEDs work, as well as the consumption and storage of energy from water waves.
Conclusions
This work aims to demonstrate a practical teaching method for harnessing the mild and renewable energy source of sea waves. It seeks to raise students’ environmental awareness, regarding alternative energy-production methods and cultivate scientific thinking, while familiarizing them with the experimental process. Students also explore topics from their curricula, such as energy, electromagnetism, and electricity.
For extension activities, students, divided into groups, could gather and present information on 1) renewable and nonrenewable energy sources, or 2) sea-wave energy (origin, exploitation).
Moreover, this experiment could be extended to other fields, such as using the electrical energy generated for hydrogen production from seawater and its use as a fuel, or connecting the setup to a computer for broader data analysis with suitable software.
Learn how climate change and melting sea ice can affect albedo through positive feedback: Cattadori M (2025) Albedo and ice: positive feedback in action. Science in School71.
Louiza Dimitriou is a graduate of the Physics Department of the National Kapodistrian University of Athens and has a master’s degree specializing in special education. She works in secondary education, and since 2022, she has collaborated with the Laboratory Centre of Physical Sciences of Egaleo. Her educational interests focus on integrating the laboratory method into the teaching of physical sciences in schools.