Supporting materials
Download
Download this article as a PDF

Shine a light on the science of colour: create and combine rainbows and explore how colours arise through reflection, absorption, and transmission.
In this article, three activities are presented to help engage students with the concept of colour: how light interacts with objects and why colours appear as they do.
In Activity 1, students will create a rainbow from white light through refraction. Activity 2 demonstrates the reverse process: how to combine the seven colours of the rainbow to produce white. In Activity 3, students will have the chance to investigate how light interacts with coloured objects – something that is important in nature, scientific research, and medicine. For instance, the green colour of leaves emerges as chlorophyll absorbs orange–red and violet–blue colours for photosynthesis, while reflecting green. Moreover, subtle changes in blood colour are indicative of how much oxygen it contains, a principle leveraged by devices such as pulse oximeters, which are routinely used in hospitals.[1]
Isaac Newton demonstrated that white light could be separated into a spectrum of colours (wavelengths) with a prism, just as raindrops in the sky act like tiny prisms, dispersing white light to form a rainbow.
This discovery also laid the foundation for understanding refraction. When light travels at an angle from one material (air) to another (glass or water), it undergoes a change in direction, known as refraction, which is described by Snell’s law. Moreover, materials have different refractive indices (n) for different colours; therefore, each colour of light is refracted in a slightly different direction (angle). Shorter wavelengths experience a greater change in direction than longer wavelengths.
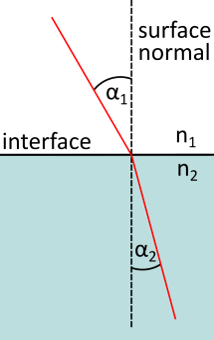
Snell’s law states that light travelling from one medium n1 at angle α1 (incidence angle) to the surface normal will change direction (angle of refraction α2) in medium n2 in a way that
In other words, when light enters a medium with higher n, it refracts closer to the normal, and when light enters a medium with lower n, it refracts away from the surface normal.
Refractive index n determines the speed of light in the medium. The velocity of light v is
where c is the speed of light in a vacuum (n=1). Snell’s law is therefore also a consequence of Fermat’s principle, in which light travels along the path that takes the shortest time.
Here, we propose to use a square transparent container filled with water as the prism. This modification of the traditional prism experiment enables easy replication in schools and at home, where glass prisms may not be readily available.
Even though the container wall causes additional interface where light is refracted, since the refractive indices of plastic and water are similar and the walls are thin compared to the volume of water light passes through, the effect of the plastic wall can be safely neglected. While aligning the setup may pose a slight challenge due to the limited acceptance angles of the rectangular container, this provides an opportunity to showcase total internal reflection. At larger incidence angles, blue does not refract out of the water container but undergoes reflection at the container/air interface.
This activity is suitable for students aged 11–14 or younger, and takes 30 minutes to an hour.
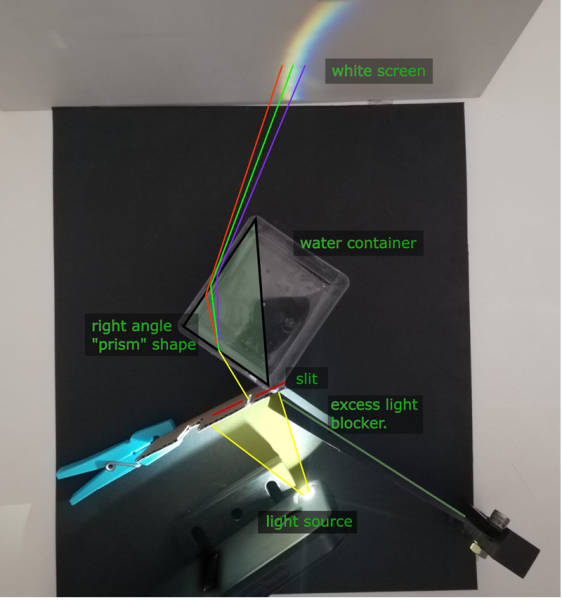
When white light travels through the slit and prism, the colour spectrum should be visible on the white screen. The slit helps increase the separation between the colours of the rainbow because each point across the slit acts as a light source, resulting in a laterally shifted rainbow. If the slit is too wide, the overlapping rainbows will cause a blurry appearance. On the other hand, a narrower slit can decrease the contrast, so a compromise is necessary. If you increase the incidence angle of the white-light source, you will see a wider separation of the colours. If you increase the distance from the prism to the screen, you will see a better colour separation, but the intensity is lower.
Our simple spectrometer simulation is available here: http://palec.eu.pythonanywhere.com/demo/009.
In this activity, students make their own Newton disc, which is a simple device that demonstrates the phenomenon of colour mixing.
The Newton disc consists of a circular cardboard or paper disc divided into seven coloured segments, typically in the order of the colours of the rainbow, which is spun to visually combine the colours to white. This offers an engaging way for students to understand the relationship between white and the colours of the rainbow.
This activity is suitable for students aged 11–14 or younger, and takes 1–1.5 hours.
Ask students to follow the instructions below or use the Activity 2 worksheet.
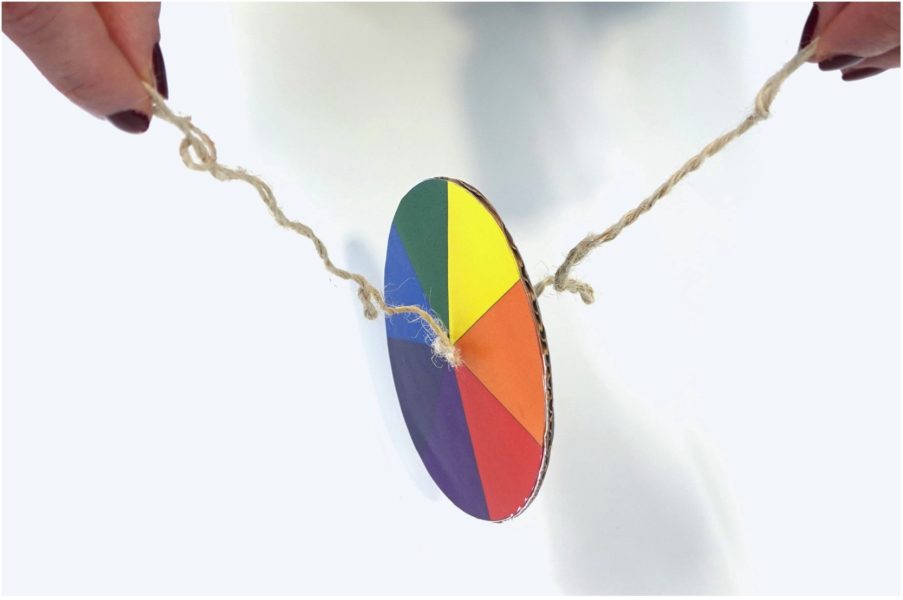
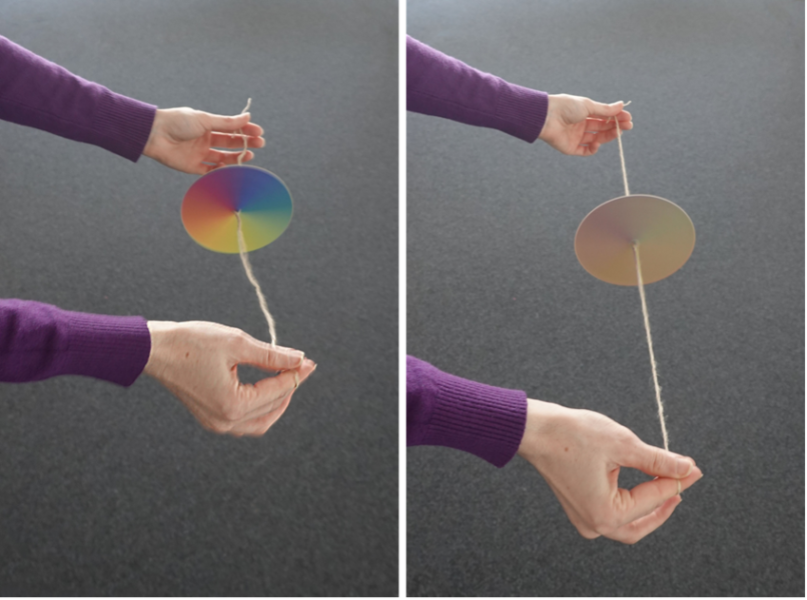
When the disc is spun rapidly, the colours appear to merge and create the perception of white or a light shade of grey (Figure 3). The Newton disc phenomenon is due to the way our eyes and brain process colour information. When the disc spins rapidly, the colours reach our eyes too fast to be differentiated and our brain perceives the combination of these colours as white. So, it’s not strictly the light that is being mixed in this case, but the signals from our eyes. The mesmerising effect of the Newton disc will leave students surprised, as if they were witnessing a magic trick!
In this activity, students learn that the colour of an object is determined by how it interacts with light – by either reflecting or transmitting certain colours – and thus, colour carries information about the properties of objects. This activity engages students by linking scientific principles to the real-world example of gummy sweets, making science concepts deliciously fun and memorable.

This activity is suitable for students aged 11–14 or younger, and takes 1–1.5 hours.
This activity is safe under following conditions:
Students should not eat the gummy sweets used in experiments. However, feel free to have extra packets of gummy bears to share with your students!
When shining white light from above onto the green gummy bears, a silhouette or shadow appears beneath each bear. This shadow replicates the colour of the gummy bear itself. For instance, the shadow of the red gummy bear appears red because only red light is transmitted, while all other colours (wavelengths) are absorbed.

When green laser light is directed at the green gummy bears, it passes through, but red gummy bears do not let green light pass because they absorb all colours (wavelengths), except red. The opposite holds true for a red laser.


Note that when green laser light is directed at the green gummy bears, for example, they exhibit a bright-green glow. The gummy bears have some level of translucency or scattering properties, which results in light being redirected in various directions within the gummy bear instead of travelling in a straight path, creating the impression that the gummy bear is glowing.
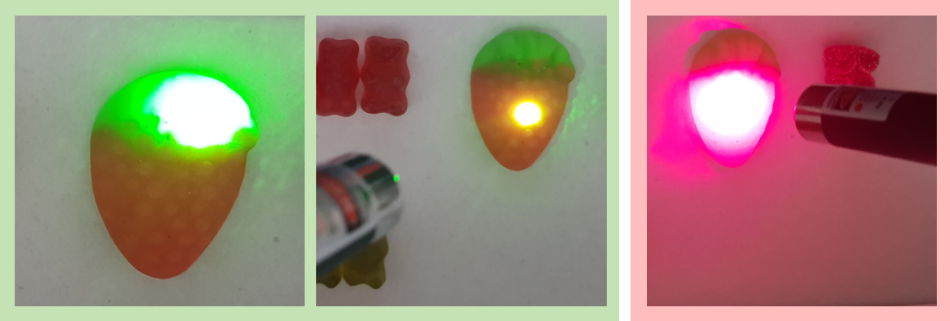
It is important to note that gummy bears are not perfectly transparent, so even gummy sweets of the same colour as the light will absorb some of it. Furthermore, the colours of gummy bears are typically achieved using food-colouring agents, and the colour may result from a combination of different food-dye colours. For example, some green gummy bears can be made with tartrazine (yellow), brilliant blue (blue), and strawberry flavour (red). Therefore, this type of gummy sweet may not be the ideal model green filter.
These easy hands-on experiments using everyday objects will help students understand the different processes that can occur when light interacts with objects, including absorption, reflection, refraction, and transmission. Although the gummy bears do not show the same ideal model transmission/absorption behaviour as the transparent coloured sheets traditionally used for these classes, they provide a real-world hook to help capture students’ imagination and encourage them to think about colours in the world around them and not just artificial experimental setups. The slightly different behaviour of the gummy sweets compared to textbook models is also an opportunity to discuss where the differences come from and all the different variables that can contribute to how objects interact with light. The learned concepts have practical applications in various scientific fields and will promote critical thinking and spark interest in the world of science.
TMC has received funding from “la Caixa” Foundation and FCT, I.P., under the project code LCF/PR/HR22/00533; the European Union’s Horizon 2020 research and innovation programme under the Marie Skłodowska-Curie grant agreement no. 867450, and from the European Union’s Horizon 2020 research and innovation programme under grant agreement no. 101094250.
RCF was funded by FCT, under the “Norma Transitória” – DL57/2016/CP1361/CT0020.
TMC, RCF, and DP have received funding from the Foundation for Science and Technology under the projects UIDB/04326/2020, UIDP/04326/2020, and LA/P/0101/2020.
[1] Chan ED, Chan MM, Chan MM (2013) Pulse oximetry: understanding its basic principles facilitates appreciation of its limitations. Respiratory Medicine 107: 789–799. doi: 10.1016/j.rmed.2013.02.004
European Molecular Biology Laboratory (EMBL)
A ground-breaking method called Light-Seq is revolutionising researchers’ ability to study biological tissues. This technique seamlessly integrates imaging and sequencing, allowing researchers to study the gene expression of specific cells, leaving them intact for further analysis. The method has been successfully used to study rare neuronal cell types and promises a new era of research, offering unprecedented insights into gene transcription patterns at the subcellular level.
European Southern Observatory (ESO)
Light is still the primary source of information for astronomers to learn more about the universe. By observing galaxies with different telescopes, cameras, and in different colours, the mysteries about the evolution of galaxies can be solved. In this ESO blog post, you will discover more about the origins of light within galaxies, how they can be studied by analyzing the light, and what it takes to create these fascinating images of gigantic islands of stars in the universe.
Download this article as a PDF