Kinder eggs and physics? Teach article
These simple physics experiments add an extra surprise to your Kinder Surprise chocolate eggs.
Most people are likely to have come across Kinder Surprise® chocolate eggs. These hollow chocolate eggs contain a surprise, in the form of a small toy, hidden inside a plastic egg-shaped container. However, not everybody realises that the plastic inner containers can also be used in simple physics experiments.
The experiments presented here, which are quick and easy to do and use readily available materials, challenge students to predict and explain the results. They can be used as teacher demonstrations or experiments for small groups of students. Depending on the level of explanation provided, the activities can be used with children as young as seven or as old as 16.
A self-righting toy
The shape of the plastic egg can be exploited to create a well-known children’s toy, a self-righting dummy.
Materials
- A plastic container from a Kinder egg
- Plasticine® or other modelling clay
- A small, heavy object such as a metal nut or small magnet
- Optional: pencils and stickers to decorate the egg
Procedure
- Use the Plasticine to fix the heavy object into the bottom of the plastic egg.
- Close the egg.
- Decorate the outside of the egg (optional).
Push the egg: it should right itself easily because its centre of gravity has been lowered by the additional weight.
A demonstration of buoyancy
Demonstrate how the floating behaviour of the plastic eggs depends on their density.
Materials
- 3 plastic containers from Kinder eggs
- A large bowl of water
- Salt solution (NaCl, at least 3% w/v)
Procedure
- Fill one plastic egg with pure water (to fill it, submerge the open egg in water and close it there).
- Fill another egg with the salt solution.
- Keep the third egg empty, i.e. filled with air.
- Put the three eggs into the bowl of water and observe their behaviour.
behaviours of the loaded
eggs
Image courtesy of Jozef
Ondera
One egg will float on the surface of the water, another will sit just below that level, and the third will sink to the bottom. Present this experiment to students as a mystery problem– their task is to explain the different behaviours of the eggs (figure 3). The students could do some further investigative work by putting different numbers of small coins into the eggs and noting the floating depth.
About what happens
When solving this mystery, students soon discover that the eggs are of different weights and hence different masses. Since the volume of the eggs is the same, it must be their density that is causing the difference in behaviour. The highest density belongs to the heaviest egg (the one filled with salty water), and since its density is greater than the density of the water in the vessel, the egg sinks to the bottom. The egg filled with pure water has approximately the same density as the water, so it hovers just below the water surface (with the plastic of the container being sufficiently light to hold it there). Finally, the egg filled with air has a lower density than water, so it floats on the water.
The mysterious motion of a Kinder egg
Puzzle your students with the effect of friction inside the plastic egg.
Materials
- A plastic container from a Kinder egg
- Fine cotton or nylon thread
- A steel ball with a hole in it (or a nut)
- A wooden or cork ball with a hole in it
- A short length of bent hose or a plastic drinking straw, somewhat longer than the plastic egg
- A pair of scissors or other sharp implement to pierce the plastic egg
Procedure
To prepare the experiment:
- Make holes in both ends of the plastic egg.
- Pass the thread through one hole, through the bent hose or drinking straw, then through the other hole (figure 4).
- Close the egg.
- Attach the steel ball (or the nut) to one end of the thread and the wooden or cork ball to the other end.
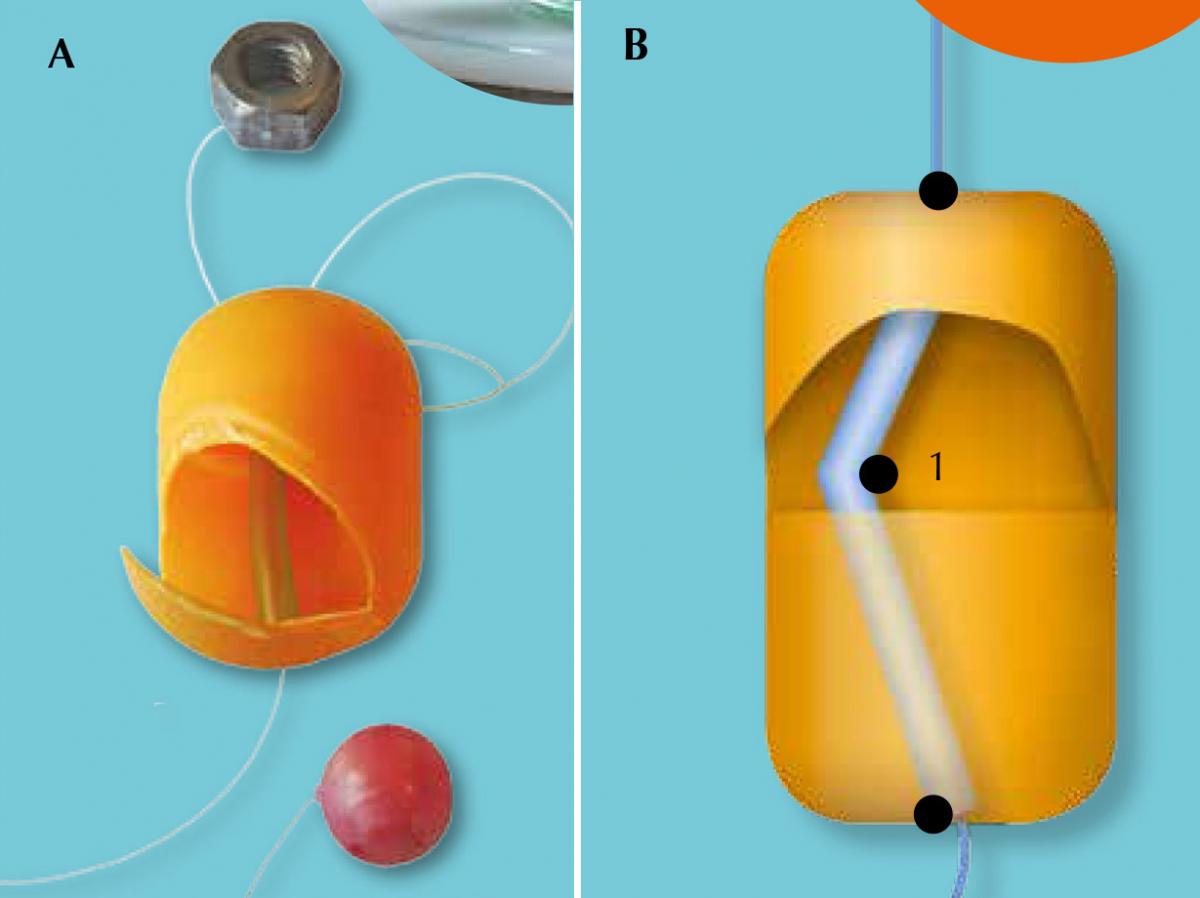
Image courtesy of Jozef Ondera (A) and Nicola Graf (B)
To perform the experiment:
- Ask your students to hold the steel ball in their hand and let the egg hang down.
- The egg slides down the thread towards the wooden or cork ball (figure 5A).
- Your students should then repeat the experiment, changing the position of the balls so that they are holding the wooden or cork ball.
- This time, the egg does not move down but stays in a stable position on the thread (figure 5B).
- Ask your students to explain what they observe. What is happening inside the egg?
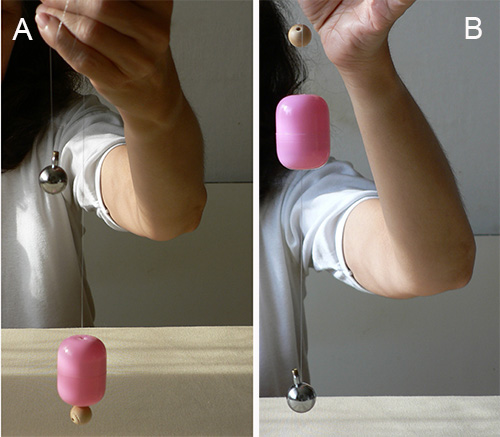
slides down to meet the
wooden ball; B: With the steel
ball below, the egg remains
part-way down the thread
Image courtesy of Jozef Ondera
About what happens
When the light wooden or cork ball hangs below the egg, the thread is not under significant tension and there is little friction between the thread and the hose (figure 4B), thus the egg can move easily. If we turn the whole system upside down so that the steel ball hangs down, the thread is under significant tension and presses onto the angle of the bent hose (figure 4B); this significantly increases the frictional force so that the egg cannot move any more.
A similar effect could be obtained in other ways, and it might be interesting to ask your students to discover them: to create the same resultant behaviour but with a different method.
Against the flow
Demonstrate how a difference in pressure causes the plastic egg to float against the flow of water.
Materials
- A plastic container from a Kinder egg
- A long transparent tube that is closed on one end, e.g. a measuring cylinder. Its diameter should be slightly larger than that of the plastic egg
- Water
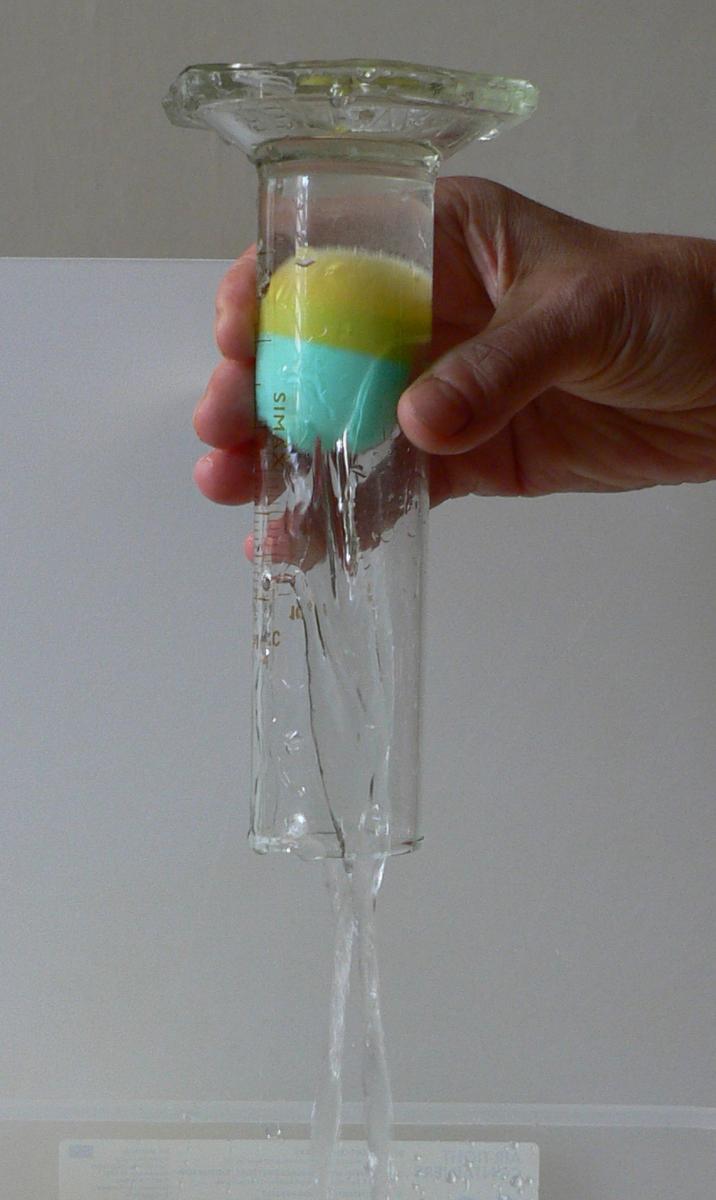
the plastic egg floats on the
water instead of falling out
of the tube
Image courtesy of Jozef Ondera
Procedure
- Put the empty egg into the tube so that it falls to the bottom.
- Start pouring water into the tube.
- The egg rises up the tube.
- Completely fill the tube with water, cover the top with your hand and turn the tube upside down.
- Hold the tube in an upside-down position and remove your hand, allowing the water to flow out.
- Instead of falling out of the tube, the egg floats on the water (figure 6).
About what happens
Once the system is upside down, water begins to flow around the egg, clinging to the surface as it falls. Thus the egg is effectively surrounded by water. Below the egg is atmospheric pressure; above the egg, the pressure is reduced by an amount of water equivalent to the height of the egg. Hence the egg experiences an up-thrust equivalent to this pressure difference. Put another way, because the water surrounds the egg, the egg will float.
The egg equilibrium
Demonstrate how moving the centre of mass changes the equilibrium position of the plastic egg.
Materials
- A plastic container from a Kinder egg
- A water-proof marker
- Approximately 30 cm of thin wire
- A non-absorbent object, the right size and shape to fit firmly into one end of the plastic egg and with a density greater than air and less than water (e.g. expanded polystyrene)
- A transparent container of water, e.g. a measuring jug
- A pair of scissors or other sharp implement to pierce the plastic egg
- Water
Procedure
the new (hinged) design; the
green egg is the old
(two-part) design
Image courtesy of Jozef
Ondera
To prepare the experiment:
- Using the water-proof marker, mark each end of the egg (e.g. a circle on one end and a cross on the other). (If you are using the old design of the Kinder egg, see figure 7, you can simply use two halves of different colours.)
- Pierce holes on both sides of the middle of the plastic egg. Pierce additional holes at both ends of the plastic egg.
- Wedge the non-absorbent object firmly into one half of the plastic egg.
- Thread the wire through the holes and twist the ends together to make a handle, then close the egg.
To perform the experiment:
- Holding the egg by the wire, note which mark (e.g. circle or cross) is on top.
- Push the egg to set it swinging.
- The egg returns to its previous position, with the same mark on top.
- Immerse the egg in the jug of water.
- As the water enters through the holes in the egg, the egg turns upside down (figure 8).
- Remove the egg from the water.
- As the water flows out of the egg, the egg returns to its original position.
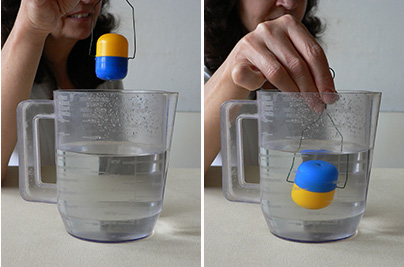
turning upside down in water
Image courtesy of Jozef Ondera
About what happens
In air, the egg is in a stable equilibrium position with the non-absorbent object in the lower half of the egg: the centre of mass is below the axis of rotation, which passes through the pivot. Thus when the egg is deflected from its equilibrium position, the moment of the gravitational force with respect to the rotational axis causes the egg to return to its original position.
When the egg is submerged, water enters the egg (as can be seen by the escaping bubbles of air), but the non-absorbent object ensures that only the upper half of the egg can fill with water. As the upper half becomes heavier than the lower half, the position of the centre of mass changes and the egg rotates, so that the centre of mass is once more below the axis of rotation.
Kinder-egg circus artist
Can your students discover what makes the plastic egg turn somersaults?
Materials
- Per group of students, one plastic container from a Kinder egg
- A selection of objects of different shapes (including balls), sizes and weights that are small enough to fit into the plastic egg
- An inclined plane
Procedure
- Place the pre-prepared plastic egg onto the inclined plane and observe your students’ amazement: instead of simply rolling down the slope, the egg turns end over end, doing somersaults like a circus artist!
- Give each group of students a plastic egg and a selection of objects, and ask them to reproduce the behaviour of the egg you demonstrated.
- Alternatively, you can give them the pre-prepared egg as a ‘black box’ and ask them to explain its behaviour without opening it.
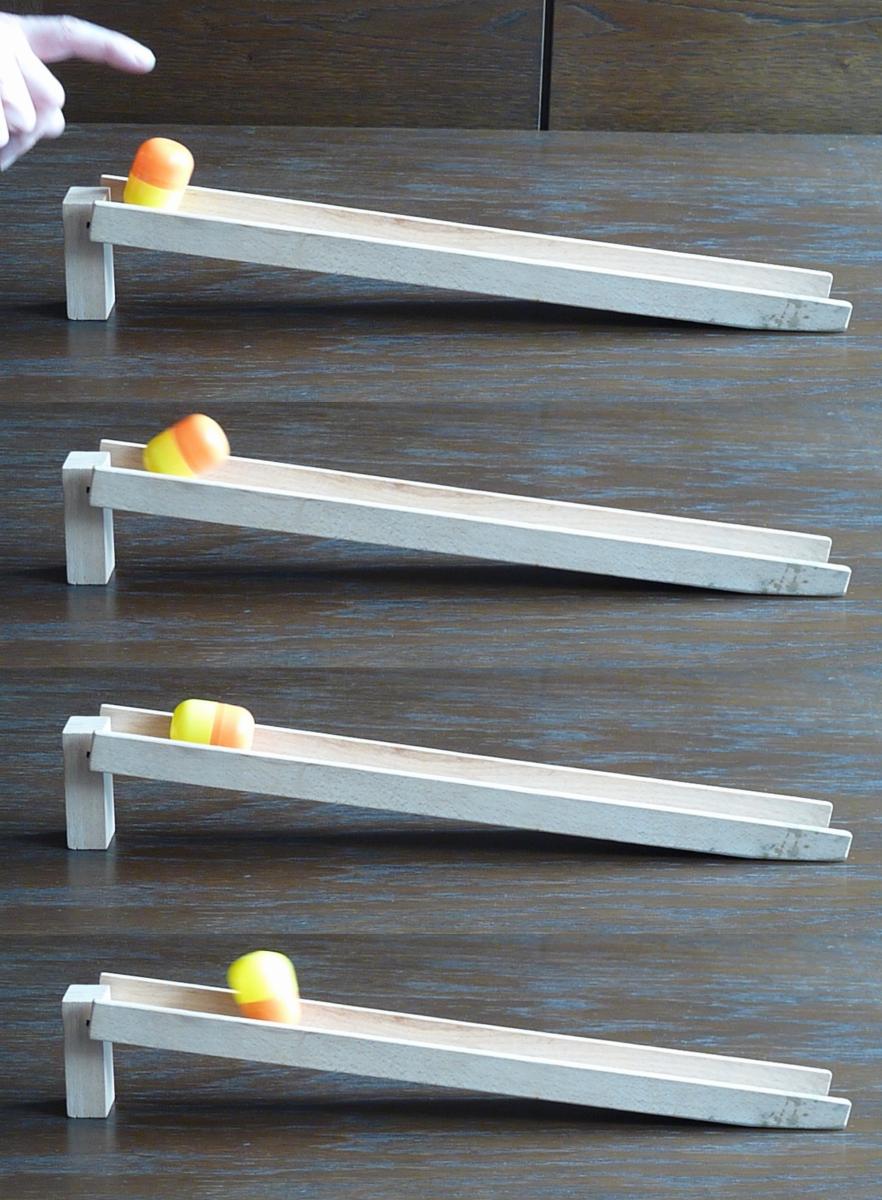
circus artist: turning
somersaults
Image courtesy of Jozef
Ondera
By shaking and turning the ‘black box’, the students will realise that there is a round object inside the egg. By putting different balls into an empty egg, they will find a ball of the right size and sufficient weight to make the egg to turn somersaults. Then they should be able to explain the behaviour.
About what happens
When the egg is placed on the inclined plane, the ball inside will, as a result of gravity, roll down to the rounded end of the egg. This causes the upper end of the egg to lift up and the whole egg (the circus artist) to overturn. The ball inside the container will then roll down again, causing the egg to somersault further.
Your ideas?
We hope that our suggestions have given you some ideas for your own experiments. Why not leave a comment on the online version of this article, telling us how you used our ideas and what other experiments you tried? Did they work well? What could have been improved?
Acknowledgement
This article has been adapted from an original paper in Physics Education (Onderová & Featonby, 2015).
References
Resources
- Further toys and simple contraptions for use in physics lessons are described in:
- Aref H, Weaire D, Hutzler S (2007) Toying with physics. Europhysics News 38(3): 23-26
- Fort J, Llebot JE, Saurina J et al (1998) A counterintuitive toy: the bird that never falls down. Physics Education 33: 98-101
- Featonby D (2005) Toys and physics. Physics Education 40(6): 537-543
- Güémez J, Fiolhais C, Fiolhais M (2009) Toys in physics lectures and demonstrations – a brief review. Physics Education 44(1): 53-64
- Onderová L (2009) Physics: a black box? Science in School 12: 40-43.
- Tifi A, Natale N, Lombardi A (2006) Scientists at play: teaching science process skills. Science in School 1: 37-40.
- Tifi A, Natale N, Lombardi A (2006) Scientists at play: contraptions for developing science process skills. Science in School 2: 20-23.
Review
What an interesting and innovative way to investigate some of the most fundamental concepts of physics! The activities can be used to carry out investigations into, for example, the centre of gravity, stability, resultant force and pressure in liquids.
All the materials required are readily available and the instructions are easy to follow, making the activities suitable for students to perform in groups. Why not ask the students to predict what will occur, investigate, observe what happens and then reflect on their findings? This can be a fun and playful way to eliminate misconceptions and learn what is behind some behaviour that is usually taken for granted.
I am sure that the students will enjoy collecting the Kinder Surprise plastic containers for their physics lessons – a great excuse to eat chocolate!
Catherine Cutajar, Malta


