


Bioenergy in a nutshell Teach article
Could leftover nutshells be the next renewable energy source? Challenge your students to find out using calorimetry.
The world is waking up to the harm caused by burning fossil fuels. As a result, many countries are turning towards more environmentally friendly alternatives, including energy derived from biomassw1. Although these sources are generally considered better than non-renewables, one argument at the heart of most bioenergy debates is that farmland is often diverted for the production of the biomass, which comes at a cost to the food supply. One obvious way to avoid this ‘food versus fuel’ dilemma (and reduce carbon emissions in the process) is to derive bioenergy from waste.
In recent years, one material that we normally think of as a food source – nuts – has started to be used as an energy source. At present, whole nuts are used, but would burning leftover nutshells be a more sustainable way to use this material? And could waste nutshells help to meet future energy demands? In the following activities, we challenge students to find out.
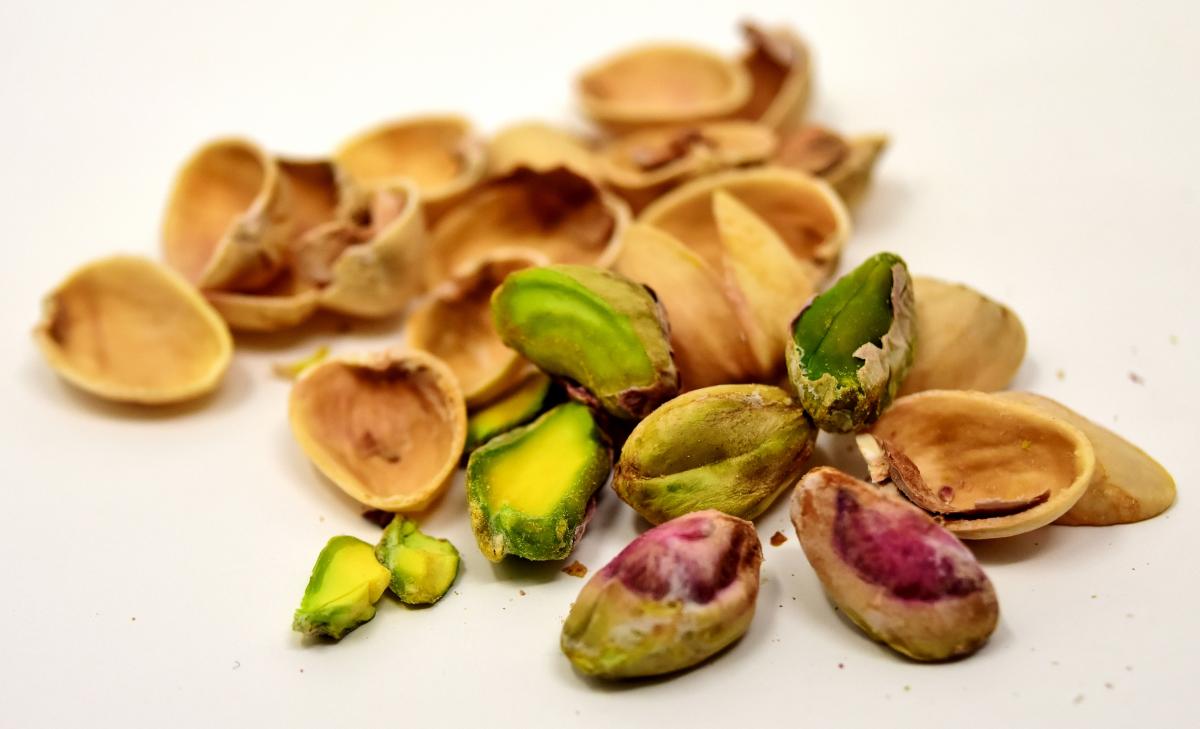
Alexas_Fotos/pixabay.com, CC0
Using a homemade calorimeter, students aged 14–19 determine the amount of heat energy released by various nutshells. By comparing their results to data from scientific literature, the students evaluate whether nutshells could replace other renewable energy sources that are currently in use.
Preparation: building a combustion calorimeter
Constructing the calorimeter takes 1–2 hours. We suggest that students work in groups of 2–3 and build one calorimeter per group. If your school already has calorimeters that can be put in contact with a flame, you can omit this part of the activity and start immediately with the experiment.
Materials
For one combustion calorimeter (figure 1):
- Metal base or tripod for supporting the calorimeter
- Three large pieces of insulating polystyrene
- 50 ml beaker with polystyrene lid
- Thermometer
- Wire gauze mat with a ceramic centre
- Adhesive aluminium foil
- Craft knife
- Rasp
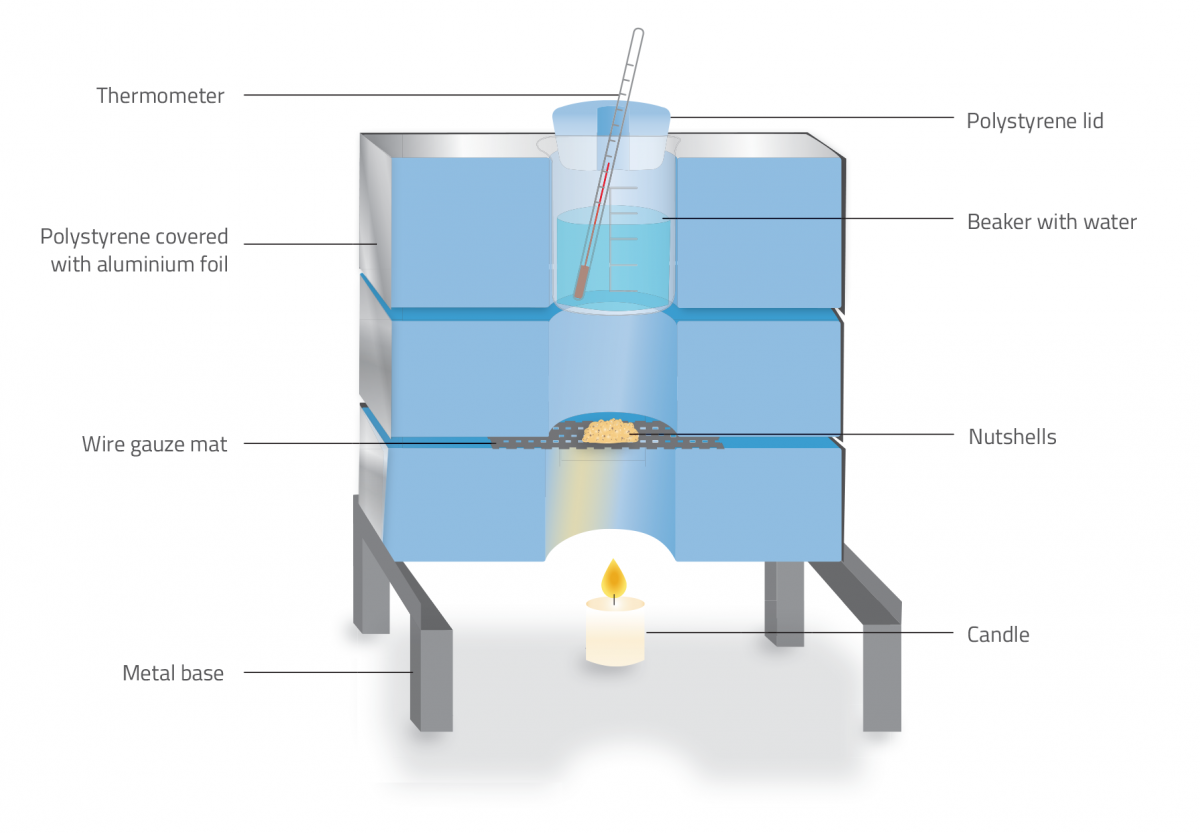
Papadopoulos Stavros/Nicola Graf
Procedure
- Find a suitable metal structure to act as the base of your calorimeter. The pieces of polystyrene will sit on top of this base, so the structure creates a space underneath where the candle can be placed. We used a metal structure that we already had available in our school laboratory (figure 2), but you can scale down the size of the calorimeter by using a tripod.
- The polystyrene part of the device will hold the beaker. Using a craft knife, cut the three pieces of polystyrene to fit the dimensions of your metal base or tripod. Note that one of the pieces of polystyrene (to be placed on top of the other two) should be thick enough (e.g. 6 cm) to fit the beaker inside. The other two pieces can be thinner (e.g. 3 cm).
- In the centre of each of the polystyrene pieces, cut a hole with the diameter of the beaker. Smooth the walls of the holes using a rasp. The beaker should fit snugly to prevent the passage of air.
- Using a leftover piece of polystyrene, cut out a lid for the beaker, which will act as a bung. Cut a small hole in the lid for the thermometer to pass through (figure 3).
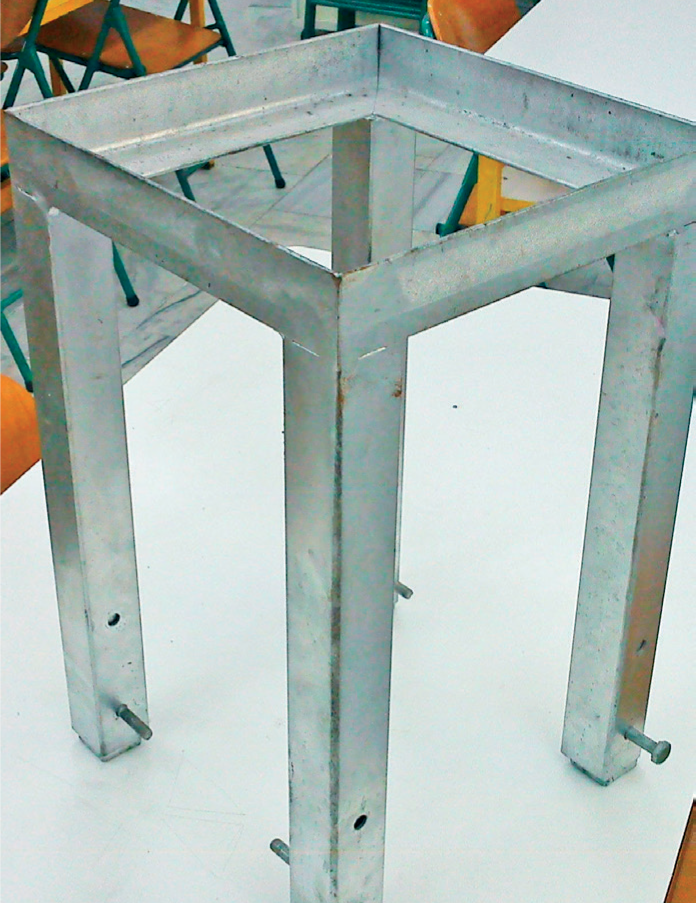
Figure 2: A metal base, such
as this, acts as the support
for the calorimeter.
Papadopoulos Stavros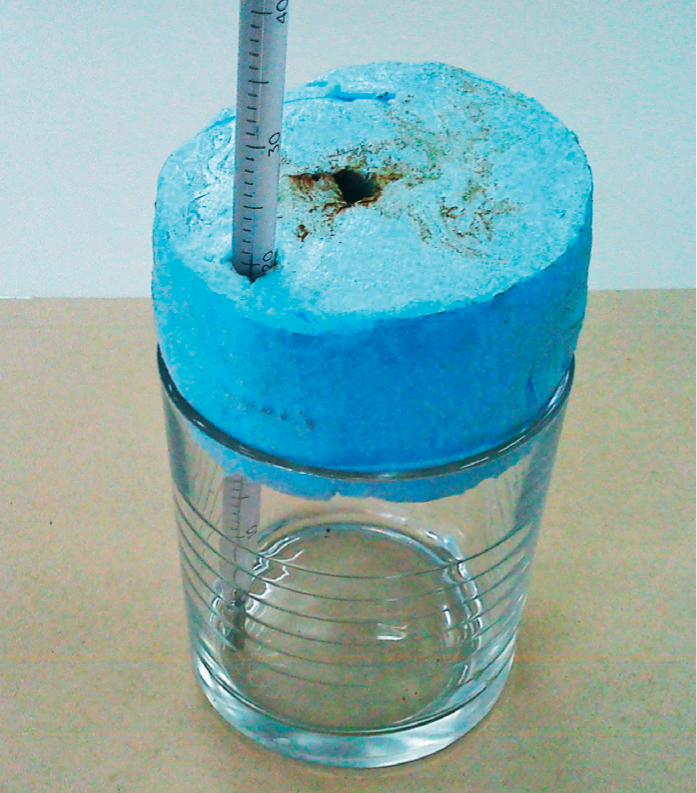
Figure 3: The beaker is
sealed with a polystyrene lid,
through which a
thermometer passes.
Papadopoulos Stavros
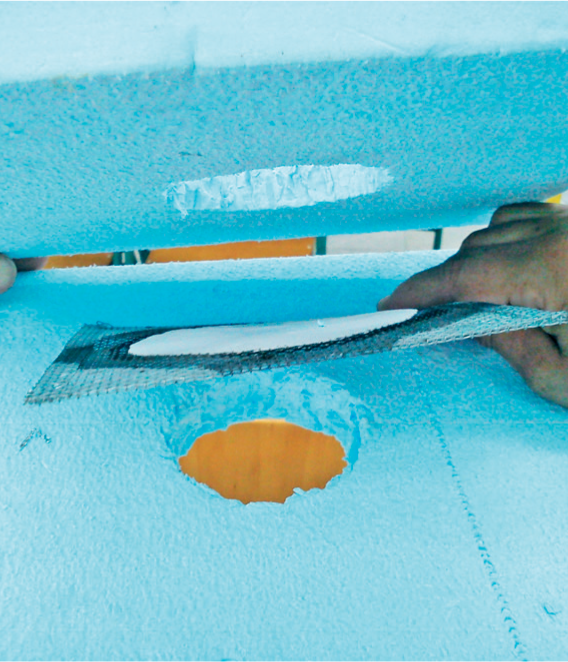
Figure 4: The wire gauze mat
is sandwiched between the
two thinner polystyrene
pieces.
Papadopoulos Stavros
- Sandwich the wire gauze mat between the two thinner polystyrene pieces (figure 4) and place the thicker piece of polystyrene on top.
- Wrap each of the three pieces of polystyrene in aluminum foil, folding the ends of the foil into the holes for the beaker. Make sure the polystyrene is completely covered by the foil, as this will ensure that the polystyrene does not catch fire.
- Position the beaker (complete with the lid and thermometer) in the top of the calorimeter (figure 5).
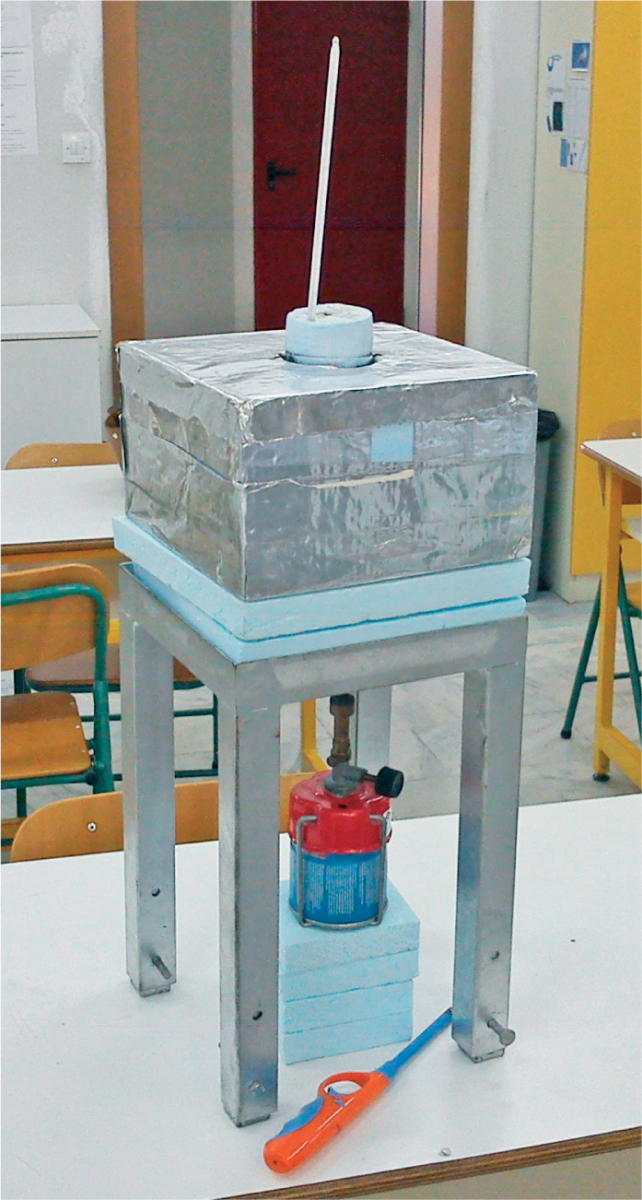
Figure 5: The finished calorimeter is ready for carrying out the experiments.
Papadopoulos Stavros
Experiment: burning biomass
In the same groups, students burn various nutshells and kernels using their calorimeter and calculate the amount of heat energy that is transferred from the kernel or shell to the water in the beaker. Although the aim of the experiment is to determine the amount of energy released by nutshells (not kernels), students also need to burn the kernels to compare their results to published values, as these values are more widely available than those for nutshells.
For the calculations, students use the following equation:
Q = m x c x ΔΤ
Where:
Q = heat energy transferred (J)
m = mass of water (kg)
c = specific heat capacity of water (4200 J kg-1 K-1)
ΔΤ = change in temperature (K)
We suggest that students burn kernels and nutshells for four different types of nut, in which case the whole experiment will take approximately 2 hours including calculations and repetitions.
Materials
- Calorimeter
- Nuts, e.g. walnut, hazelnut, almond, pistachio
- Mortar and pestle
- Electronic precision balance (readability of 0.1 g or smaller)
- Thermometer
- Nutcracker
- Tweezers
- 50 ml water
- Candle, e.g. tea light (and matches)
Safety note
This activity should not be carried out if any students or staff involved have an allergy to nuts. Remember that remnants may stay in the air following the grinding or burning of nuts, which could affect other individuals with severe allergies that use the same room afterwards.
Safety goggles should be worn and special care should be taken with the open flames.
Procedure
- Using a nutcracker, break each type of nut and separate the kernels from the shells. Gently grind each sample (kernels and shells separately) with a mortar and pestle.
- Weigh 0.2 g of each sample using the electronic precision balance. This amount is enough to cause a measurable change in water temperature when burned.
- Remove the upper piece of polystyrene and place your first ground sample on the wire gauze mat.
- Add 50 ml of water to the beaker and seal it with the polystyrene lid. Ensure that the thermometer is in contact with the water. Record the initial temperature.
- Light the candle and place it under the wire gauze mat to ignite the sample.
- As soon as the sample ignites, remove the candle to avoid heating the water from the flame of the candle. Place the upper piece of polystyrene (with the beaker) back into position.
- Closely watch the burning sample from underneath the calorimeter. As soon as it stops burning, read and record the water temperature again.
- Calculate the temperature change of the water and then determine the amount of heat that the sample transferred when it burned, using the equation Q = m x c x ΔΤ. Remember that 1 ml of water weighs 1 g.
- Repeat the steps for each of the nut samples at least three times, replacing the water in the beaker between each sample.
- Calculate the mean heat energy per kilogram for each material (table 1). Note that values for kernels from published literature are shown in table 2.
| Mean heat energy per kg (x 104 kJ/kg) | ||
|---|---|---|
| Nut type | Kernel | Shell |
| Walnut | 1.4595 | 0.5320 |
| Hazelnut | 1.4175 | 0.5285 |
| Almond | 1.1690 | 1.0745 |
| Pistachio | 0.6685 | 0.5180 |
Assessing reliability
Students should compare their own results for nut kernels to values that are widely available in scientific literature. This allows them to assess the reliability of their results for nutshells. Students can search for the literature themselves or use the values provided in table 2. Our students found that their own experimental values for nut kernels differed by roughly 50% from the published values they obtained (Brufau et al., 2006). This large difference provides an opportunity to discuss why the experimental setup and procedure may cause such a discrepancy. Later, students will calculate a correction factor by which to amend their data. There are a number of sources of error that you can discuss, for example:
- At the start of the experiment, students weigh 0.2 g of nut material using an electronic precision balance. This measurement could introduce some error depending on the readability of the balance.
- To check whether the samples have finished burning, students may need to remove the beaker and polystyrene to see the sample, which would release heat from the calorimeter and affect the final temperature of the water.
- When the material stops burning, can students be sure that the entire sample burned or might combustion be incomplete? Leftover ashes or unburned pieces of nuts, for example, would add to the error.
Overall, however, the biggest source of error in calorimetry occurs as a result of heat being lost to the surroundings. To deal with this, students need to calibrate their calorimeter. In the next activity, they do this by measuring the combustion energy of a paraffin wax candle with a specific mass.
| Mean heat energy per kg (x 104 kJ/kg) | |||
|---|---|---|---|
| Nut kernel | Experimental values without calibration | Experimental values with calibration | Published values |
| Walnut | 1.460 | 2.840 | 2.735 |
| Hazelnut | 1.418 | 2.757 | 2.679 |
| Almond | 1.169 | 2.274 | 2.302 |
| Pistachio | 0.669 | 1.300 | 1.147 |
Calibration: improving accuracy
Students calculate the amount of heat energy that the water in the beaker absorbs from the heat of the candle, and compare this to the amount of heat energy that the candle releases. By comparing the two values, students can calculate the heat loss and the error in their measurements. This procedure takes approximately 1 hour including repetitions.
Materials
- Calorimeter
- 50 ml water
- Candle, e.g. tea light (and matches)
- Electronic precision balance (readability of 0.1 g or smaller)
- Stopwatch
Procedure
- Weigh the candle using the precision balance and record the value.
- Remove the upper piece of polystyrene and place the candle on the wire gauze mat.
- Add 50 ml of water to the beaker, seal it with the polystyrene lid, and record the water temperature as in the first experimental procedure.
- Light the candle using a match and quickly place the upper piece of polystyrene (with the beaker) back into position.
- Using the stopwatch for timing, allow the candle to burn for 10 minutes before blowing it out. Record the water temperature and calculate the change in temperature.
- Weigh the candle again and calculate the change in mass.
- Calculate the amount of heat energy transferred to the water using the equation Q = m x c x ΔΤ.
- Repeat the procedure at least three times and calculate the mean heat of combustion of the paraffin wax by dividing the heat energy (Q) by the change in mass of the candle. In our case, the experimentally determined mean heat of combustion of the wax was 2.1589 x 10⁴ kJ/kg. The heat of combustion of paraffin wax is known to be 4.2 x 10⁴ kJ/kg (Seager et al., 2011).
- Using these two values, determine a correction factor (D) by calculating the ratio. Using the values above:
D = 4.2 x 10⁴ / 2.1589 x 104
= 1.945
- Multiply your experimental values by the correction factor, which takes into account the heat energy that was lost to the surroundings. Your experimental data should now be more closely in agreement with the values obtained from scientific literature (table 2). Variations may still exist, however, highlighting the importance of discussing all sources of error in the investigation.
Drawing conclusions
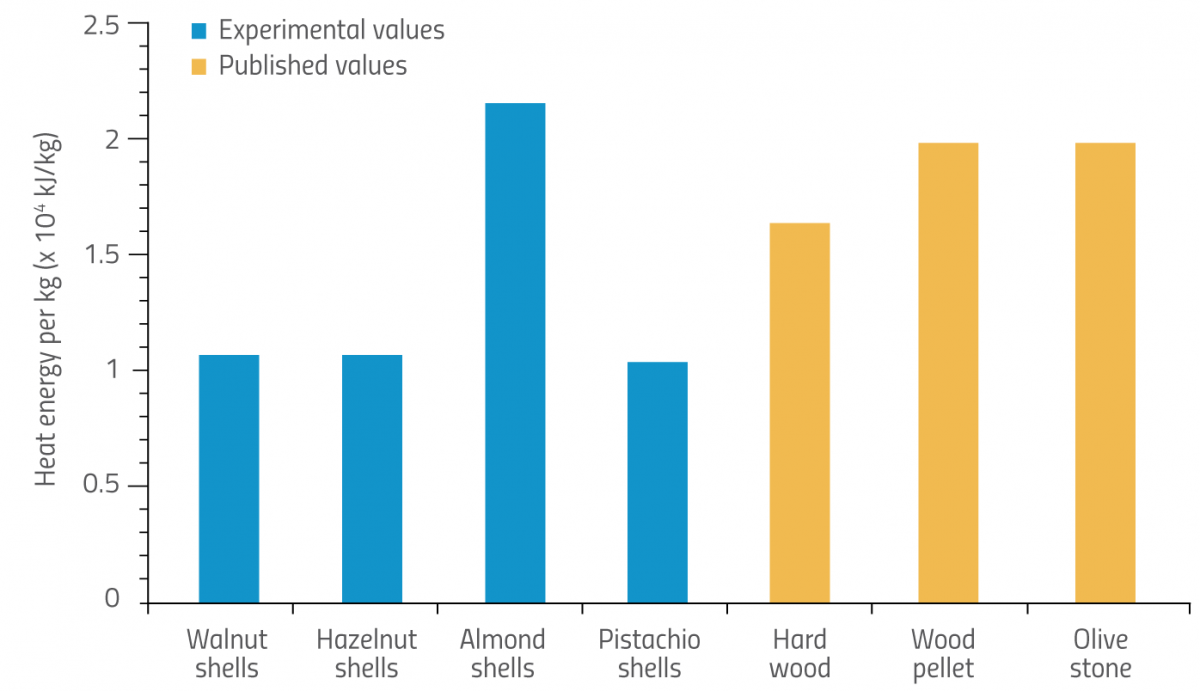
For the final part of the activity, students evaluate whether nutshells could replace other renewable energy sources. To do this, students can obtain data from scientific literature regarding the energy released by burning existing sources of biomass, such as hardwood, wood pellets or olive stones, and compare these to their own experimental results for nutshells. Alternatively, students could use the values in table 3, which are sourced from published literature. They can then plot this information on a graph (figure 6).
| Mean heat energy per kg (x 104 kJ/kg) | |||
|---|---|---|---|
| Biomass (nutshells and other sources) | Experimental values without calibration | Experimental values with calibration | Published values |
| Walnut | 0.5321 | 1.0349 | – |
| Hazelnut | 0.5285 | 1.0279 | – |
| Almond | 1.0745 | 2.0899 | – |
| Pistachio | 0.5180 | 1.0075 | – |
| Hardwood | – | – | 1.5823 |
| Wood pellet | – | – | 1.9088 |
| Olive stone | – | – | 1.8944 |
Papadopoulos Stavros
Overall, our results showed that the energy released from the combustion of nutshells was approximately 46% lower than the energy released by these three other renewable sources. However, note that our energy value for almond shells was actually comparable to that for wood pellet and even better than those for hardwood or olive stones.
If time allowed, students could actually perform the calorimetry experiments for these other sources of biomass themselves, and compare their own values for hardwood, for example, to their values for nutshells.
To fully assess whether nutshells could be a suitable alternative, students should also consider the advantages and disadvantages of using nutshells for bioenergy. For example, the major advantage is that shells are a waste material, so the production cost is very low. Nutshells also contain very little moisture, so they don’t require any further drying – unlike (for example) wood pellets – which reduces processing costs. However, the amount of energy produced by certain nuts is much lower than other potential sources, as the results show. In addition, using nutshells as a bioenergy source is feasible only in countries where the production of nuts – and in particular, almond nuts – is high, such as the USA, Spain, Iran, Italy and Syriaw2.
Overall, our students appreciated the importance of using nutshells as a source of energy, and came to the conclusion that using shells – which would otherwise go to waste – for bioenergy production is a valuable and innovative practice. What conclusions will your own students draw?
Acknowledgements
The authors would like to warmly thank their students, Giannis Charalambidis, Alexis Nikas and Giannis Mantzaridis, for their assistance with the experiments described in this article, which was written in memory of Giannis Mantzaridis, who died in 2017.
Their thanks also go to Dr Georgios Memetzidis for fruitful discussions regarding the construction and calibration of the calorimeter. They would also like to express their gratitude to their current headmaster, Dr Konstantinos Keramidas, for his interest and continued support.
References
- Brufau G, Boatella J, Rafecas M (2006) Nuts: source of energy and macronutrients. British Journal of Nutrition 96(2): S24–S28. doi: 10.1017/BJN20061860
- Lee JS (2015) Calorific value of wood pellets. Master’s thesis. University of British Columbia. doi: 10.14288/1.0135651
- Miranda T et al. (2008) Combustion analysis of different olive residues. International Journal of Molecular Sciences 9(4): 512–525. doi: 10.3390/ijms9040512
- Seager SL, Slabaugh MR (2011) Chemistry for Today: General, Organic, and Biochemistry. Cengage. ISBN: 978-0-538-73332-8
- Telmo C, Lousada J (2011) Heating values of wood pellets from different species. Biomass and Bioenergy 35(7): 2634–2639. doi: 10.1016/j.biombioe.2011.02.043
Web References
- w1 –The Sustainable Energy Handbook, available on the European Union website, provides information regarding the use of biomass for heat and electricity.
- w2 – Visit the website of the Food and Agriculture Organization of the United Nations (FAO) to read more about production quantities of almonds in different countries.
Resources
- Find case studies describing how nutshells are used to generate power on the Biomass Producer website.
Review
In this exciting investigation, teachers are provided with information to enable students to make their own calorimeter. This could be a fun activity to run in a science or technology club outside lessons, although it might be possible within a lesson if all the materials are ready to use.
Another novel aspect of the investigation is the exploration of nutshells (which are usually seen as waste materials) as potential biofuels. This investigation links well to physics and chemistry, as students calculate heat energy released, calibrate their calorimeter, assess the reliability of data collected, apply correction factors and compare final results to published values. These steps offer much potential for students to discuss sources of error and how to minimise them, an aspect that is applicable to all branches of science. The ideas surrounding bioenergy could also link to biology, environmental science, geography and economics.
If safety issues concerned with nut allergies make this activity problematic, other materials that are also considered as waste could be used instead of nuts. These could include stones of fruits such as olives, plums, peaches or avocados, and possibly grape seeds.
Dr Sue Howarth, science education consultant and former senior lecturer in science education, UK