The latex motor Teach article
Can you imagine building a motor from latex gloves? Physics teachers Ludwig Eidenberger and Harald Gollner, and their students Florian Altendorfer and Christoph Eidenberger, show how, exploiting the reversible thermodynamic processes of thin layers of latex.
How the project began
In 2006, we took part in the Experimentale 2007w1 in Wels, Austria, a biennial regional science exhibition for schools. The inspiration for our project came from a simple effect described in the chapter on thermodynamics of the popular physics book Feynman Lecturesw2: a stretched rubber band contracts when heated. This is unusual, since most materials expand when heated, rather than contract.

at Science on Stage in Berlin, 2008:
Harald Gollner, Christoph
Eidenberger, Ludwig Eidenberger,
Florian Altendorfer (from left to right)
Image courtesy of Science on
Stage Germany
We concentrated on how best to visualise this effect, and developed an elevator and a motor, as well as two types of refrigerator – all driven by the expansion and contraction of latex, a type of rubber. The advantages of latex over other types of rubber are its high quality, lack of additives, the thin layers in which it is available – plus the added fun factor of using coloured condoms.
This interdisciplinary project was a valuable experience for everyone involved: we collaborated with art and technology teachers on the experimental design; the students translated texts, designed posters and a websitew3, and practised their presentation and communication skills, not only in German, but also in English and Spanish.
They carried on working on the project for over a year after leaving school in 2007, and the whole team are still running teacher workshops on the project, such as in Technorama, The Swiss Science Centerw4 in Zürich (2009), and in Berlin, Germany (2010)w5.
The principle
Latex is a polymer consisting of long, chain-like molecules of repeating isoprene units (C5H8). In its relaxed state, the chains are interlinked at a few points. Between a pair of links, each monomer can rotate freely about its neighbour, and at room temperature, latex stores enough kinetic energy for them to do so. When latex is stretched, though, the monomers are no longer able to oscillate, and their kinetic energy is given off as excess heat. When the expanded latex is heated, the process is reversed: the latex absorbs the heat, the molecular motion increases, and the latex contracts.
Experiment 1: the elevator
Click to enlarge image
Image courtesy of the
latex motor team
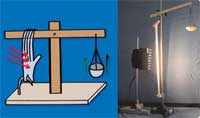
This is a simple experiment, suitable for students aged 11 and above, to introduce the thermodynamics of latex, as it shows the conversion of energy. A latex glove emits heat when expanded and absorbs heat when it contracts again.
Kinetic energy -> thermal energy
As this effect is reversible, a stretched latex glove contracts when heated by a spotlight. We can use this to build an elevator.
Thermal energy -> kinetic energy
The difference between the effect that stretched latex contracts when heated and heat expansion should be mentioned.
The elevator can be built by students with little effort and basic materials (such as a Lego® construction set). In the teacher workshop we ran in Zürich, participants built very diverse elevators with great success entirely without instructions. Instructions that are too detailed will constrain the students’ creativity – try formulating the aim instead: the effect that the stretched latex band will contract when heated should be visualised. Mechanisms to enhance the visibility of this effect could be a lever, a pulley, etc. Below are some guidelines you might like to use.
Materials
-
Sealing clips
Image courtesy of Olaf BrustA thin latex glove or condom
- A spotlight (minimum 500 W)
- A clamp stand with two clamps
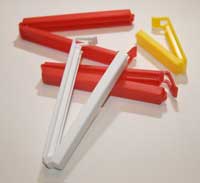
- A wingnut clamp or sealing clip
- A plastic / metal / wooden balance arm with holes spaced at regular intervals
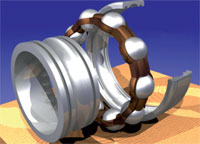
- A nail or similar object as a pivot (if possible with a ball bearing)
- Two hooks
- A hanging scale pan and weights
Procedure
- Fix the two clamps at a distance of about 40 cm along the stand (depending on the latex band you use – it needs to be stretched).
- Fix the balance arm flexibly to the upper clamp, using the nail as a pivot point. One arm should be much shorter than the other: the shortening you will observe in the latex band when applying the spotlight is minimal, and it’s easier to see if the lever is longer.
- Attach the latex glove to the bottom clamp (using its fingers).
-
A ball bearing
Image courtesy of Yannick Patois;
image source: Wikimedia CommonsAttach the hand end of the glove to the wingnut clamp / sealing clip.
- Attach the wingnut clamp / sealing clip with the glove to the short end of the bar using a hook. Be careful not to damage the latex. The glove should be stretched to about ¾ of its maximum so that it can shorten visibly in the experiment.
- Hang the scale pan from the other (long) end of the bar using the second hook.
- Use the weights to adjust the balance arm’s position to be horizontal.
- Shine the spotlight onto the glove – the weight will be lifted due to the glove’s contraction.
This experiment can be used
- To explain that Joule is the dimension of both work and heat
- To show that machines can transform heat into work
- To introduce reversible processes in physics
- To calculate the efficiency factor of the elevator.
Experiment 2: the latex motor
This experiment takes advantage of the thermodynamics of rubber to generate power, creating a thermal engine.
Materials

Image courtesy of the latex motor team
- A hula hoop (diameter about 1 m)
- 8 thin latex gloves or condoms
- A spotlight (minimum 500 W)
- A ball bearing (this will increase the motor’s efficiency)
- A hub (diameter about 20 cm)
- An axis (thread rod)
- A stand
- 16 sealing clips / wingnut clamps
Procedure
- Build a stand that will limit the friction exerted on the axis.
-
The latex motor.
Click to enlarge image
Image courtesy of the latex motor teamConnect the axis and hub to the stand.
- Attach 8 clips / clamps to the hub (e.g. using wire).
- Attach 8 clips / clamps at regularly spaced intervals to the hula hoop.
- Work in groups to fix the moderately stretched gloves / condoms between the hub and the hula hoop with the sealing clips.
- Make sure that the hula hoop is perfectly balanced on the hub – otherwise it won’t work. Adjust the tension of the gloves / condoms; use small weights to balance the system.
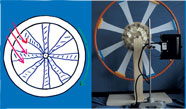
- Shine the spotlight onto one side of the motor – it will start turning.
The latex spokes contract on the side that is heated, so the centre of mass shifts. Thus the wheel starts turning, and due to the cooling-down of the spokes on the other side, a continuous energy conversion is possible.
Thermal energy -> rotational energy
This experiment can be used
- To introduce heat engines
- To show the application of a physical effect in a simple machine.
Experiment 3: refrigerator I

, type I. The infrared camera shows
the temperature difference in the
latex refrigerator.
Click to enlarge imagea
As an introduction, expand a latex glove and wait for it to emit its heat to the surrounding air. If you now let the glove contract, it will be cold.
Kinetic energy -> heat transmission
The following experiment illustrates that the latex motor is a reversible process. If the hula hoop runs in guide rolls (powered by an electric motor) and the axis is not in the centre, the condom spokes are warm on the expanded side and cool on the other side. The resulting temperature difference can only be visualised using an infrared camera (see images).
Motor: temperature difference -> rotation
Refrigerator: rotation -> temperature difference
Experiment 4: refrigerator II
The following is a variation of the experiment above, and can be used to explain the concept of a refrigerator (a closed circle which absorbs heat on one side and emits heat on the other side).
Materials
- A clamp stand with two clamps
- Two wooden rollers covered with rubber (e.g. a small balloon), one of them with a handle
- A latex glove
- Scissors
- An infrared camera (optional)
Procedure

Click to enlarge image
Image courtesy of the latex motor team
- Fix the two clamps at a distance of about 20-40 cm along the stand (the latex loop will need to be stretched).
- Fix the two rollers in the clamps: both should be motile.
- Cut off the finger part of the glove and the rolled up edge at the bottom, if present. A clean cut without frayed edges is important.
- Stretch the resulting latex loop over the two rollers.
- If you have an infrared camera, you can use it to monitor the temperature in different parts of the machine.
- Turn the handle to power one of the rollers. Slow the other one down gently by hand.
Thus, the latex loop is permanently expanded (warm) on one side and permanently relaxed (cold) on the other side. This machine produces a temperature difference of about 10 °C.
Experiment 4: refrigerator II (students’ version)
This is a simplified version of Experiment 3 which can easily be performed in class without a lot of preparation. It is best done in groups of three students.
Materials
- Two round wooden sticks (diameter 3-5 cm, can be bought in hardware shops)
- A balloon
- A glove
- Scissors
Procedure
-
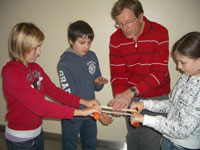
Student’s version of the type II
latex refrigerator
Image courtesy of the latex motor teamCover one wooden stick with the balloon.
- Cut a latex loop from a glove as described for Experiment.
- Stretch the latex loop over the two sticks.
- Each stick should be held horizontally by a student, with one hand at each end (see image).
- The stick covered with the balloon should now be rotated around its axis. The second stick is held still or rotated slowly. Friction between the balloon and the latex loop drags one half of the latex loop towards the stick being turned; the other half becomes slack.
- A third student should now feel the temperature difference between the upper and the lower halves of the latex loop.
Hints and tips
For higher heat emission, stretch the latex close to its elastic limit.
Very thin layers of latex give the best results. Use thin latex gloves (disposable gloves) or condoms. Replace the materials after some time to ensure good results.
Note: some students may be allergic to latex, so be sure to check.
Let the students invent new machines based on those effects!
References
- Hayes E (2008) Science on Stage: recent activities. Science in School 10: 4-7.
- Furtado S (2009) Science on Stage: recent international events. Science in School 11: 11-14.
Web References
- w1 – For more information on Experimentale 2009, visit the Netzwerk Nawi OÖ website (www.nawi4you.at) or use the direct link: http://tinyurl.com/ybutsr2
- w2 – For more physics experiments, see the Feynman Lectures website: www.feynmanlectures.info
- w3 – The website of the latex motor project (in English and German), including videos of the experiment, can be found here: http://latexmotor.brgrohrbach.at
- w4 – You can visit the website of Technorama, the Swiss Science Center, here: www.technorama.ch
- w5 – The teacher workshop in Berlin on ‘European concepts in science teaching’ will take place on 18 June 2010 in the PhysLab of the Freie Universität Berlin. Interested teachers can contact the organiser, Science on Stage Germany: www.scienceonstage.de
- w6 – Learn more about Science on Stage Austria here: www.scienceonstage.atMaterials science to the rescue: easily removable chewing gum
Resources
- Suggestions on working in the primary-school science classroom with the effect that a rubber band heats up when stretched and cools down when relaxed can be found on the website ‘Science is Fun in the Lab of Shakhashiri’ (http://scifun.chem.wisc.edu) or follow the direct link: http://tinyurl.com/yc2hjtg
- To learn more about latex and other rubbers, and how to test their characteristics in the classroom, see:Stanley H (2008) Materials science to the rescue: easily removable chewing gum. Science in School 9: 56-61.
Review
Although thermodynamics are important in any physics course, they are very often addressed only indirectly at secondary-school level. This article explores the subject through a number of innovative and interesting experiments making use of a very commonly found material, latex. The experiments are useful for discussing the concepts of the heat engine and the convertion of heat to work, as well as of heat pumps.
Paul Xuereb, Malta


