Supporting materials
Worksheet 1-3 (combined Word document)
Download
Download this article as a PDF

The topic of polymers is often limited to chemistry lessons. The Establish project offers some hands-on activities to investigate these materials and some of their medical applications.

We use polymers every day, for example in the form of plastics, coatings and paper, and in products such as nappies and shampoos. Polymers consist of large molecules made up of repeating structural units.
The following activities have been developed to help students to make links between the macroscopic world of materials that we can see and the sub-microscopic world of particles (atoms and molecules) that we cannot see, using real applications. They use the approach of inquiry-based learning, whereby the students are encouraged to develop their ideas based on their observations of the practical activities and then to test them in new contexts.
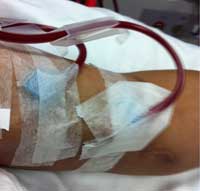
In the first activity, students aged 13-15 investigate the diffusion of liquids through different types of polymer membrane (Worksheet 1). They then move to a consideration of membranes in medicine: how the human kidney works and how its functions can be taken over by a dialysis machine (Worksheet 2). The particular focus is to understand why some molecules are removed from the blood during dialysis and others are not. The students should also predict what would happen if the dialysis fluid were water, leading them towards an understanding of osmosis.
In the second activity, students aged 15-17 create membranes of polyvinyl chloride (PVC) and investigate their physical and chemical behaviour. They then create and test an antibacterial PVC membrane (Worksheet 3). As extensions of this activity, the students can investigate membranes made with different plasticisers, or determine the antibacterial effectiveness of membranes containing different metals or different quantities of metals.
All three worksheets can be downloaded in Word or PDF format from the Science in School websitew8.
In this activity, students are asked to think about the invisible world of atoms and molecules and, through their understanding of the activity, will develop an understanding of the particulate nature of matter. These activities can be used to show both the existence of molecules and that molecules have different sizes. The students investigate the diffusion of particles through different types of membranes, then apply what they have learned to a consideration of the kidney and of dialysisw1.
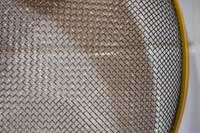
The students will already have encountered the use of sieves to separate mixtures and the need to use a sieve with appropriately sized holes. The teacher can use the context of wrapping food to introduce plastic membranes, after which the students can carry out the investigation below with different membranes. The teacher should encourage a discussion of possible explanations for the results. If necessary, encourage the development of the idea that there are particles of different sizes and membranes with holes of different sizes.
The idea is to use a variety of films / membranes, e.g. cheap plastic bags, food wrapping or food bags, to investigate the movement of iodine particles through different membranes. The students should set up several experiments, as suggested in Table 1. The teacher should try them out in advance, to make sure that they give sufficiently different results.
| Tube number | Membrane |
|---|---|
| 1 | No membrane |
| 2 | Jam-pot cover |
| 3 | Plastic bag or cling film |
| 4 | Latex glove |
The students should learn to:
Investigate the movement of iodine particles through different membranes. Make a small bag out of each membrane and place it in a tube of starch solution, as shown in Figure 1. Pour some iodine solution into each bag and observe what happens.
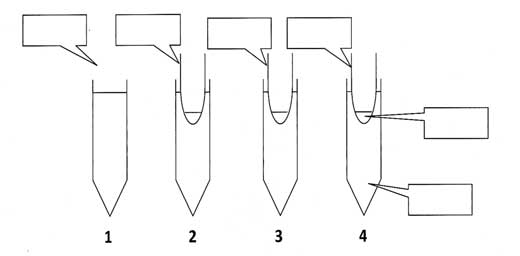
| 1 | 2 | 3 | 4 | ||
|---|---|---|---|---|---|
| Colour at start | In small bag | ||||
| In tube | |||||
| Colour at end | In small bag | ||||
| In tube |
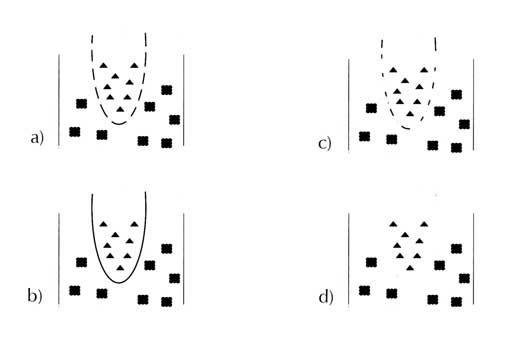
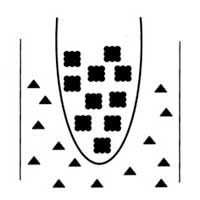
| 1 | 2 | 3 | 4 | ||
|---|---|---|---|---|---|
| Colour at start | In small bag | ||||
| In tube | |||||
| Colour at end | In small bag | ||||
| In tube |
The human kidney is an amazing organ, with two essential functions: the maintenance of water balance in the body, and the excretion of urea, salts and water. Each day, the kidneys filter 180 l of fluid out of the blood – most of which is reabsorbed, together with all the nutrients that the body still needs, such as glucose and amino acids. From the 180 l of fluid that they filter, the kidneys produce about 2 l of urine containing waste products such as urea, which is toxic to the body. The urine is then stored in the bladder before being excreted.
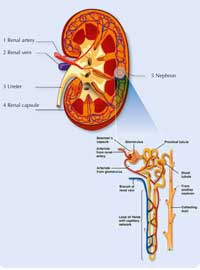
If a person’s kidneys fail, death will follow in about four days because urea builds up and the body loses control of its water balance. The person’s life may be saved with the help of dialysis; this typically involves attending hospital three times a week. During dialysis, which takes about six to eight hours, the blood is taken from the patient’s body in a tube and flows into a machine where it passes next to a filter called a dialysis membrane. A specialised dialysis solution flows on the other side of the membrane. The composition of this solution ensures that urea passes through the membrane from the blood into the dialysis fluid, but glucose and amino acids do not. The blood – minus urea – is then returned to the body.
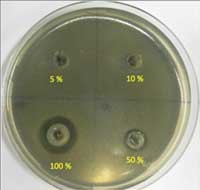
In this activity, students create PVC membranes and investigate the effect of a plasticiser on the physical and chemical properties of the membrane (these membranes can also be used in the first activity). The students then create a PVC membrane containing silver particles, and test its antibacterial properties by incubating it overnight.
As a more advanced investigation, the students could get a better understanding of the antimicrobial property of the membrane by incorporating different concentrations of silver in membranes and examining the effect of concentration on the zones of inhibition that they observe. Typical examples are shown on the right.
Non-pathogenic Escherichia coli can be obtained from the American Tissue Culture Collection (ATCC)w2. BAA 1427 in particular is a non-pathogenic surrogate strain suitable for use in this experiment.
The polymer polyvinyl chloride (PVC) is a cheap and durable plastic used in pipes, signs and clothing. Plasticisers are often added to it to make it more flexible and easier to manipulate. In this activity, you will make a membrane of PVC both with and without a plasticiser, then compare their physical and chemical properties.
Antimicrobial membranes are used in many medical technologies, and are produced by incorporating nanoparticles or microparticles of silver or other metals into polymers. In the presence of oxygen (in air) and water, the elemental silver particles react to form silver ions (Ag2+), which can break down cell walls, inhibit cell reproduction and disturb metabolism in some bacteria, viruses, algae and fungiw3, w4.
Safety note: All steps should be carried out under the fume hood. Tetrahydrofuranis a highly flammable liquid and vapour that can cause serious eye irritation. Handle with care under the fume hood only and wear gloves when using it.
Repeat the steps above to create four more membranes of PVC, each with a different amount of plasticiser added to the heated solvent (see Table 4).
| Sample no. | PVC (g) | Solvent (ml) | Dibutyl sebacate (ml) |
|---|---|---|---|
| 1 | 1.5 | 20 | 0.5 |
| 2 | 1.5 | 20 | 1 |
| 3 | 1.5 | 20 | 2 |
| 4 | 1.5 | 20 | 3 |

The preparation of PVC containing silver particles requires the membrane to have large holes, which is why we use a plasticiser. The silver itself is added in the form of silver nitrate, which is then reduced using sodium citrate.
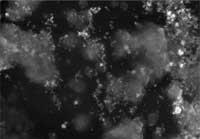
Make a 5 mM solution of sodium citrate and pour this carefully into one of the beaker-shaped membranes. It should pass through the membrane (hold it over a beaker), reacting with the silver nitrate, giving silver nano- or microparticles.
Next, you can investigate the antibacterial properties of the prepared membranes.
Safety note: As with all microbial studies, sterilised implements should be used at all times (either sterilised in an autoclave or pressure cooker, or dipped in ethanol and then flamed). This includes the scissors that you use to cut the membrane. To prevent cross-contamination, wash the inoculation loops with antibacterial wash before use.
The antibacterial property of these membranes makes them useful for treating wounds and burns, as well as infections with bacteria such as methicillin-resistant Staphylococcus aureus (MRSA) and E. coli.
These activities are among the teaching units being developed by the Establish project, an EU-funded project to encourage the widespread use of inquiry-based science teaching for secondary-school students (aged 12-18). A group of more than 60 partners from 11 European countries are working together to develop and adapt teaching units for use in classrooms across Europe.
The activities in this article are taken from the teaching unit entitled ‘Exploring holes’. At the time of going to press, units are also available on sound and on disability, and further units are planned on cosmetics, chitosan, forensic science, photochemistry, renewable energy and medical imaging. To learn more and download the completed units, visit the Establish websitew5.

The use of nanoparticles is very important in new health care applications. Understanding the impact of nanoparticles on cells and tissues is crucial for safety, reliable diagnosis and treatment of diseases. Many medical nanoparticles are based on metals, and X-ray techniques at the European Synchrotron Radiation Facility (ESRF)w6 are well suited to monitor, for example, the interaction of a single nanoparticle with a cryopreserved cell at the nanoscale (Lewis et al., 2010).
ESRF is a member of EIROforumw7, the publisher of Science in School.
The activities described in this article are based on information in Wilms et al. (2004; Worksheet 1), from Alison Graham at Dublin City University, Republic of Ireland (Worksheet 2), and from Laura Barron and James Chapman at Dublin City University (Worksheet 3).
Have you ever wondered how a dialysis membrane works? Can plastics be used to filter unwanted substances from your body? How about antibacterial plastics? This article introduces the role of polymers in dialysis machines used for blood filtration and for the treatment of wounds.
The experiments for younger students that are described in this article will help them to understand the science of polymers and how they are used in dialysis. In the activities for older students, the class actually get to make their own PVC – one of the most common polymers used today – and investigate its antibacterial properties.
The activities would be appropriate in both chemistry and biology lessons, addressing the topics of polymerisation, osmosis, diffusion and excretion. It could be followed by a discussion of the wider uses of polymers, of selectively permeable membranes or of excretion.
Andrew Galea, Giovanni Curmi Post-Secondary School Naxxar, Malta
Worksheet 1-3 (combined Word document)
Download this article as a PDF