Investigating blood types Teach article
In this experiment, simple liquids that mimic blood are used to demonstrate blood typing.
The topic of blood types is often taught in school science lessons but experimenting with real blood may not be possible for many good reasons—because of the concerns of parents, the need for comprehensive risk assessments to prevent infection or the transmission of blood-borne disease, or the reluctance of students to use their own blood.
In this practical activity, simple chemical solutions are used to simulate blood types. The activity can be used in lessons, for a science club or as part of a forensic science day for students of many ages.
The science of blood

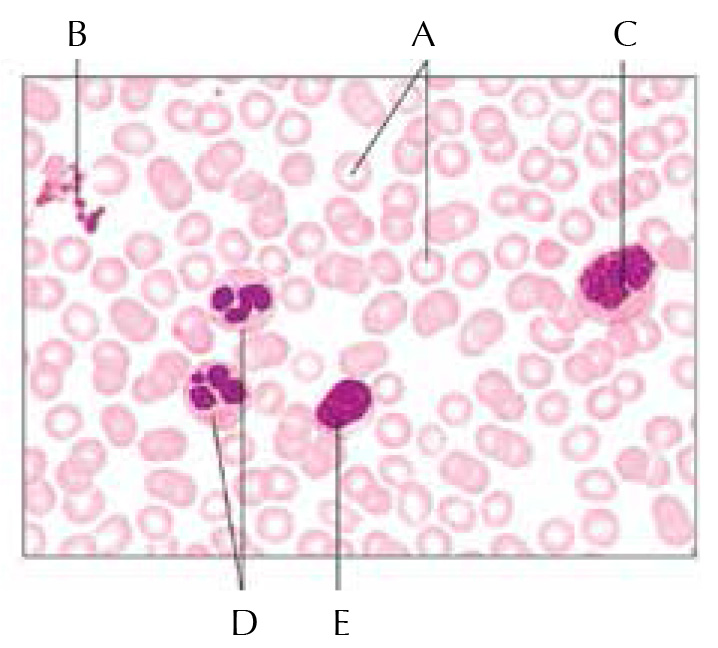
a human blood smear
showing red blood cells (A),
platelets (B) and white blood
cells (C, D; and E)
Image courtesy of Magdalena
Wajrak
Blood is a sticky red fluid containing several kinds of cell suspended in a watery liquid called plasma: red blood cells, white blood cells and platelets (figure 1). Many chemicals are also suspended or dissolved in the plasma, including proteins, sugars, fats, salts, enzymes and gases. Each person’s blood has certain inherited characteristics that distinguish it from the blood of other people.
Until the 1980s, blood was primarily differentiated by ABO blood typing, which relies on the presence of three substances on the outside of red blood cells, called antigens. Although for forensic purposes, this technique has since been replaced by other methods such as DNA fingerprinting, for clinical purposes, ABO blood typing is still used before giving someone a blood transfusion to prevent complications such as rejection.
The presence or absence of A and B antigens on red blood cells determines a person’s ABO blood type. This leads to the identification of four main blood types: A, B, AB (when both antigens are present) and O (when neither antigen is present). A third important blood antigen is the Rhesus (Rh) factor, or D antigen. People with the D antigen are Rh positive, and those who lack it are Rh negative.
In order to type a person’s blood, antibodies (called agglutinins and sometimes referred to as antiserums) are added to a few drops of blood. These agglutinins bind to the antigens on the surface of the red blood cells, causing the cells to aggregate or clump. If clumping occurs in a blood sample, then that associated antigen is present. Once all antigens have been tested, the blood type can be deduced (table 1).
| Anti-A agglutinin + blood: clumping |
Anti-B agglutinin + blood: clumping |
Blood type |
|---|---|---|
| Yes | No | A |
| Yes | Yes | AB |
| No | Yes | B |
| No | No | O |
ABO blood typing experiment
Safety note
Wear safety glasses and gloves. See also the general safety note.
Materials

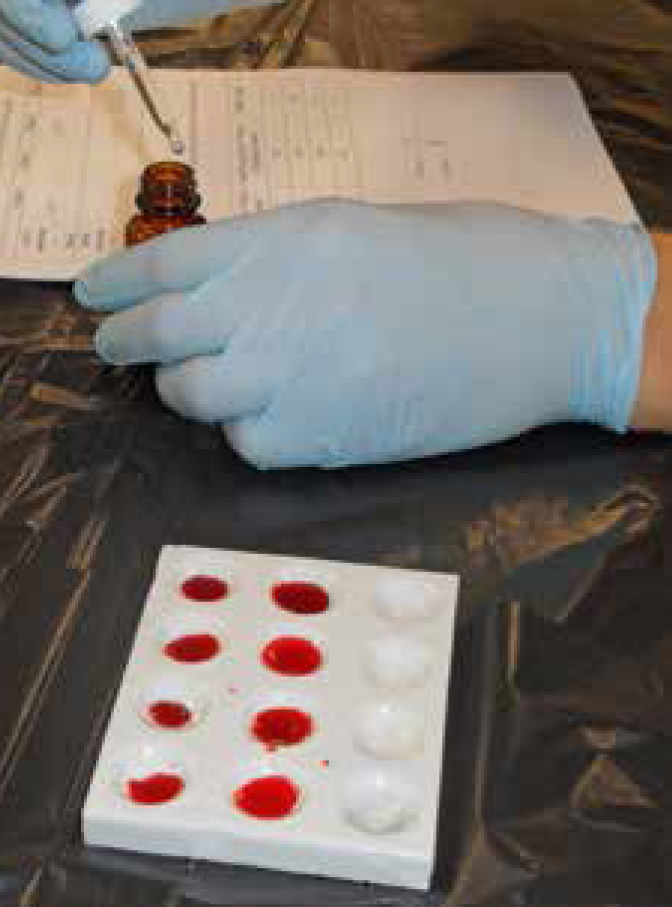
Image courtesy of Magdalena
Wajrak
Each group will need:
- Spotting tiles (dimple tray)
- Two pipettes, one for each blood sample
- 2.0 mol dm-3 hydrochloric acid solution in a dropping bottle labelled ‘Anti-A’
- 2.0 mol dm-3 sulfuric acid solution in a dropping bottle labelled ‘Anti-B’
- Identified ‘blood samples’ (aqueous solutions made thicker with glycerol and dyed with food colouring to resemble blood), labelled by blood type:
- ‘O’ = distilled water
- ‘A’ = 0.1 mol dm-3 silver nitrate solution
- ‘B’ = 0.1 mol dm-3 barium nitrate solution
- ‘AB’ = a 50:50 mixture of 0.1 mol dm-3 silver nitrate and barium nitrate solutions
- Unidentified blood samples, made from the same solutions as the identified blood samples, labelled ‘victim 1’, ‘victim 2’, etc.
Procedure
Explain the scenario to your students: there has been an accident and you need to know the ABO blood type of the victims before they can be given blood transfusions. It is the students’ job to use the blood samples and work out the type of blood each victim has.
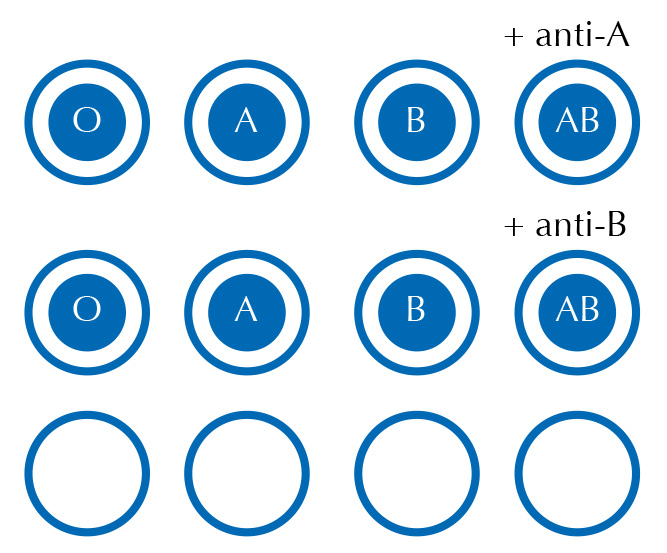
- Using a clean pipette, put one drop of one of the identified blood samples into each of the first wells of the first two rows of your dimple tile. Complete the rows with the other blood samples, as shown in figure 2.
- Add a drop of Anti-A antiserum to each dimple in the first row and record your observations in table 2. If you’re not sure of a result, add another drop of Anti-A antiserum.
- Add a drop of Anti-B antiserum to each dimple in the second row and record your observations, also in table 2. If you’re not sure of a result, add another drop of Anti-B antiserum.
- Use your results to conclude how each blood type (O, A, B and AB) reacts to the antibodies.
- Take a clean dimple tray and test the victims’ blood using the same method. Record your observations in table 3.
- Use your results to assign the correct blood type to each victim.

Image courtesy of Magdalena Wajrak
| Blood type | Observations with anti-A. Did clumping occur? | Observations with anti-B. Did clumping occur? |
|---|---|---|
| A | ||
| B | ||
| AB | ||
| O |
| Victim | Observations with anti-A. Did clumping occur? | Observations with anti-B. Did clumping occur? | Blood type |
|---|---|---|---|
| 1 | |||
| 2 | |||
| 3 | |||
| 4 |
What is happening?
These tests mimic how different blood types react with agglutinins, by using simple chemistry. With older students you may wish to discuss this chemistry, pointing out the differences between the antibody-antigen reaction which is being modelled and the simple displacement reaction that is actually happening.
In this experiment, instead of clumping blood cells, the (white) precipitates make the solutions clump in the spotting tiles.
Barium nitrate(aq) + sulfuric acid(aq) → barium sulfate(s) + nitric acid(aq)
Silver nitrate(aq) + hydrochloric acid(aq) → silver chloride(s) + nitric acid(aq)
The clumps that form are dark red, instead of white, because of the food colouring present.
More types of artificial blood
The need to identify the blood type of patients before blood transfusion may soon be a thing of the past. Recently, UK-based researchers at the University of Edinburgh announced that they had made type O negative red blood cells from stem cells. If scaled up successfully, this method could lead to a new source of universal donor blood, and there are plans for a small-scale clinical trial in 2016.
Furthermore, researchers are developing products based on haemoglobin (the oxygen-carrying protein in blood), for example in a polymerised and powdered form that can be stored for months at room temperature, unlike blood, which has to be refrigerated.
Acknowledgement
There are a few alternatives to this experiment. The solutions used in this version came from a group of science technicians from the Association of Science Technicians in Independent Schools in Western Australia (LABNETWEST)w1.
Web References
- w1 – To learn more about LABNETWEST visit their website.
Resources
- While A, B, AB and O are the most common blood types, there are other rarer blood types, as this article in Mosaic explores.
- From the same website, why not explore why we have blood types at all?
- For further Science in School articles about forensic science projects, see:
- Wallace-Müller K (2011) The DNA detective game. Science in School 19: 30-35.
- Gardner G (2006) The detective mystery: an interdisciplinary foray into basic forensic science. Science in School 3: 35-38.
Review
This interesting practical activity addresses a basic topic of biology: blood types. Although the theory may be familiar to students, experiments on blood are normally avoided for reasons explained by the author. This, however, is an easy simulation to try in the laboratory using a simple chemical reaction.
The subject of this article could be related to other important topics such as immunology in biology, displacement reactions in chemistry, and even civil rights in ethics. The experiment could also be useful for awakening students’ interest in the need to investigate new materials and technologies that allow us to make safer and faster transfusions.
Suitable comprehension questions could include:
- What is the importance of knowing your blood type?
- Why does clumping occur? What is the relationship between antigen and antibody?
- Do you know an example of blood typing other than ABO?
- What is the difference between agglutination and displacement reactions?
- Why is it important to investigate new sources of universal donor blood?
Ana Molina, IES Gil y Carrasco, Ponferrada, Spain


