The resourceful physics teacher Teach article
Physics teacher Keith Gibbs shares some of his many demonstrations and experiments for the physics classroom.

iStockphoto
During more than 30 years of teaching physics, I have come across many interesting demonstrations and teaching ideas – often suggested by relatives, friends, colleagues and past students. In 2000, I began to gather these ideas together – this was the basis of the Schoolphysics website and CD-ROM collection. Over time, I added more explanation and background for teachers whose specialism was not physics.
Below are four ideas from the collection. I hope that you will find at least one of them new, challenging, informative and fun, and that the ideas go some way towards popularising the subject and making people realise that physics can be interesting and fun.
Boiling water under reduced pressure
Age range: 13-15
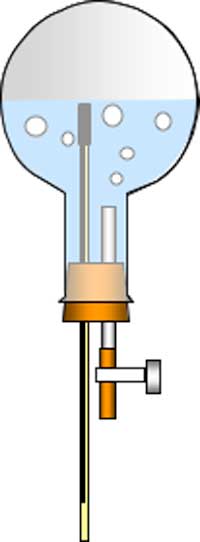
This simple experiment demonstrates that the saturated vapour pressure of water depends on the temperature. It is best performed as a teacher demonstration, with a safety screen between the apparatus and the students.
Materials
- A round-bottomed flask
- A bung with two holes
- A glass tube, with an external diameter to fit the hole in the bung
- A rubber tube with a diameter to connect to the glass tube
- A thermometer to fit the hole in the bung
- A Bunsen burner
- A retort stand and clamp
- A safety screen
- A tray
- Water
Procedure
- Fit the rubber tube onto the end of the glass tube.
- Fit the thermometer and glass tube into the holes in the bung, pour cold water into the flask until it is just less than half full. Then seal the flask with the bung.
- Fit the clamp onto the rubber tube but do not close the clamp.
- Use the Bunsen burner to heat the water to boiling.
- Close the clamp and turn off the Bunsen burner.
- Invert the flask and pour cold water over it.
Steam will condense inside the flask, reducing the pressure and allowing the water to start boiling again. When the water stops boiling, pour more water over the flask. How low can you get the temperature and still observe the water boiling? You should be able to get the water to boil at 40 °C – I once observed the water boiling at body temperature (37 °C)!
Safety note
Wear safely goggles. Although unlikely, it is possible that the glass flask could shatter, so keep a safety screen between the experiments and the students. If possible, stand behind the screen yourself. See also the general safety note.
Theory
The explanation is that the saturated vapour pressure of water depends on the temperature: the lower the temperature, the less water vapour the air can hold (see Table 1). When the water condenses, it lowers the pressure in the flask – and this, of course, allows water to boil at less than 100 °C.
| Temperature | Saturated vapour pressure |
|---|---|
| 37 °C | 0.06 x 10⁵ Pa |
| 60 °C | 0.19 x 10⁵ Pa |
| 75 °C | 0.38 x 10⁵ Pa |
| 85 °C | 0.57 x 10⁵ Pa |
| 100 °C | 105 Pa |
An alternative method
A simpler method is to partly fill (about 20%) a syringe with 50-60°C warm water. Then pull on the plunger of the syringe. This lowers the pressure in the syringe, causing the water to boil at well below 100 °C.
The wire coat hanger and circular motion
Age range: 14-18
This is a simple demonstration of centripetal force.
Materials
- A wire coat hanger
- A metal file
- A small coin
Procedure
- Bend the wire coat hanger until it forms a square.
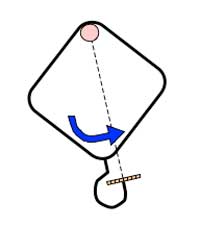
- File the tip of the hook flat and then bend the hook until it points towards the opposite corner of the square (see diagram).
- Balance a small coin (try a UK one-penny piece or a 5 or 10 Euro-cent coin) on the hook.
- Place one finger in the corner of the square opposite the hook and spin the coat hanger in a vertical circle. The coin should remain in place.
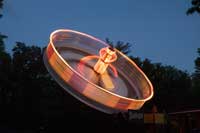
should be grateful to
centripetal force
Image courtesy of inabeanpod;
image source: Flickr
Theory
The force of the hook on the coin provides the centripetal force, and this always acts towards the centre of rotation.
How many coins can you balance on the swinging coat hanger? My record is five one-penny pieces. With only one penny and with great care, I have once even been able to bring the coat hanger to rest without the coin falling off.
Electromagnetic separator
Age range: 16-18
This is a small-scale simulation of the type of electromagnetic separator that is used industrially to separate non-ferrous metals from other non-metallic scrap, and is suitable as a teacher demonstration.
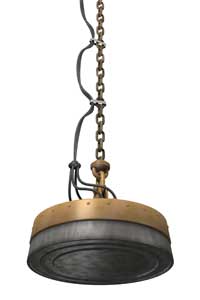
large electromagnet, of the
type used for separation in
an industrial setting
Image courtesy of
ZargonDesign / iStockphoto
Materials
- A U-shaped electromagnet with an iron core to give a high field intensity
- An AC (alternating current) power supply
- Aluminium scraps (e.g. kitchen foil)
- A piece of thin card
- Some scraps of paper
Procedure
- Place the card on top of one arm of the electromagnet and put a few scraps of aluminium and paper onto the card.
- Connect the electromagnet to an AC supply and turn on the current. The aluminium scraps will be ejected from the magnetic field.
Theory
The AC electromagnet induces eddy currents within the aluminium scraps. These turn the scraps into tiny electromagnets that are then repelled by the large electromagnet and so fly off the card. With non-metallic scraps there are no induced currents and so these scraps remain on the card.
In a moving-belt version of this experiment, mixed metal and non-metal scraps are passed along a belt over an AC electromagnet. This induces eddy currents in the metal scraps, which are then repelled by the field and fly off sideways while the remaining non-metal scraps continue along the belt. Schools might be able to construct such a version for demonstration use, using a mixture of paper and aluminium.
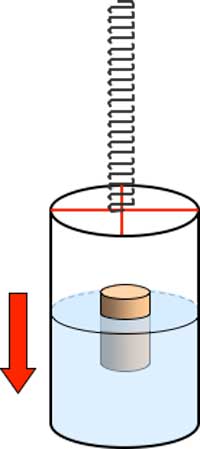

A floating block in a falling jar
Age range: 11-18, depending on the treatment of the theory.
This is a very useful demonstration of one of the ideas of general relativity, using a wooden block floating in a jar of water that is suspended from a spring.
Materials
- A helical spring tied with string to a plastic jar
- A wooden block or straw loaded with modelling clay (e.g. Plasticine®)
- Water
Procedure
- Half fill the jar with water, add the wooden block or straw, and suspend the apparatus from the spring.
- Support the jar, then let it fall, suspended from the spring. The jar and contents will then oscillate in a vertical plane (up and down) but the water level will stay at the same position in the jar, and the block or straw will float at the same level in the water as it falls and rises.

of the night sky, were it to
feature a black hole with a
mass ten times that of the
Sun, and seen from a
distance of 600 km.
Einstein’s theory of general
relativity allows details of a
black hole’s structure to be
calculated. Black holes are
thought to be distortions in
space and time, consisting
of zero volume and infinite
density.
Image courtesy of Ute Kraus;
image source: Wikimedia
Commons
Theory
The depth at which the wooden block or straw floats depends on both its weight (not its mass) and the upthrust on it. The upthrust depends on the weight of water displaced. Thus, as the acceleration of the jar and the block changes, the weight of the block and the upthrust on it change in direct proportion to each other; as a result, the depth at which the block floats remains unchanged as the apparatus oscillates.
Objects undergoing acceleration behave in the same way as they would in a gravitational field. As the jar and its contents oscillate, they have an acceleration that is due to both the constant gravitational field of Earth and the simple harmonic motion of the oscillation.
As the jar moves upwards, its net acceleration is greater than that of Earth’s gravitational field and as it falls, its acceleration is less than that of Earth’s field. On the downward part of the motion, it is as if the jar were on the Moon, where the gravitational acceleration is less than on Earth.
This is a very useful demonstration of the equivalence of gravitational and inertial fields.
Acknowledgements
The editors of Science in School would like to thank Catherine Cutajar and Gerd Vogt for their help in selecting the experiments to include in this article.
Web References
- w1 – To view more (free) teaching material collected by Keith Gibbs or to purchase the CD-ROMs, see: www.schoolphysics.co.uk
Review
The four experiments described in this article are innovative and use items that are easily available in school laboratories. The aim, materials, procedure and diagram for each experiment make it very straightforward for teachers and students to understand the processes and theories involved. It is also interesting to read about the author’s experiences and the results that he obtained from these experiments.
Teachers could use the experiments for a wide array of physics topics and adapt them to different age groups, depending on how much theory the teacher chooses to explain. They can be performed as a pre-topic experiment to introduce the students to the theory or else while the theory is being explained, to consolidate concepts with facts. A discussion can be held with students during the experimental investigations to prompt them to make predictions and explain the outcomes.
The activities can be used with students of different ages, depending on the emphasis. The boiling water activity could be used with students aged 13-15 to discuss the boiling point of water; for students aged 16-19, it could be used in a lesson about gas laws. The coat-hanger experiments could be used with 16- to 18-year-olds to introduce circular motion, centripetal force and centripetal acceleration. For 10- to 13-year-olds, the electromagnetic separator activity could be used in general science lessons or to discuss magnetic materials; for students aged 14+, it could be used in magnetism lessons. Finally, the experiment with the falling jar could be used for students aged 16+ to teach simple harmonic motion, gravitation and inertia.
These types of demonstration are ideal for students who are visual learners and who will understand and remember theory better when they see it applied in practice.
Catherine Cutajar, Malta


