Hooked on science Teach article
Encouraging your students to create science videos can be a way of catching – and keeping – their attention.

shutterstock
Everyone knows how journalists and newspapers try to grab readers’ attention by using a ‘hook’ – an eye-catching headline or idea at the start of an article. Hooks are also a good way to draw students into learning about science – although not usually in the form of celebrity gossip or some shocking speculation, of course.
What are hooks in teaching?
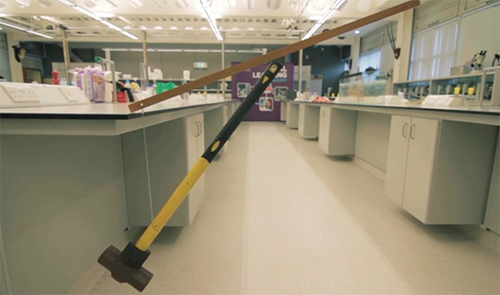
A hook is any short instructional activity that gets students more interested or engaged during a lesson. Usually, hooks are used to introduce a lesson, but they can be used at any point. Hooking strategies include mysteries, questions, practical work, new technologies and anything that appears novel to students. Anomalies such as the counter-intuitive situation shown in figure 1 can also be used as a hook, because – like mysteries – they catch our interest by posing a puzzle.

Image courtesy of Martin McHugh
To keep students engaged, teachers need to develop new hook ideas on a regular basis. Videos, for example, are often used as an effective way to introduce or add interest to science topics.
In the activity we describe in this article, we pass the hook-making task to the students and encourage them to construct their own hooks – by making short films on science topics. In the process, students work together creatively to explore a science-related topic of their choice, and capture it on film (McCauley et al., 2015; McHugh & McCauley, 2015). The activity takes 2–3 hours, ideally split over two lessons, and is suitable for students aged 12 to 16. It can be used in relation to a specific science topic or more broadly.
Film-making as a hook
The idea of film-making as a hook has a double benefit: students engage with their chosen science topic while making their film; and watching films – especially those made by their peers – helps to interest other students in the topic. Also, uploading the films to blogs or video-hosting websites allows students to extend their engagement with science outside the school.
This is all in addition to the skills they will learn in the process of creating the short films: planning, teamwork, critical thinking, reflective writing – and, of course, filming.
Materials
Each group of students will need:
- Filming device (camera, tablet, webcam or smartphone) – any device that can record and save video so that it can be played back on a projector linked to a computer or an electronic whiteboard
- Tripod or other support for the camera
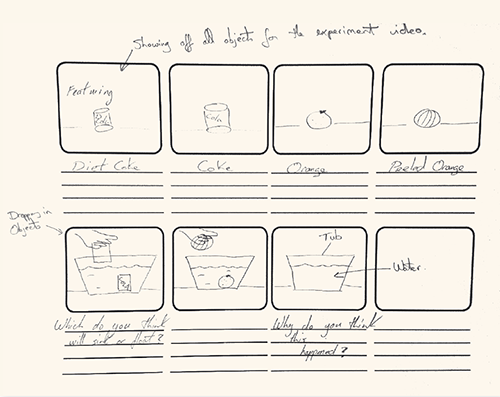
- Storyboarding sheets (blank template sheets can be made in class and photocopied, or can be found easily online; see figure 2).
- Any equipment or materials needed for their chosen topic, sourced from the classroom or from home

Image courtesy of Martin McHugh
Procedure
The activity works best if teachers guide students through each stage, as follows.
1. Introducing hooks
First, introduce students to the idea of short science films as hooks by showing some fun videos on science phenomena. The idea is to draw the audience into the science, rather than to explain the science. You can see some ready-made examples in the Resources section at the end of the article.
Then tell students they are going to make their own films, and divide the class into groups of three or four students. Ask them to develop ideas for a short film on a scientific theme that would look good on video and make the rest of the class say “Wow!”
2. Research
Encourage students to research ideas online or using books, and also to discuss their ideas with each other. If students are struggling to find ideas, you can provide suggestions for simple science tests or experiments (see Table 1 and the Resources section). Don’t simply give the list of ideas to the students – rather, just use them if needed to help the creative process along.
|
3. Development and testing
Students then need to find the materials for the phenomenon or experiment they have chosen to film. This is the development phase, so students can decide to remove or add elements to make their film better. At the end of this stage, students should be confident that they can make their demonstration work smoothly and film it in a single take (to avoid the need for editing different shots together).
4. Storyboarding
Before they can start filming, students need to storyboard their video using the storyboarding sheets (figure 2). Storyboarding is a way of organising the filming, so that sketches of shots are shown in sequence along with any other elements for that shot. These elements are usually:
- Any narration or music
- Any labels or other objects needed for the shot
- Any directions or descriptions
- Time in minutes and seconds (e.g. 0.01 to 0.10 means the first ten seconds of the film) – this is essential.
Storyboards act as a type of pre-visualisation for the film and form the exact plan that students have to follow when filming. They therefore need to be carefully thought through so that the action takes place in the right sequence with the right narration and other elements at each step. The storyboard sheets are designed to allow all the different elements to be shown alongside each shot in one frame. Both visuals and narration should be given specific timings in the storyboard. Students soon learn that the better the storyboard, the easier the filming.
A narration can help the viewer understand what is happening. The video should be simple enough that a few short lines will suffice. Posing a question at the start of the video is often an effective strategy. For example, “Do you think object X will sink or float?” This type of narration introduces and sets up the action: the viewer immediately knows the context and the purpose of the video. The demonstration or experiment can then proceed without any more explanation.
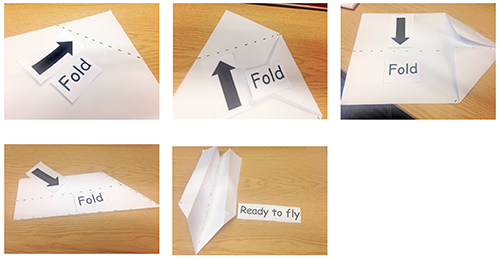
Any labels needed should also be created at this stage, using bold, clear writing or print (figure 3).
Image courtesy of Martin McHugh
Before filming, students will also have to work out where to place the camera, bearing in mind that all the filming will be done from the same viewpoint (again, for simplicity and to avoid the need for editing).
5. Filming
Before filming, set out some rules for students to follow:
- Work with a fixed camera. This means that students need to work their experiment around the camera’s field of view while moving any objects and labels by hand.
- Shoot the film in one continuous take without breaks.
- The narrator can speak from behind the camera.
- Try not to film faces – this is distracting when replaying the video. The focus should be on the science action, not the people making the film.
- Follow the storyboards strictly, and truly understand the content of the storyboard before starting to film.
Once filming is completed, the film should be saved or emailed to the teacher for the last step: the replay.

Image courtesy of Martin McHugh
6. Replay
The replay is the final step in the film-making process, and the reward for all the students’ hard work. They will be very interested not only in their own film, but also in what other students have created.
It’s up to you as the teacher to decide how to use their creations. You can devote the next lesson to watching all the films, asking each group of students to present theirs in turn. The class can then judge which is the best video hook.
Alternatively, you can use one film per lesson, perhaps as a theme for a whole term or half-term. This way, the films made by the students will continue to garner the students’ interest for longer – engaging them not only with science, but with their own process of learning and creation. Either way, in the end the focus should be on the learning journey that the class has taken, rather than the content of the individual video hooks.
Acknowledgement
This work has been funded by the NUI Galway Hardiman Scholarship.
References
- McCauley V, Davison K, Byrne C (2015) Collaborative lesson hook design in science teacher education: advancing professional practice. Irish Educational Studies 34(4): 307-323. doi: 10.1080/03323315.2015.1114457
- McHugh M, McCauley V (2015) Designing physics video hooks for science students. Physics Education 51(1): 015015. doi: 10.1088/0031-9120/51/1/015015
Resources
- The website of the Science Education Resource Hook Series offers examples of hooks from biology, chemistry and physics with explanations of phenomena.
- The Physics Hooks Series channel on Youtube offers a collection of engaging physics videos.
- The GoAnimate Resources Blog, though aimed at businesses, offers detailed advice on storyboarding that is just as applicable in the classroom.
- As part of an activity guide to making a film, the BBC website provides a storyboard template.
- The website of the ReelLIFE SCIENCE competition includes some useful tips and examples of student-made videos.
- Additional ideas for counter-intuitive demonstrations can be found in:
- Tsakmaki P, Koumaras P (2017) When things don’t fall: the counter-intuitive physics of balanced forces. Science in School 39: 36–39.
- Featonby D (2017) Fantastic feats. Science in School 39: 45–47.
- Norrby M, Peltoniemi R (2016) Can something accelerate upwards while falling down? Science in School 37: 25-28.
- Onderová L, Featonby D (2015) Kinder eggs and physics? Science in School 32: 41-46.
Review
In this article, Martin McHugh and Veronica McCauley present a modern and interesting way to get students more engaged during lessons. They describe a detailed procedure that can be followed by any teacher or adapted to the teacher’s own needs and plans.
As science teachers may occasionally find it difficult to make science lessons exciting, the idea of using videos as hooks may be a great help. This idea can easily be applied to almost every science classroom or lab, even using students’ own smartphones or cameras. The fact that these short science videos are produced by the students themselves offers extra added value.
Vangelis Koltsakis, Greece


