Small is beautiful: microscale chemistry in the classroom Teach article
Learn how to carry out microscale experiments for greener chemistry teaching – and less washing up.

in Heroes’ Square,
Budapest, Hungary
Image courtesy of Gerwin Filius;
image source: Flickr
Last year, I worked with my students on an international Scientixw1 project, using chemistry to investigate metal objects found in UNESCO cultural heritage sites, such as the copper and bronze statues in Heroes’ Square, Budapest, Hungary. We carried out experiments using compounds of iron, copper, nickel, silver, lead, mercury and other heavy metals – materials that are dangerous, toxic and polluting. Although only one or two millilitres of solution were used in each test tube, a huge amount of toxic waste was produced by the time the whole class had performed each experiment. We are very committed to protecting the environment, so we started thinking about how we could reduce the amount of chemicals used during the experiments.
Developing small-volume experiments
Our first idea was to replace the test tubes with ‘dimple trays’ from empty plastic boxes of pills or chewing gum, using the indentations in the trays as the containers for the reactions (figure 1). This method, which we found described in a previous Science in School article (Kalogirou & Nicas, 2010), greatly reduced the amount of toxic chemicals used – but we wanted to go further.
Our next idea was to use filter paper as the reaction ‘container’ for precipitation reactions, using drops of the chemicals reacting together at the same spot. In these experiments, we used just one or two drops of each reagent – about a hundredth of the amount used in the test tube experiments. Because colourful compounds were used, the reactions were immediately visible and the products could be identified just from their colour.
We found it worked well if we soaked the filter paper in one of the non-toxic reagents, dried it, and then dripped the other reagents onto the paper. Several reactions can be carried out on the same filter paper if gaps are left between the reaction spots.
Figure 2 shows the reactions of iron(III) chloride: first with sodium hydroxide on the filter paper, producing a precipitate of iron(III) hydroxide; and then with potassium hexacyanoferrate on the filter paper, producing the characteristic Prussian blue precipitate. (For the equations for these reactions, please see Activity 1.)
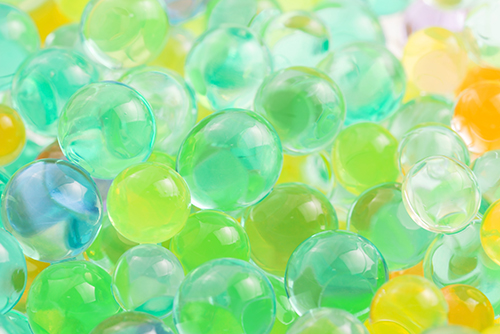
The next method was inspired purely by chance when we found a used air-freshener box containing tiny, dried-up hydrogel balls. Hydrogels are super-absorbent polymers that shrink as they dry out, but swell up again when they are placed in water. These balls are easily available to buy, and are often used in floral displays as well as in air fresheners. As they swell, they retain their spherical shape, thus forming an aqueous bead in which reactions can take place.
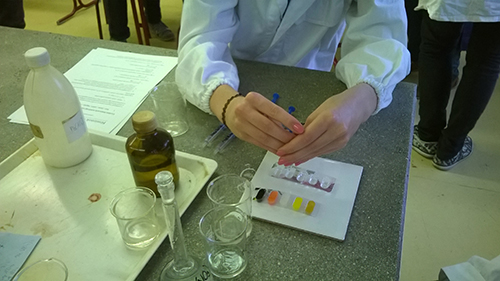
Image courtesy of Éva Dobóné Tarai
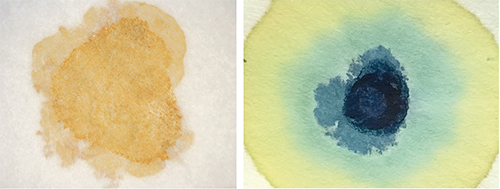
Image courtesy of Éva Dobóné Tarai
Reactions in hydrogel balls
Using the hydrogel balls, we first carried out precipitation reactions (as with the filter paper experiments). The results obtained with this method were interesting and convincing. Not only did we use a minimal amount of reagents, but due to the hydrogel balls’ spherical shape, they acted like magnifying lenses and made the reactions more visible.
/ shutterstock
We therefore tried out some other standard chemical reactions using the hydrogel balls – with mixed results. The acid-base reactions did not work well, because the colours of the indicators (universal, litmus, phenolphthalein and others) were not strong enough, and the procedure was rather complicated.
The electrochemical reactions, however, were a success: for example, electrolysis of silver nitrate solution, zinc iodide solution, water and other solutions all worked well (see Activity 2). Normally in such experiments, a thin layer of metal is deposited on the surface of an electrode, and this layer is often poorly visible. In the hydrogel balls, however, the reduced metal appears within the gel as a spot, where it is more visible and can be studied more easily.
Activity 1: precipitation reactions in hydrogel balls
To get the reagents into the hydrogel balls, we used syringes and hypodermic needles. For this reason, these experiments are suitable only for students aged 16 or older, and great care and disciplined behaviour are needed. For younger (or perhaps less well-behaved) students, the experiment can be carried out as a teacher demonstration using a computer webcam.
The time needed for this activity is approximately 10 minutes for each precipitation experiment, although the hydrogel balls need to be soaked in advance. Because so little reagent is used in each hydrogel ball, the filled hypodermic syringes can be reused in the next chemistry lesson.
Safety note
This experiment is suitable strictly for students aged 16 or older, and with a high level of supervision by the teacher at all times. Hypodermic needles must be counted when given out and when given back, so that all are accounted for. Used hypodermic needles should be bent before disposal in a sharps bin. Safety glasses and disposable gloves need to be worn throughout.
Suitable additional precautions should be taken if any toxic reagents are used (e.g. mercury or lead compounds), with the hydrogel balls containing these compounds placed in a hazardous waste collector.
See also the general safety note on the Science in School website.
Materials
You will need the following materials for each student or group:
- One hydrogel ball for each experiment
- A white glazed ceramic tile, glass plate or Petri dish
- Two syringes fitted with hypodermic needles (assembled in advance by a teacher / technician)
- Distilled water
- A pair of disposable gloves
- A pair of safety glasses
Reagents:
- Sodium hydroxide (NaOH) solution (1.0 M)
- Iron(III) chloride (FeCl3) solution (1.0 M)
- Nickel(II) chloride (NiCl2) solution (1.0 M), or nickel(II) sulfate (NiSO4) solution (1.0 M)
- Sodium sulfide (Na2S) solution (1.0 M)
- Potassium hexacyanoferrate (K4[Fe(CN)6]) solution (1.0 M)
The method can also be used for other precipitation reactions, so the list of the materials here can be extended or adapted.
Procedure
First, wash the hydrogel balls several times in distilled water, then leave them to swell in more distilled water for at least 2 hours. Approximately 500 ml of distilled water is needed to soak 30 hydrogel balls.
For each reaction:
- Place a swelled-up hydrogel ball on one white tile.
- Fill a syringe with one of the solutions containing a heavy-metal compound (e.g. iron(III) chloride solution) and inject a small amount of reactant into the centre of the ball.
- Fill the next syringe with sodium hydroxide solution and inject a similar amount into the hydrogel ball through the same hole.
- As the reaction proceeds, observe the colour change and record what you see. You should observe a coloured, solid precipitate form inside the ball (figure 3).
- Using another hydrogel ball, repeat the experiment with the next heavy-metal compound (e.g. nickel(II) chloride solution), again reacting this with the sodium hydroxide solution.
- Continue repeating the experiment with the other reagents:
- nickel(II) chloride with sodium sulfide
- iron(III) chloride with potassium hexacyanoferrate
- Finally, compare the results of the different precipitation reactions.

Iron(III) chloride with sodium hydroxide (left)
Nickel(II) chloride with ammonium sulfide (centre)
Iron(II) chloride with potassium ferrocyanide (right)
Image courtesy of Éva Dobóné Tarai
Discussion
The equations and colour changes for these reactions are:
- Sodium hydroxide with iron(III) ions: Fe3+(aq) + 3 OH–(aq) → Fe(OH)3(s) (red-brown precipitate)
- Sodium hydroxide with nickel(II) ions: Ni2+(aq) + 2 OH–(aq) → Ni(OH)2(s) (green precipitate)
- Sodium sulfide with nickel(II) ions: Ni2+(aq) + S2-(aq) → NiS(s) (black precipitate)
- Potassium hexacyanoferrate solution reaction with iron(III) ions (or ferric ions): 4 Fe3+(aq) + 3 Fe(CN)4-6(aq) → Fe4[Fe(CN)6]3(s) (Prussian blue precipitate)
For a class discussion, questions could include:
- What are the advantages of the hydrogel ball reaction method? (Small quantities are used, so it is safer and more environmentally friendly.)
- What might be a disadvantage of this method? (It is less suitable for quantitative chemistry than standard methods.)
- Which other reagents might work to produce highly visible reactions? (Examples: copper sulfate and sodium hydroxide; or iron(III) chloride and potassium sulfocyanide.)
- Which reagents might not work so well, and why? (Examples: reactions producing solutions of sodium salts and potassium salts, because these are colourless and soluble.)
Activity 2: electrochemical reactions in hydrogel balls
In these experiments, instead of injecting the swelled-up hydrogel balls with the electrolyte solutions, we placed the balls on filter paper soaked with the electrolyte and then inserted electrodes into the balls (figure 4). The electrolyte ions migrate from the filter paper into the balls, where the deposit forms. For the miniature electrodes, we used graphite leads from a mechanical pencil. In the electrolysis of water experiment, the bubbles of evolved gas (hydrogen at the cathode and oxygen at the anode) were very visible (figure 5).
Unlike the precipitation reactions, this experiment does not use hypodermic needles, and so it is suitable for students from age 14. The time needed for the activity is approximately 10 minutes for each of the reactions, if you are using already swelled-up hydrogel balls; otherwise add 2 hours soaking time.
Materials
You will need the following for each student or group:
- Two soaked, swelled-up hydrogel balls, prepared as for Activity 1.
- A white glazed ceramic tile, glass plate or Petri dish
- A Pasteur pipette
- One piece of filter paper (2 cm x 4 cm)
- One battery (4.5–9 V)
- Two cables (to connect each battery terminal to an electrode)
- Two crocodile clips
- Two graphite leads from a mechanical pencil (for the electrodes)
- Distilled water
Electrolyte solutions:
- Sodium chloride (NaCl) solution (2.0 M)
- Silver nitrate (AgNO3) solution (1.0 M)
- Zinc iodide (ZnI2) solution (1.0 M)
- Distilled water with a few drops of dilute sulfuric acid added
Procedure
- Prepare the hydrogel balls as in Activity 1 (this needs to be done in advance).
- Place a piece of filter paper onto the tile or Petri dish. Drip some sodium chloride solution onto the filter paper, as an electrolyte.
- Place two hydrogel balls on the filter paper and insert an electrode into each hydrogel ball.
- Using a Pasteur pipette, insert some silver nitrate solution into the hole in each hydrogel ball where the electrodes enter it.
- Clip the cables to the electrodes and the battery. Close the electrical circuit.
- Observe the changes and record them.
- Repeat for the other electrolytes.
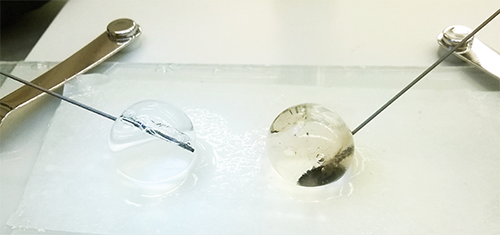
Image courtesy of Éva Dobóné Tarai
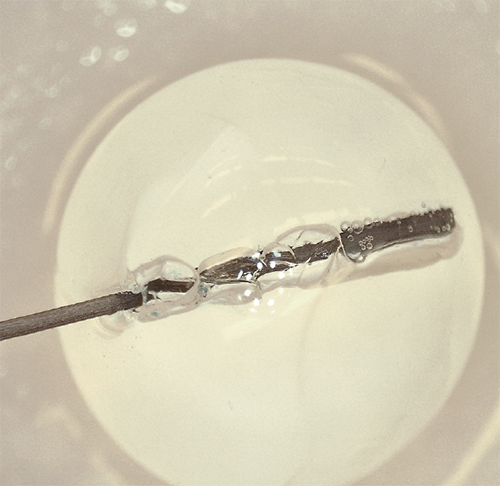
Image courtesy of Éva Dobóné Tarai
Discussion
The equations of the electrolysis reactions are:
- Electrolysis of silver nitrate solution:
Cathode (negative electrode): 2Ag+(aq) + 2e– → 2Ag(s)
Anode (positive electrode): H2O(l) → ½ O2(g) + 2H+(aq) + 2e–
- Electrolysis of zinc iodide solution:
Cathode (negative electrode): Zn2+(aq) + 2e– → Zn(s)
Anode (positive electrode): 2I–(aq) → I2(s) + 2e–
- Electrolysis of water:
Cathode (negative electrode): 4H2O(l) + 4e– → 2H2(g) + 4OH–(aq)
Anode (positive electrode): 2H2O(l) → O2(g) + 4 H+(aq) + 4e–
All these experiments are inexpensive to carry out and encourage students to consider the environment. We also found one final advantage of not using test tubes and other laboratory glassware: we avoided the need to wash up after finishing the experiments – which saves time, water and effort.
The chemistry of hydrogel balls
Hydrogels are super-absorbent polymers, usually made from polymethacrylate polymers. These polymers are xerogellants, which means that when they are placed in water, they swell and significantly increase in size. They are used in agrochemistry to grow plants in hydroculture, and can be found in disposable nappies, potpourris, air fresheners and so on.
Chemically, xerogellants are ionic compounds. When placed into water or diluted salt solution, the ions become hydrated as they attract the polar water molecules, which is what makes the hydrogel balls grow in size. In distilled water, a hydrogel may absorb 300 times its weight, but in sodium chloride solution (at a concentration isotonic to human blood), the increase is only around 50-fold. The hydrogel keeps its original shape, thanks to the polymers’ cross links.
Acknowledgement
The author would like to thank the Doctoral School of Humanities of University of Debrecen, Hungary, for supporting her work.
References
- Kalogirou E, Nicas E (2010) Microscale chemistry: experiments for schools. Science in School 16: 27–32.
Web References
- w1 – Scientix is a European science education community. For ideas, projects, methods, news and other resources, see the Scientix website.
Resources
- The website of the UK’s Royal Society for Chemistry describes some experiments with hydrogels in hair gels and disposable nappies.
- The Royal Society for Chemistry offers other ideas for microscale precipitation reactions and methods.
Review
This article demonstrates a novel way to carry out precipitation reactions using the least amount of reagents possible, safely and in such a way that ensures there is practically no waste. This remarkable idea is simple, visual and inexpensive, and can be carried out in the classroom even if no laboratory is available.
The article relates to the chemistry of precipitates and electrolysis, and could also be used for discussions on solubility, stoichiometry, redox reactions, neutrality and migration of ions.
Maurice Cosandey, École Polytechnique Fédérale de Lausanne, Switzerland


